Vegetable · Brassicaceae
Brussels Sprouts
Brassica oleracea Gemmifera Group
Plant them for fall and let a light frost finish the job, and the sprouts come in firm and sweet.
Full sun
Every 3–7 days
41–77°F · 5–25°C
80–110 days
Overview
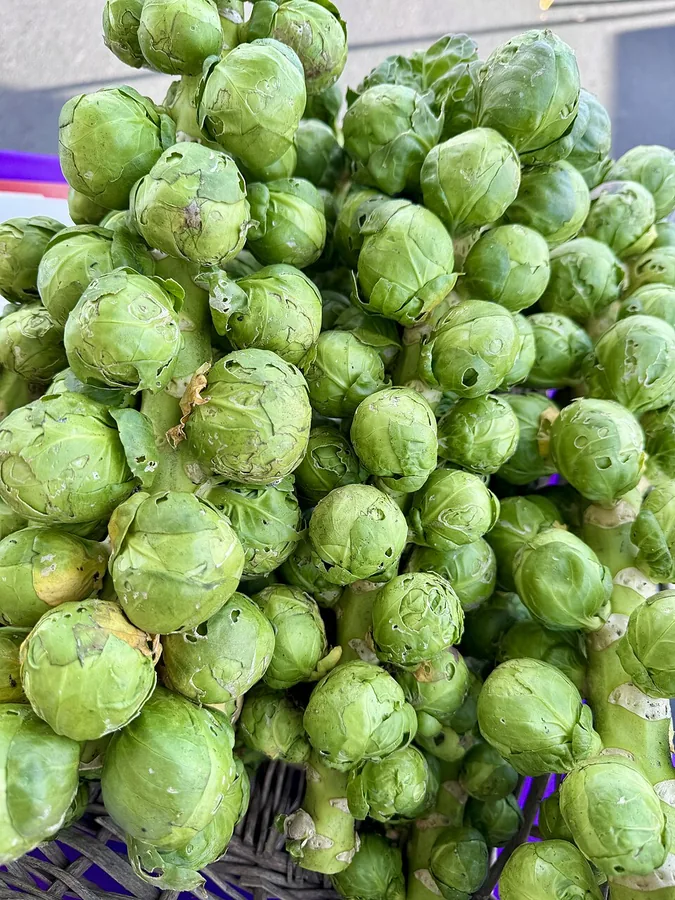
Brussels sprouts belong to the cabbage family, the very same species as broccoli, kale, and cauliflower, all shaped into different forms by generations of gardeners. The plant builds a tall, sturdy stalk lined with dozens of little cabbage-like buds, and those buds are the sprouts you eat. It is a biennial grown as an annual, harvested in its first season well before it would ever bother to flower.
This is a crop that quietly rewards patience, so there is no need to rush. Brussels sprouts grow slowly and want a long stretch of cool weather to do their best, which is why gardeners aim to have them mature in fall rather than in the heat of summer. Cold actually makes them better, turning starch into sugar so the sprouts taste sweeter after the first light frosts.
What they ask of you is steady, gentle care over a long season: rich soil, even moisture, and a watchful eye for the cabbage pests that find every brassica. Get the timing right and feed them well, and a single stalk will hand you weeks of harvest from the bottom up. Even if a step slips, the plant is forgiving enough to give you a fine crop.
Care
The short version: give them full sun and rich, evenly moist soil, plant them so the sprouts mature in cool fall weather, feed steadily through a long season, and keep a kind, watchful eye out for cabbage pests.
Light
Brussels sprouts love full sun, ideally 6 or more hours a day, which lets them build the strong stalk that carries a heavy crop. They will put up with a little partial sun, but true shade leaves you with weak plants and loose, lackluster sprouts, so give them the brightest spot you can.
Water
Keep the soil evenly moist right through the long season, around 1 to 1.5 inches (2.5 to 4 cm) of water a week. Swinging between bone dry and soaking is what stresses the plant, so a layer of mulch makes this easy by holding moisture and keeping the roots cool.
Soil
Plant them in rich, well-drained loam full of organic matter, since these hungry plants stay in the ground for months and appreciate a generous bed. Aim for a pH between 6.0 and 7.0, leaning toward the higher end, which has the happy bonus of helping hold clubroot at bay.
Temperature
Brussels sprouts are a cool-weather crop that grows best from about 41°F to 77°F (5°C to 25°C). Once hardened off they shrug off frost and can stand in the garden until temperatures slip toward 20°F (-7°C), and that very cold is what sweetens the sprouts for you.
Humidity
Ordinary outdoor humidity suits them just fine, so there is no number to chase or fret over. Good airflow matters more than moisture in the air, since crowded, damp foliage is what tempts the diseases that bother brassicas.
Feeding
These are heavy nitrogen feeders, so feel free to be generous. Work a balanced fertilizer into the bed at planting based on a soil test, then begin side-dressing with nitrogen about 3 to 4 weeks after transplanting and keep feeding through the season to keep the plant pushing out sprouts.
Pruning
Strip away the lower leaves as they yellow and the sprouts beneath them ripen, simply working your way up the stalk. About 3 to 4 weeks before you want to harvest, you can gently pinch out the growing tip to send energy into the remaining sprouts so they size up evenly.
Size & spacing
A grown plant stands 2 to 4 feet (60 to 120 cm) tall and spreads about as wide, so give it room. Set transplants 18 to 24 inches (45 to 60 cm) apart so air can move freely between the big leaves and disease stays down.
When to plant
Brussels sprouts are made for the back half of the year, so the rhythm is easy to follow. Start the seeds in late spring, set the young plants out in early to midsummer, and harvest from early fall into winter, picking the firm sprouts from the bottom of the stalk upward as the cold sweetens them.
Northern hemisphere
Southern hemisphere
Typical months for a temperate climate: start earlier in warm zones, later where spring frosts linger.
- Sow: Sow indoors 6-8 weeks before transplanting; in cold-winter regions sow in late spring (May-June) so plants mature as a fall crop, or 4-6 weeks before the last spring frost for an early planting
- Plant: Transplant hardened seedlings in early to mid summer (late June-early July in northern gardens) for fall harvest; in mild-winter regions plant in late summer for winter harvest
- Harvest: Harvest from early fall into winter, picking firm 2.5-4 cm sprouts from the bottom of the stalk upward; flavor sweetens after light frosts and plants can stand in the garden until temperatures drop toward 20°F
Hardiness
USDA hardiness zones: 2–9
Temperature: down to -46°C
Troubleshooting
Most Brussels sprouts hiccups come down to timing, feeding, or the steady push of cabbage-family pests, and the good news is that almost all of them are recoverable. Spot the early signs on the leaves and roots and you can usually keep a small problem from climbing the stalk. Match what you see below, then act while it still helps.
Wilting on warm days with swollen, misshapen roots
This is the one problem to take seriously, so it helps to know the signs early. Clubroot is a soilborne disease of cole crops that takes hold in acidic, wet ground, showing up as wilting on warm days and stunted growth. Lift a struggling plant and you will see the telltale swollen, club-shaped galls on its roots. There is no cure once it settles in, so be thorough: destroy infected plants roots and all, lime the bed toward pH 7.0, and move your brassicas to fresh, clean ground.
Fix:
- Remove and destroy infected plants including roots; do not compost them
- Lime soil toward pH 7.0 or slightly above to suppress the pathogen
- Move brassicas to a clean bed
Sprouts coming in loose and leafy rather than firm
Take heart, because loose, blown-open sprouts are usually about timing and not a sign you did anything wrong with the soil. When the buds try to form in summer warmth instead of cool fall air they come in leafy and open, and a late helping of nitrogen nudges them further that way. The fix is gentle and forgiving: shift your planting so the sprouts mature in the cool of fall, and top the plant 3 to 4 weeks before harvest to firm up the ones still on the stalk.
Fix:
- Time plantings so sprouts develop in cool fall weather
- Harvest loose sprouts promptly and use them; they remain edible
- Top the plant 3-4 weeks before harvest to firm up remaining sprouts
Mealy gray aphids crowding inside the sprouts
Try not to panic if you spot cabbage aphids, even though they can multiply quickly on brassicas in warm weather and tuck themselves down between the sprout leaves where they feel hard to reach. Look for dense, mealy gray clusters under the leaves, curling foliage, and a sticky honeydew film. You can turn it around: knock them off with a firm spray of water, then coat the leaf undersides well with insecticidal soap or horticultural oil, and gently pull off any lower leaves that are badly covered.
Fix:
- Knock colonies off with a strong spray of water
- Apply insecticidal soap or horticultural oil with thorough coverage of leaf undersides
- Remove and destroy heavily infested lower leaves
Chewed, hole-riddled leaves and little green droppings
Ragged holes look alarming, but the culprits are easy to spot and easy to manage once you know them. Three caterpillars share this work, often together: the imported cabbageworm, the cabbage looper that arches its back as it crawls, and the small, wriggling diamondback moth larva. Turn the leaves over to find the green caterpillars and their droppings, and keep an eye out for the white butterflies laying eggs. Handpick the ones you see, spray Bt or spinosad while they are still small, and drape the plants with floating row cover to keep the moths out for good.
Fix:
- Handpick caterpillars
- Apply Bacillus thuringiensis (Bt) or spinosad while caterpillars are small
- Cover plants with floating row cover to exclude egg-laying moths and butterflies
Toxicity
Good news for pet owners: Brussels sprouts are a food crop and safe to grow around cats, dogs, and other animals. The plant is not toxic, and the most a curious nibble brings is a little gas. Just cook them before serving to people, since a steady diet of large raw amounts is the only real thing to keep in mind.
Safe for
People · Cats · Dogs · Horses · Rabbits · Livestock · Birds
Cats None
You can relax around cats here. If a curious one chews a leaf it might get a touch gassy, but nothing in the plant will do it any harm.
Dogs None
There is nothing to worry about with dogs. One that wolfs down a big helping of raw sprouts may turn a bit flatulent or have a briefly unsettled stomach, and that is truly the worst of it.
Horses None
Rest assured it is not toxic to horses. Brassica greens can be a little gassy in quantity, so let them be an occasional nibble rather than a staple.
Rabbits None
Perfectly fine for rabbits in small amounts. Just introduce the leaves slowly, since a sudden load of any cabbage-family green can loosen their digestion.
Livestock None
Cattle, goats, and sheep can graze brassica foliage happily at normal levels. Only steady, heavy raw feeding would raise any concern.
Birds None
Backyard hens love to peck at the leaves and trimmings, and it does them no harm at all.
People Safe
Grown to be eaten and genuinely good for you. The sprouts taste best cooked, and only a steady diet of large raw amounts would matter for thyroid health.
No special handling precautions; wash before eating as with any garden produce.
Varieties
Brussels sprouts come in a handful of dependable varieties, from old heirlooms to colorful modern hybrids, and any of them is a kind place to start. These are the ones worth knowing by name.
Long Island Improved
A friendly classic, this open-pollinated heirloom grows on a fairly compact plant and was the go-to home-garden sprout for generations.
Jade Cross E
An early hybrid that takes heat in stride and produces generously, which makes it a reassuring choice where the fall season is short.
Falstaff
A late variety with cheerful red-purple sprouts that hold much of their color even after cooking.
Companions
Brussels sprouts do best beside plants that mask their scent from cabbage pests, and worst beside a few crops that simply don't get along with the cabbage family.
Plant near
onions: WVU Extension lists the onion family as compatible with cabbage-family crops; alliums' strong scent helps mask brassicas from common pests
aromatic herbs (sage, rosemary, peppermint): WVU Extension lists aromatic herbs such as sage, peppermint, and rosemary as compatible with the cabbage family; their scents help confuse and deter cabbage pests
beets: WVU Extension lists beets as compatible with cabbage-family crops; the low-growing roots share space well beneath tall brassicas
Keep apart
strawberries: WVU Extension lists strawberries as incompatible with cabbage-family crops and recommends keeping them apart
How to propagate
Brussels sprouts are grown from seed, started indoors and moved outside as transplants once they are big enough to hold their own, which makes them an easy first step for a new grower.
SeedEasy
Sow indoors 6-8 weeks before transplanting (late spring in cold-winter regions for a fall crop); seeds can also be direct-sown about 4 months before the expected first fall frost · Germinates in about 5-10 days; seedlings reach transplant size in 4-6 weeks
Starting from seed is wonderfully forgiving, and Brussels sprouts come up with little fuss. Sow them about a quarter to half an inch (0.6 to 1.3 cm) deep in sterile starting mix 6 to 8 weeks before you plan to transplant, and you will see the seedlings break ground in 5 to 10 days and reach planting size in 4 to 6 weeks. Harden them off gently, then set them out 18 to 24 inches (45 to 60 cm) apart at the same depth they grew in their pots.
Myths
You should never pick Brussels sprouts until a hard freeze has hit them.
You do not need to wait for a freeze at all, and any firm sprout is ready for the pot. Cool fall weather and light frosts simply sweeten the flavor by building up sugars, which is why the crop is timed to mature in fall. You can happily pick fine, tight sprouts well before the first frost.
Snipping the top off your sprout plant will spoil the entire crop.
Far from ruining anything, topping is a helpful little trick. Pinching out the growing tip 3 to 4 weeks before harvest keeps the plant from climbing and sends its energy into the sprouts already on the stalk, so they fill out more evenly.