
Introduction
I got my first pilea plant from a coworker who had too many pups in her pot. That one cutting grew into 8 plants within a year. I gave most away to friends, and in my experience that's what makes this plant so fun to own.
The pilea peperomioides has a wild backstory. A missionary named Agnar Espegren brought it from China's Yunnan mountains back in 1946. He gave cuttings to friends all over Scandinavia for decades. Kew Gardens didn't even know what it was until 1984. By the 2010s, single cuttings sold for up to 75 US dollars on Instagram.
Most people know it as the Chinese money plant or the friendship plant. It earned that name because it grows pups so fast that you always have extras to share. That generous habit made it one of the most traded houseplants on earth. Here's a wild fact though. It's endangered in its native Yunnan habitat on shady mountain rocks.
This guide gives you everything you need to grow a healthy pilea plant at home. You'll learn the best tips for light, water, and soil. You'll also find pest fixes and a full section to help you solve common problems fast.
6 Popular Pilea Varieties
The pilea peperomioides is part of the nettle family. Friedrich Diels first wrote about it back in 1912. You might know it as the pancake plant, UFO plant, or coin plant. Those fun names all come from its flat round leaves that look like little green coins on sticks.
I've grown 4 of these pilea varieties over the past few years, and each one has a different look. The original green version is still the easiest to find. But variegated types like Mojito and White Splash are popping up in more shops now. Here's a look at 6 popular pilea varieties so you can figure out which one you own or want next.
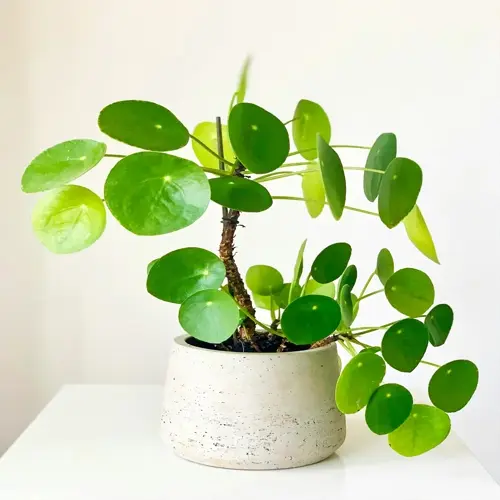
Pilea Peperomioides (Chinese Money Plant)
- Leaf Shape: Produces distinctive round, flat, dark green leaves on long petioles that can reach up to 4 inches (10 centimeters) in diameter at maturity.
- Growth Habit: Grows as an erect perennial reaching 8 to 12 inches (20 to 30 centimeters) tall and wide, maintaining a compact rosette shape when given proper light.
- Care Level: Considered one of the easiest houseplants for beginners with low maintenance needs, rapid growth rate, and tolerance for occasional neglect.
- Propagation: Produces abundant offsets (pups) from the base and along the stem, making it the ideal plant to share with friends and family.
- Origin: Native to the shady mountain forests of Yunnan and Sichuan provinces in southwestern China at elevations of 1,500 to 3,000 meters.
- Pet Safety: Confirmed non-toxic by NC State Extension, making it safe for homes with cats, dogs, and small children.
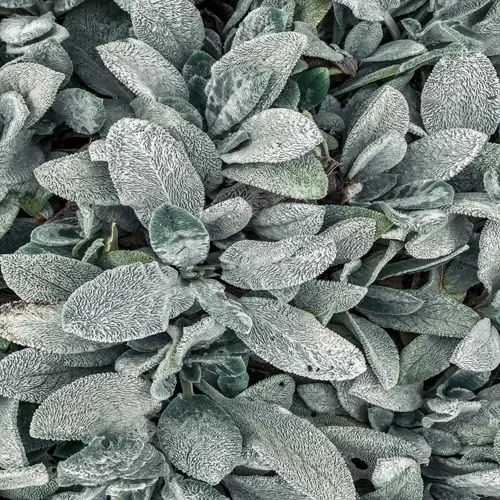
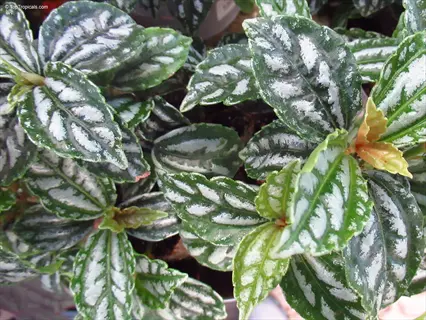
Pilea Sugar
- Leaf Pattern: Features the same round peltate leaf shape as the original but with subtle silver or white speckling across the dark green surface.
- Growth Size: Stays compact and reaches similar dimensions to the standard peperomioides, typically 8 to 12 inches (20 to 30 centimeters) in height.
- Light Needs: Requires bright indirect light to maintain its distinctive speckled variegation pattern, as low light can cause the markings to fade.
- Availability: Less common than the standard variety but now sold through more specialty plant shops and online houseplant retailers.
- Care Difference: Follows the same care routine as standard pilea peperomioides with no significant differences in watering, soil, or temperature requirements.
- Visual Appeal: The frosted sugar-like speckling gives leaves a delicate shimmering quality that stands out among other green houseplants.
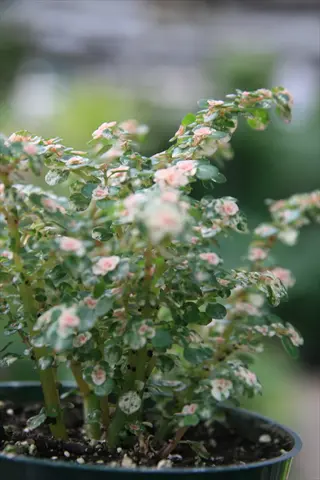
Pilea White Splash
- Leaf Pattern: Displays bold white and cream patches splashed randomly across each leaf, with no two leaves showing the same exact pattern.
- Variegation Stability: The variegation can be unpredictable, with some new leaves emerging solid green while others show heavy white coverage.
- Light Requirements: Needs consistently bright indirect light to support variegated foliage because white leaf sections produce less energy from photosynthesis.
- Growth Rate: Grows slightly slower than the all-green standard variety due to the reduced chlorophyll content in the variegated leaf portions.
- Watering Note: Variegated varieties can be more sensitive to overwatering, so allow the soil to dry out well between waterings.
- Collector Value: Remains one of the most sought-after pilea cultivars among houseplant collectors due to its striking and variable leaf patterns.
Pilea Mojito
- Leaf Pattern: Showcases dramatic marbled variegation with swirls of dark green, light green, and silvery white across each round leaf surface.
- Uniqueness: Every leaf develops a unique camouflage-style pattern, making each Mojito plant a one-of-a-kind specimen in any collection.
- Growth Habit: Maintains the same upright growth form as the standard pilea peperomioides but may grow slightly more compact under bright light.
- Care Approach: Requires the same well-draining soil, moderate watering, and bright indirect light as the standard variety with no extra fuss.
- Propagation Trait: Pups may or may not inherit the full marbled variegation from the mother plant, which adds an element of surprise.
- Market Availability: Becoming more accessible as tissue culture production increases, though prices still trend higher than the all-green standard.
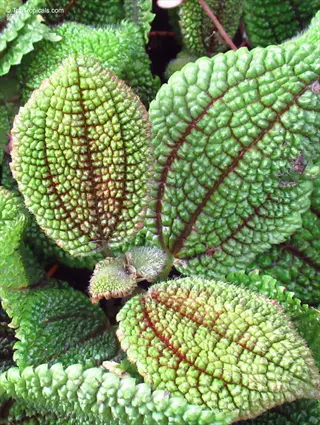
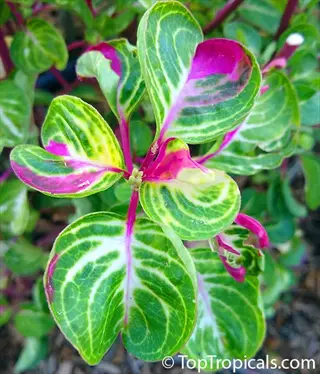
Pilea Moon Valley
- Leaf Texture: Features deeply textured, crinkled leaves with pronounced veins that create a crater-like surface resembling the surface of the moon.
- Color Profile: Leaves display bright chartreuse green on the ridges with dark bronze or burgundy coloring in the deep valleys between veins.
- Size Difference: Stays smaller than peperomioides, typically reaching about 6 to 8 inches (15 to 20 centimeters) tall in a compact mounding habit.
- Light Preference: Tolerates slightly lower light levels than peperomioides, though bright indirect light brings out the best leaf coloring and contrast.
- Humidity Needs: Appreciates moderate to higher humidity compared to the standard pilea, making it a good candidate for kitchens and bathrooms.
- Flowering: More likely to produce tiny clusters of pink or white flowers indoors compared to other pilea species when conditions are right.
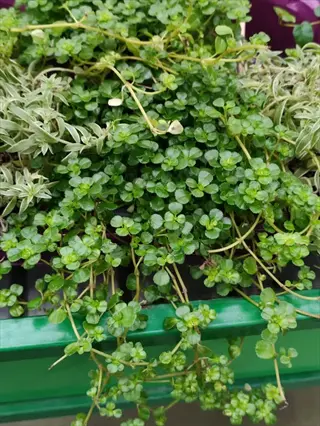
Pilea Baby Tears (Depressa)
- Growth Form: Grows as a trailing or creeping plant with tiny round leaves on delicate stems, making it ideal for hanging baskets and terrariums.
- Leaf Size: Produces miniature leaves measuring only about a quarter of an inch (6 millimeters) across, a dramatic contrast to the large-leaved peperomioides.
- Spread Pattern: Spreads horizontally and cascades over pot edges rather than growing upright, creating a lush trailing green curtain over time.
- Moisture Needs: Prefers slightly more consistent moisture than peperomioides and benefits from regular misting or higher ambient humidity levels.
- Ideal Uses: Works great as ground cover in dish gardens, terrariums, and mixed planters where its trailing habit fills gaps with ease.
- Care Note: Requires more attention to watering than the low-maintenance peperomioides, as its thin stems dry out faster in warm environments.
The standard pilea peperomioides is still your best bet if you're just getting started. It's the most forgiving of the bunch and grows pups faster than any other variety. Once you feel confident with that one, the pilea Moon Valley makes a great second pick with its textured leaves and compact size.
Pilea Light and Placement
Getting the pilea light requirements right is the single best thing you can do for your plant. In its native Yunnan mountains, pilea grows on shady rocks under forest canopies. Think dappled forest floor light rather than open meadow sun. That's the vibe you want to copy at home.
Your pilea does best in bright indirect light for most of the day. NC State Extension says it can handle 2 to 6 hours of direct sunlight, but I've found that too much direct sun burns the leaves fast. An east facing window gives you the perfect morning light without the harsh afternoon rays. A north facing window works too if you keep the plant close to the glass.
You need to rotate plant pots every 5 days to keep your pilea growing in a nice round shape. Without rotation, your pilea will lean hard toward the light source and look lopsided within weeks. I set a phone reminder for mine and just give the pot a quarter turn each time.
Watch out for leggy growth with long gaps between leaves on the stem. That's your pilea telling you it needs more light. Move it closer to the window or add a grow light above it for 10 to 12 hours a day. On the flip side, if leaves start to curl or get brown edges, your plant is getting too much direct sunlight and needs to move back a foot or two.
Seasons change your light game too. In winter, pull the plant closer to the window since the sun is weaker and the days are shorter. In summer, push it back a bit to avoid leaf burn from stronger rays. I move my pilea about 12 inches between summer and winter spots and that keeps it happy all year.
Watering, Soil, and Feeding
Pilea watering trips up more new owners than any other care task. The New York Botanical Garden says to let the top two thirds of your potting mix dry out before you water again. That means most of the soil should feel dry when you stick your finger in. I water mine every 7 to 14 days and adjust based on the season.
Overwatering is the fastest way to kill your pilea. It leads to root rot which turns the roots dark and mushy. Your pot must have a drainage hole at the bottom so extra water can escape. Don't put pebbles in the bottom of your pot either. The New York Botanical Garden confirms that pebble layers do not help with drainage and can make things worse.
Your pilea soil mix needs to drain fast but still hold some moisture. Here's the recipe I use: mix equal parts houseplant compost, perlite, and orchid bark. This blend gives you well-draining soil with good air flow around the roots. Pilea has a small root system that does fine in a 3 to 4 inch pot, so don't go too big on the container.
For your pilea fertilizer, grab a balanced organic blend. Use it at half strength every 2 weeks during spring and summer. Stop feeding in winter when the plant slows down. I've made the mistake of feeding year round and it caused salt buildup in the soil that burned the leaf edges.
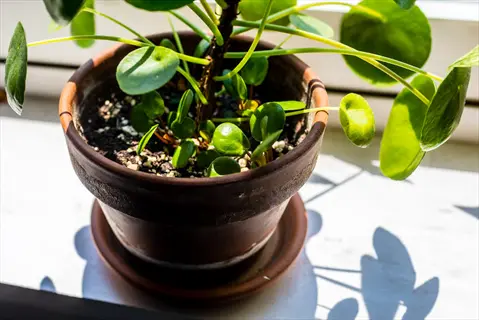
Propagating Pilea Pups
Pilea propagation is one of the most fun parts of owning this plant. Your mother plant will push out pilea pups from its base and along the stem as it matures. NC State Extension says the best time for stem cuttings and offsets is spring or early summer when the plant is growing fast.
Here's a tip most guides skip. You can't grow a new pilea from just a leaf. A leaf cutting without stem tissue won't root at all, and that frustrates a lot of beginners. You need a pup or a section of stem to make pilea propagation work. I learned this the hard way after wasting 3 leaves in water jars that never did anything.
Want more pilea babies faster? Let your mother plant get a bit pot bound. When the roots fill up the pot, the plant pushes out more offsets as a survival response. I keep my main plant in a snug pot on purpose and it gives me 4 to 6 pups per growing season that I can root in water or soil.
Identify a Ready Pup
- Size Check: Wait until the offset reaches at least 3 inches (7.6 centimeters) tall with its own small cluster of leaves before attempting separation.
- Root Inspection: Gently push aside the soil at the base of the pup to check for small white roots already forming, which increases survival rate.
- Stem Connection: Follow the pup's stem down to where it connects to the mother plant's root system or main stem to plan your cut location.
Separate from Mother Plant
- Clean Tool: Use a sharp, sterilized blade or knife to cut the pup away from the mother plant, slicing cleanly through the connecting stem tissue.
- Stem Tissue Required: Ensure the cutting includes a section of stem, not just the leaf, because pilea leaves without stem tissue will not root successfully.
- Gentle Handling: Work carefully around the mother plant's roots to avoid unnecessary damage, and press the soil back into place after removal.
Root the Cutting
- Water Method: Place the pup in a small jar of room-temperature water with only the stem submerged, keeping the leaves above the waterline to prevent rot.
- Soil Method: Alternatively, insert the stem directly into moist, well-draining potting mix and keep it consistently damp but not waterlogged for two to three weeks.
- Timeline: Expect visible root development within one to three weeks in water, or a gentle tug resistance within three to four weeks when rooting directly in soil.
Pot Up and Aftercare
- Pot Selection: Choose a small pot of 2 to 3 inches (5 to 7.6 centimeters) in diameter with a drainage hole, as pilea's small root system thrives in snug containers.
- Soil Mix: Use the same well-draining blend of equal parts houseplant compost, perlite, and orchid bark recommended for mature pilea plants.
- First Weeks: Keep the newly potted pup in bright indirect light and water gently when the top layer of soil feels dry to encourage root establishment.
Pilea Pest Identification
Pilea pests catch most owners off guard because this plant looks so healthy most of the time. NC State Extension lists 4 common pests you should watch for: spider mites, mealybugs, fungus gnats, and scale insects. I check my plants every time I water them and that habit has saved me from 2 bad outbreaks so far.
Quick pest treatment makes all the difference. Catch a problem early and you can fix it in a week. Wait too long and you might lose the plant. Keep a bottle of neem oil and some rubbing alcohol on hand so you're ready to act fast when something shows up.
Spider Mites
- Identification: Tiny arachnids barely visible to the naked eye that create fine webbing on leaf undersides and between stems, often appearing as small moving dots.
- Damage Signs: Leaves develop tiny yellow or white stippling marks, gradually becoming pale and dry-looking as mites feed on plant cell contents.
- Preferred Conditions: Thrive in warm, dry environments with low humidity, making heated indoor spaces during winter a prime time for spider mite outbreaks.
- Treatment: Spray leaves thoroughly with a diluted neem oil solution or insecticidal soap every five to seven days for three consecutive treatments to break the life cycle.
Mealybugs
- Identification: Small white, cottony insects that cluster in leaf joints, along stems, and on the undersides of leaves, leaving fluffy white deposits behind.
- Damage Signs: Leaves become sticky from honeydew secretions, growth slows noticeably, and heavily infested areas may develop sooty mold from the residue.
- Manual Removal: Dab individual mealybugs with a cotton swab dipped in rubbing alcohol to kill them on contact, checking back daily for any survivors.
- Systemic Treatment: For larger infestations, spray the entire plant with neem oil or insecticidal soap solution and repeat weekly until no new mealybugs appear.
Fungus Gnats
- Identification: Tiny dark-colored flying insects that hover around the soil surface and near the base of the plant, resembling very small mosquitoes in appearance.
- Damage Source: Adult gnats are mostly a nuisance, but their larvae feed on organic matter in the soil and can damage fine roots in heavy infestations.
- Root Cause: Consistently wet or overly moist soil creates ideal breeding conditions, so allowing soil to dry between waterings is the most effective prevention method.
- Treatment: Place yellow sticky traps near the plant to catch adults and let the top layer of soil dry completely between waterings to disrupt the larval cycle.
Scale Insects
- Identification: Appear as small brown or tan bumps firmly attached to stems and leaf undersides, often mistaken for natural growths or dried soil spots.
- Damage Signs: Infested plants show yellowing leaves, stunted growth, and sticky honeydew residue on leaves and surrounding surfaces from scale feeding.
- Manual Removal: Scrape individual scale insects off with a fingernail or soft brush, then wipe the area with rubbing alcohol to remove any remaining residue.
- Persistent Treatment: Apply horticultural oil or neem oil to smother scale insects, repeating every seven to ten days for several weeks to eliminate all life stages.
Your best pest treatment is prevention. Good air flow around the plant, proper watering, and regular leaf checks keep most bugs away. If you do spot something, act that same day for the best results.
Pilea Troubleshooting Guide
When your pilea starts acting up, you need answers fast. Pilea yellow leaves, pilea drooping, and brown spots are the 3 issues I hear about most from other plant owners. The good news is that most problems have a simple fix once you know what's causing them.
One thing that scares people is finding white spots pilea owners often panic about. Those chalky circles on leaf undersides are just mineral residue from tap water. The New York Botanical Garden says the water moves through the stomata and leaves those marks behind. They're not pests and not a disease. In my experience, you can wipe them off with a damp cloth if they bug you.
If you see pilea leaves curling inward or your plant getting tall and stretched with a leggy pilea look, those are light problems. Curling means too much direct sun. Leggy growth means not enough light. Sudden leaf drop points to temperature shock or a cold draft hitting your plant. Use the table below to match your symptoms to the right fix.
5 Common Myths
Pilea plants purify indoor air and remove toxins, so they improve air quality in your home.
The American Lung Association states houseplants do not meaningfully clean indoor air, and pilea has no proven air-purifying ability.
You should place pebbles or rocks at the bottom of a pilea pot to improve drainage instead of using drainage holes.
The New York Botanical Garden confirms that pebble layers do not substitute for drainage holes and can actually worsen waterlogging.
Pilea leaves with white spots on the underside are infected with a disease or pest infestation.
Those chalky white circles are harmless mineral residue left by tap water evaporating through the stomata on the leaf undersides.
You can propagate a new pilea plant from a single leaf cutting placed in water or soil.
A leaf cutting without stem tissue will not root successfully because pilea requires a stem section or offset pup to propagate.
Pilea plants need constant moisture and should never be allowed to dry out between waterings.
Pilea prefers to dry out significantly between waterings, and the New York Botanical Garden recommends letting the top two-thirds of soil dry first.
Conclusion
Good pilea plant care comes down to a few key basics. Give your Chinese money plant bright indirect light, let the soil dry out between waterings, and keep it in temps between 65°F and 80°F. NC State Extension confirms it's non-toxic for pets and kids, so you can put it in any room without worry.
What makes the pilea peperomioides stand out is how fast it grows and how many pups it throws off each season. I've given away over 20 baby plants in the past 2 years alone. That generous habit is what earned it the name friendship plant, and it's the reason people love it so much.
Think about the path this plant has taken. It started as an endangered species on rocky mountain slopes in Yunnan, China. A missionary brought one home to Norway in 1946. Now it sits on windowsills all over the globe. The Royal Horticultural Society even gave it an Award of Garden Merit to prove it's the real deal.
Every pup you grow and share with a friend keeps that tradition going. Your pilea plant care work connects you to a chain of growers that stretches back almost 80 years across dozens of countries. That's a story worth being part of.
External Sources
Frequently Asked Questions
How do you take care of a Pilea plant?
Provide bright indirect light, water when the top two-thirds of soil is dry, use well-draining soil, and fertilize at half strength every two weeks during spring and summer.
Is Pilea a good indoor plant?
Yes, pilea is an excellent indoor plant because it is low-maintenance, non-toxic to pets, grows quickly, and produces pups you can share with friends.
Do Pilea plants like sun or shade?
Pilea plants prefer bright indirect light, which mimics their natural habitat under forest canopies in the mountains of Yunnan, China.
How do I know if my Pilea is happy?
A happy pilea has flat, dark green, glossy leaves, a sturdy upright stem, and regularly produces offsets or pups from its base.
How to make a pilea happy?
Give it bright indirect light, rotate it regularly, water properly, keep it in temperatures between 65 and 80 degrees Fahrenheit, and repot when roots fill the pot.
How often should you water a pilea?
Water your pilea roughly every 7 to 14 days, letting the top two-thirds of the potting mix dry out between waterings, and reduce frequency in winter.
What are common Pilea problems?
Common pilea problems include yellow leaves from overwatering, drooping from thirst or root rot, brown spots from sunburn, and leggy growth from low light.
Where is the best place to put pilea?
Place your pilea near an east-facing or north-facing window where it receives bright indirect light without direct afternoon sun exposure.
Is pilea an air purifier?
Despite popular claims, pilea has not been proven to meaningfully purify indoor air, according to research supported by the American Lung Association.
Can pilea survive winter?
Pilea can survive winter indoors if kept above 55 degrees Fahrenheit (13 degrees Celsius), away from cold drafts, and with reduced watering.