
Introduction
About 20 to 30% of what Americans toss in the trash is food scraps and yard waste that could go into a compost bin instead. That means almost a third of your garbage has the potential to feed your garden rather than rot in a landfill. Picking the right bin is simpler than most people think.
In my experience, composting at home changed how I think about waste and gardening. I started over 8 years ago with a cheap plastic bin from a garden center. That first bin taught me more about soil than any book ever did. Since then I have tested tumblers, worm bins, bokashi buckets, and hot composters to find what works best for different setups and budgets.
Think of it as a kitchen for your garden where yesterday's scraps become tomorrow's harvest fuel. Food waste reduction starts with one small step, and a single setup can keep hundreds of pounds of organic waste out of landfills each year. Right now only about 5% of food waste in the U.S. gets composted, so there is a massive chance to make a real difference.
This guide shares the 8 best options for every garden size. You will learn how composting works, how to pick the right setup, and how to fix common problems that trip up beginners.
8 Best Compost Bins
I tested every major type of best compost bin over 8 years to find what works for real people in real spaces. A compost tumbler in a small yard performs nothing like a worm bin under a kitchen counter. Each option below earned its spot based on how well it fits a specific living situation and budget.
The EPA confirms that a well maintained outdoor compost bin can produce finished material in 3 to 5 months. Hot composters cut that down to 30 to 90 days, while a basic static bin takes 6 to 12 months. Your timeline depends on the bin type you choose and how much effort you put into managing it.
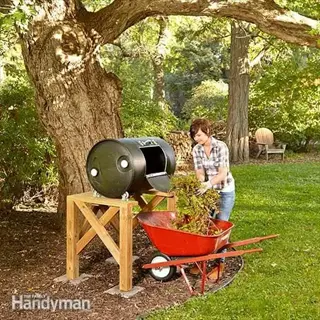
Dual-Chamber Tumbler
- How it works: A rotating drum mounted on a frame lets you spin the contents to mix and aerate them, speeding up decomposition compared to static piles that rely on manual turning with a fork.
- Best for: Gardeners with a small to medium backyard who want finished compost in 6 to 8 weeks without hand-turning, and who generate moderate amounts of kitchen and yard waste weekly.
- Capacity: Most dual-chamber models hold 37 to 43 gallons (140 to 163 liters) per side, giving you one active chamber and one curing chamber at all times.
- Pros: Enclosed design keeps rodents and raccoons out, two chambers allow continuous composting, and the elevated frame means no bending to harvest finished material.
- Cons: Plastic drums absorb heat in summer and can overheat contents, heavy when full making rotation difficult, and the enclosed space limits airflow compared to open bins.
- Cost range: Most quality dual-chamber tumblers fall between 80 and 200 dollars depending on capacity and frame material, with galvanized steel frames lasting longest.
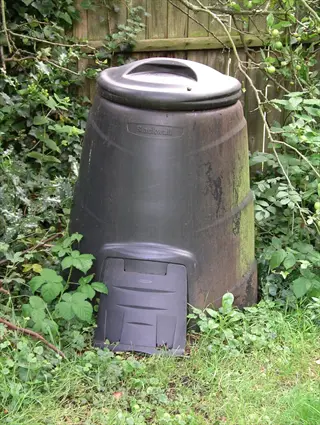
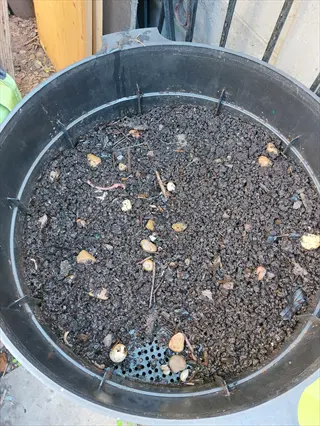
Static Plastic Bin
- How it works: A bottomless plastic container sits directly on soil, allowing worms and microbes to enter from below while you add scraps through the top lid and harvest from a bottom door.
- Best for: Budget-conscious beginners who prefer a low-maintenance set-and-forget approach, since cold composting in a static bin requires very little attention beyond adding materials.
- Capacity: Standard models range from 55 to 80 gallons (208 to 302 liters), enough for a household of 2 to 4 people generating typical kitchen scraps and seasonal yard waste.
- Pros: Cheapest enclosed option often under 50 dollars, lightweight and easy to move, requires no assembly, and the open bottom supports natural earthworm activity in the pile.
- Cons: Composting takes 6 to 12 months without active turning, harvesting from the small bottom door is awkward, and thin plastic walls provide no insulation for cold climates.
- Cost range: Basic models start around 25 to 40 dollars at garden centers, while larger or insulated versions can reach 60 to 90 dollars for improved durability.
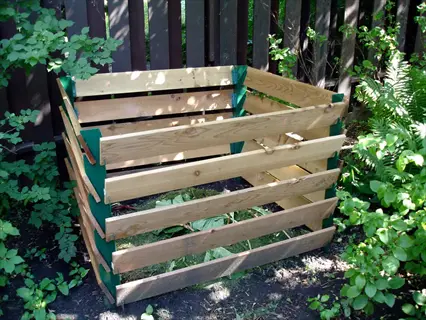
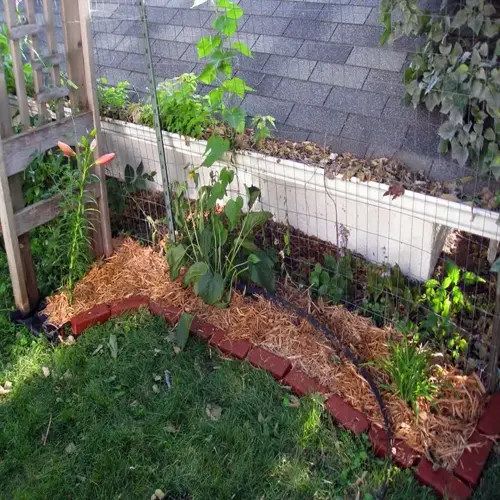
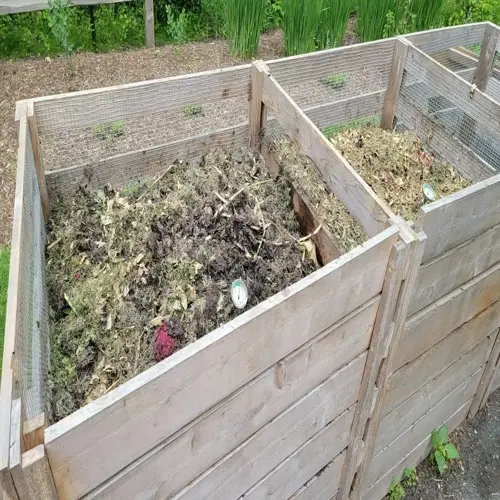
Wooden Compost Bin
- How it works: Slatted wooden panels form an open-topped box that allows generous airflow from all sides, encouraging aerobic decomposition while blending naturally into garden landscapes.
- Best for: Gardeners who value aesthetics and have space for a permanent bin, especially those producing large volumes of yard waste like leaves, hedge trimmings, and grass clippings.
- Capacity: Most wooden bins hold 70 to 100 gallons (265 to 378 liters), and modular designs let you add extra panels to expand capacity as your garden and composting volume grow.
- Pros: Cedar and treated wood resist rot for 5 to 10 years, excellent airflow through slats speeds decomposition, and the open top makes adding bulky yard waste effortless.
- Cons: Wood eventually degrades and needs replacement, open designs offer no pest protection without hardware cloth lining, and they cost more than basic plastic alternatives.
- Cost range: Pre-built cedar or FSC-certified wooden bins typically cost 80 to 200 dollars, while DIY pallet versions can be assembled for free using reclaimed materials.
Worm Composting Bin
- How it works: Red wiggler worms consume food scraps inside stacked trays, producing nutrient-dense worm castings and liquid fertilizer as they eat roughly 25% of their body weight each day.
- Best for: Apartment dwellers and indoor composters who lack outdoor space, since a worm bin operates quietly under a kitchen counter or in a closet year-round without any odor.
- Capacity: Typical household worm bins hold 10 to 20 gallons (38 to 76 liters) across 3 to 5 stacked trays, sufficient for 1 to 2 people generating daily fruit and vegetable scraps.
- Pros: Produces the richest compost per volume of any method, works indoors year-round, generates both solid castings and liquid worm tea, and teaches children about natural decomposition.
- Cons: Worms are sensitive to temperature extremes surviving only between 32 and 95°F (0 to 35°C), cannot process meat or dairy, and need consistent feeding schedules.
- Cost range: Commercial worm bins range from 40 to 130 dollars for the bin alone, plus 25 to 40 dollars for a starter batch of roughly 1000 red wiggler worms.
Bokashi Fermentation Bucket
- How it works: An airtight bucket uses beneficial microbes in bokashi bran to ferment food waste anaerobically, pre-processing scraps in about 2 weeks before you bury them in soil to finish decomposing.
- Best for: People who want to compost meat, dairy, cooked food, and other items that traditional bins cannot handle, and who have even a small patch of soil for burying the fermented output.
- Capacity: Standard bokashi bins hold 5 gallons (19 liters), enough for a household of 2 to 3 people filling one bucket every 1 to 2 weeks while the other ferments.
- Pros: Processes all food waste including meat and dairy, no odor when sealed, compact size fits under any kitchen sink, and the liquid byproduct works as a concentrated plant fertilizer.
- Cons: Fermented waste still needs burial in soil or a secondary setup to fully decompose, ongoing cost of bokashi bran adds up, and the process does not reduce waste volume.
- Cost range: A two-bucket starter kit with bran costs 40 to 70 dollars, with ongoing bran refills running about 10 to 15 dollars per month depending on household waste volume.
Insulated Hot Composter
- How it works: Thick insulated walls trap heat generated by microbial activity, maintaining internal temperatures of 130 to 160°F (55 to 71°C) that kill weed seeds and speed decomposition.
- Best for: Experienced composters who want finished material in 30 to 90 days and are willing to actively manage moisture, aeration, and input ratios to maintain high temperatures.
- Capacity: Most insulated models hold 50 to 80 gallons (189 to 302 liters), requiring a consistent supply of both green and brown materials to generate enough heat for proper function.
- Pros: Fastest method for finished compost at 30 to 90 days, kills weed seeds and pathogens through sustained heat, works in cold climates, and accepts a wider range of materials.
- Cons: Highest price point of any bin type, requires active management of inputs and moisture, needs steady material supply to maintain temperature, and heavier than other options.
- Cost range: Insulated hot composters run 200 to 500 dollars depending on capacity and brand, making them the most expensive home option but the fastest to produce results.
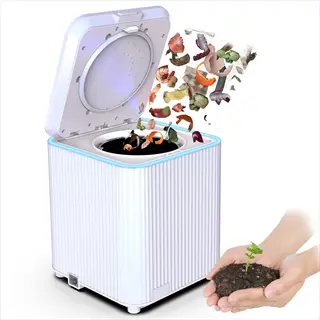
Electric Countertop Composter
- How it works: An electric composter heats and grinds food scraps over several hours, reducing them to a dry, odorless material that can be added directly to garden soil or potted plants.
- Best for: Urban apartment dwellers with no outdoor space at all, or anyone who wants daily food scrap processing without maintaining a living system like a worm bin or bokashi bucket.
- Capacity: Most countertop models hold 0.5 to 1 gallon (2 to 4 liters) per cycle, processing a single day's food scraps for a household of 1 to 3 people in 4 to 8 hours.
- Pros: No outdoor space needed, processes scraps in hours instead of months, produces odorless dry output, and fits on a kitchen compost bin counter beside other small appliances.
- Cons: Uses electricity for every cycle adding to energy bills, output is technically dehydrated food rather than true compost with active microbes, and unit capacity is very limited.
- Cost range: Quality electric composters cost 200 to 500 dollars, with ongoing electricity costs of roughly 5 to 10 dollars per month depending on local rates and usage frequency.
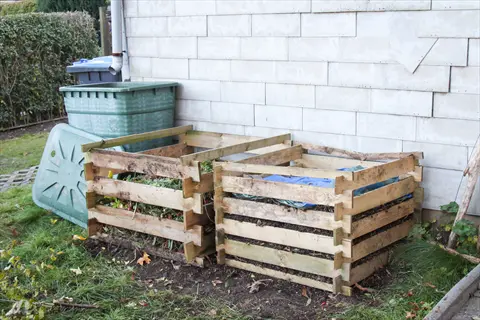
DIY Pallet or Wire Bin
- How it works: Four wooden pallets lashed together or a circle of galvanized wire mesh creates a simple open-air composting enclosure that relies on natural airflow and ground contact for decomposition.
- Best for: Budget-focused gardeners with large yards and plenty of brown materials like leaves and straw, who want maximum capacity at minimum cost and do not mind a rustic appearance.
- Capacity: Pallet bins typically measure 3 by 3 by 3 feet (0.9 by 0.9 by 0.9 meters) holding about 27 cubic feet, while wire mesh can form any diameter for flexible sizing.
- Pros: Costs under 30 dollars or even free using reclaimed pallets, easiest design to build in under an hour, unlimited capacity by adding more bins, and excellent airflow on all sides.
- Cons: Open design attracts rodents and neighborhood animals, no insulation means slow winter composting, appearance is utilitarian at best, and pallets may contain chemical treatments.
- Cost range: Wire mesh bins cost 15 to 30 dollars for 16-gauge galvanized wire, while pallet bins can be completely free if you source pallets from local businesses or online listings.
Only 7 out of 9,000 earthworm species work for worm composting, so always buy red wigglers from a trusted source. The best outdoor compost bin for your yard depends on how much space you have and how fast you want finished compost.
How Composting Works
Learning how composting works saves you months of trial and error with your first bin. Billions of tiny microbes eat your food scraps and yard waste, then break them down into dark, crumbly soil food. These microbes need three things to thrive: air, moisture, and the right mix of greens and browns.
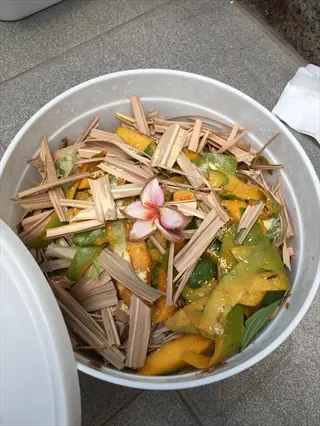
Greens and browns are the two main ingredients in every compost pile. Greens include fruit peels, veggie scraps, coffee grounds, and fresh grass clippings that provide nitrogen as fuel. Browns are dry items like dead leaves, cardboard, straw, and wood chips that provide carbon and act like a chimney to keep air flowing through the pile.
The EPA recommends a carbon to nitrogen ratio of 2 to 3 parts browns for every 1 part greens measured by volume. Some guides say 50:50, but that advice measures by weight which confuses most beginners. Stick with the volume method and you will get it right without a scale.
Aerobic decomposition uses oxygen and is what you want in most bins. Microbes that breathe air work faster and produce less smell. They also generate heat that can reach 130 to 160°F in a well managed pile. When air gets cut off, slower microbes take over and create that rotten egg smell nobody wants near their home.
Hot composting means your pile stays above 130°F for days or weeks, which kills weed seeds and speeds up the process. Cold composting takes longer but requires far less work since you just add scraps and wait. Both methods make great compost. Your finished pile will shrink to about one third of its starting size either way.
I watched my first cold pile sit for almost a year before it turned into anything useful. Once I learned the right green to brown ratio and started turning the pile each week, my next batch finished in under 4 months. That simple fix made all the difference.
Choosing Your Compost Bin
Figuring out how to choose compost bin styles comes down to four things: your space, your budget, how fast you want results, and how much work you want to do. Most people overthink this step and delay for months. The table below lays out composting methods compared side by side so you can pick one fast.
A compost bin for apartment living works best as a worm bin or bokashi bucket. A compost bin for small garden spaces does well as a tumbler or static plastic model. For a compost bin for beginners, I suggest starting with the cheapest option that fits your space. You can always upgrade later once you learn what you like.
The EPA says a maintained bin finishes in 3 to 5 months while a neglected pile takes about a year. Hot composters cut that to 30 to 90 days but cost the most money upfront. For outdoor bins, the EPA recommends a minimum size of 3 by 3 by 3 feet to generate enough heat for fast breakdown.
Don't let sizing anxiety hold you back from starting. I wasted 6 months researching before I bought my first bin. The cheapest static model ended up teaching me everything I needed to know. Start small, learn as you go, and upgrade when you're ready.
Setting Up Your Bin
Good compost bin placement makes or breaks your results. Set your bin on bare soil or grass in a spot that gets partial shade during the hottest part of the day. Full sun dries out the pile too fast, while full shade slows things down. Keep the bin close enough to your kitchen door that you won't skip trips on cold or rainy nights.
For compost bin setup, the EPA says outdoor bins need a minimum size of 3 by 3 by 3 feet to build enough heat for fast breakdown. If your bin is smaller than that, it will still work but the process takes longer. Place the bin on level ground so water drains out instead of pooling at the bottom.
Learning how to use compost bin gear starts with layering compost the right way. Put down a 6 inch base of browns like dead leaves, straw, or torn cardboard first. Then add a thin layer of greens such as veggie scraps or coffee grounds. Keep going back and forth with more browns than greens until the bin is about half full.
Test your compost moisture level by grabbing a handful and squeezing it. The material should feel like a wrung out sponge with just a drop or two of water coming through. Too wet means your pile will smell bad. Too dry means the microbes can't do their job. Add water or dry browns to adjust as needed.
When to start composting is a question I get from beginners all the time. Spring and fall are the best seasons to start because temperatures stay moderate. But you can start any time of year with the right approach. In cold climates, decomposition slows below 40°F but it does not stop. Your winter scraps will break down once things warm back up in spring.
I set up my first bin in late November and worried I had wasted my money for months. Once March hit, that pile heated up fast and I had usable compost by June. If you run a worm bin indoors, keep it between 32 and 95°F since red wigglers die outside that range. Check your bin 3 days after setup and you should already notice the pile shrinking and warming up.
Troubleshooting Common Issues
Most composting mistakes have simple fixes you can handle in one afternoon. I have dealt with smelly compost, soggy piles, bug swarms, and stubborn bins that refused to heat up over the years. Every single problem came down to one of 5 basic issues listed below.
The number one reason beginners quit is frustration from a compost too wet or a pile that smells terrible. Don't give up on a struggling bin. The EPA's ratio of 2 to 3 parts browns to 1 part greens fixes most problems on its own. Flies in compost and rats in compost usually mean you left food exposed on top instead of burying it under brown material.
Strong Odor from the Bin
- Cause: Too many green materials like food scraps and grass clippings without enough brown materials creates an anaerobic, nitrogen-heavy environment that produces a strong ammonia or rotten smell.
- Quick fix: Add a thick 3 to 4 inch (7.5 to 10 centimeter) layer of dry browns such as shredded cardboard, dead leaves, or straw on top, then turn the pile to introduce fresh air immediately.
- Prevention: Maintain the EPA-recommended ratio of 2 to 3 parts brown materials for every 1 part green materials by volume, and always cover fresh food scraps with a handful of browns.
Pile Is Too Wet and Slimy
- Cause: Excess moisture from heavy rain, too many water-rich scraps like melon rinds, or poor drainage turns the pile soggy and creates conditions where beneficial aerobic microbes cannot survive.
- Quick fix: Mix in dry absorbent browns such as shredded newspaper, sawdust, or torn egg cartons, and turn the pile to break up compacted wet clumps and restore airflow.
- Prevention: Cover your bin during heavy rain, balance wet food scraps with equal amounts of dry material, and check moisture weekly by squeezing a handful to test for the wrung-out sponge feel.
Fruit Flies and Insects
- Cause: Exposed food scraps sitting on the surface attract fruit flies and other insects that lay eggs in the warm, moist organic material before it has a chance to break down.
- Quick fix: Bury all new food scraps at least 4 to 6 inches (10 to 15 centimeters) deep under existing brown material, and add a fresh layer of dry leaves or shredded paper on top.
- Prevention: Always cover fresh additions with browns immediately, avoid adding fruit directly to the surface, and keep a sealed container of browns near your bin for convenient layering.
Rodents and Pests Visiting
- Cause: Meat, dairy, cooked food, or uncovered scraps attract rats, mice, raccoons, and other animals searching for an easy meal in open or poorly sealed compost bins.
- Quick fix: Remove any meat or dairy that may have been added, secure the bin lid, and line the bottom with quarter-inch hardware cloth to block burrowing access from below.
- Prevention: Use an enclosed bin with a locking lid, never add meat or dairy to traditional bins, and place the bin on a hard surface or wire mesh base to prevent ground-level entry.
Pile Not Heating Up
- Cause: The pile is too small, too dry, or lacks enough nitrogen-rich green materials to fuel the microbial activity needed to generate temperatures above 130°F (55°C).
- Quick fix: Add fresh nitrogen sources like grass clippings or coffee grounds, moisten the pile until it feels like a wrung-out sponge, and ensure the pile is at least 3 by 3 by 3 feet in size.
- Prevention: Build your pile to the minimum size in one session if possible, mix greens and browns thoroughly rather than layering them in thick separate bands, and turn weekly to redistribute heat.
A compost not heating up is often the easiest fix of all. Just add more greens and water, then give it a good turn. Most of these problems clear up within 3 to 5 days once you make the right changes to your bin.
Environmental Impact of Composting
The composting benefits you get go far beyond your garden beds. U.S. landfills push out 143 million tons of CO2 equivalent gases every year. Research from Farhidi et al. shows that greenhouse gas emissions composting produces are less than 10% of what landfills create per ton. When you compost at home, you cut your share of that pollution.
Your food waste reduction efforts add up fast on a national scale. If Americans composted all their food waste, we would cut emissions by 128.7 million tons of CO2 equivalent each year. Your single bin won't solve the whole problem, but every household that starts composting chips away at it.
Landfill waste reduction is another major win you get from composting. Over a third of everything sent to U.S. landfills right now could be composted. Your household sends hundreds of pounds of food scraps and yard waste to the dump each year. One bin in your backyard keeps all of that out of the system for good.
Soil health composting is something you might overlook when you think about why this matters. U.S. topsoil wears away at 9 times the natural replacement rate right now. Compost is one of the few tools you have as a homeowner to rebuild that soil. It boosts water retention, feeds helpful microbes, and gives your plants nutrients they can use for months.
In my experience, I saw a clear change in my garden after just one season of adding finished compost. My tomato plants grew taller and my peppers produced more fruit than ever before. The USDA calls composting one of the most powerful personal actions you can take against climate change. Once you see your garden respond, you will understand why.
5 Common Myths
Compost bins always smell terrible and attract rats, making them unsuitable for residential neighborhoods.
A properly balanced bin with the right green-to-brown ratio produces an earthy smell, and enclosed designs keep pests out effectively.
Compost tumblers produce finished compost in just two weeks, far faster than any other home method.
Even the fastest tumblers take 4 to 8 weeks under ideal conditions, and most home users see results in 2 to 3 months.
You need a large backyard to compost, so apartment dwellers and small-space gardeners cannot participate.
Worm bins, bokashi buckets, and countertop electric composters all fit in kitchens, balconies, and small patios.
Adding meat, dairy, and cooked food to any compost bin will always ruin the entire batch.
Bokashi fermentation systems and hot composters can safely process meat and dairy, though traditional cold bins cannot.
Finished compost and store-bought fertilizer do the same job, so there is no reason to make your own.
Compost improves soil structure, water retention, and microbial life in ways synthetic fertilizers cannot, while also diverting waste from landfills.
Conclusion
You now know that 20 to 30% of your household waste can go into a compost bin instead of a landfill. You have seen 8 bin types that fit every budget and living space, from apartment kitchen counters to large backyard gardens. The composting process is simple once you get your greens and browns ratio right.
Composting at home gives you free garden compost that makes your soil richer. You also save money on fertilizer each season. The USDA calls composting one of the most powerful actions you can take against climate change. Every scrap you toss in the bin is one less piece of trash sending greenhouse gases into the air from a landfill.
If you want the best compost bin for beginners, start with a basic tumbler in the $80 to $120 range. It keeps pests out, speeds up the process with easy turning, and fits in a small yard. You can always add a worm bin or bokashi bucket later once you build confidence with your first batch.
In my experience, the magic happens when you spread your first batch of finished compost on your garden beds. Your plants respond fast and the whole effort starts to feel like a rewarding routine rather than a chore. Each season you get better at it, and your garden gets better because of it.
External Sources
Frequently Asked Questions
Is it worth having a compost bin?
Yes. A compost bin diverts 20 to 30 percent of household waste from landfills, saves money on fertilizer, and improves soil health.
What is a compost bin for?
A compost bin holds organic waste like food scraps and yard trimmings while they break down into nutrient-rich soil amendment.
What are 5 disadvantages of composting?
Five disadvantages include potential odors, pest attraction, space requirements, time commitment, and a learning curve for beginners.
Which vegetables don't like compost?
Root vegetables like carrots and parsnips can fork in rich compost, and some Mediterranean herbs prefer leaner soil.
What should you never put in a compost bin?
Avoid meat, dairy, oils, pet waste, treated wood, and synthetic materials as they attract pests or introduce toxins.
What foods cannot go in a compost bin?
Meat, fish, dairy, oily foods, and heavily processed items should stay out of most home compost bins.
Is composting hard for beginners?
Composting is straightforward once you learn the green-to-brown ratio and basic moisture management.
How often should I empty my compost bin?
Most bins are ready to empty every 3 to 6 months, though tumblers and hot composters may finish sooner.
What is the laziest way to compost?
Cold composting in a simple static bin or open pile requires almost no effort beyond adding scraps and waiting.
What is the lifespan of compost?
Finished compost can last 1 to 2 years when stored properly, though nutrient levels decline over time.