Houseplant · Asparagaceae
Spider Plant
Chlorophytum comosum
Offer it gentle indirect light and a drink once the soil goes dry, and your spider plant grows quickly while staying safe for the pets you love.
Bright indirect
Every 7–10 days
55–75°F · 13–24°C
USDA 9–11
Overview
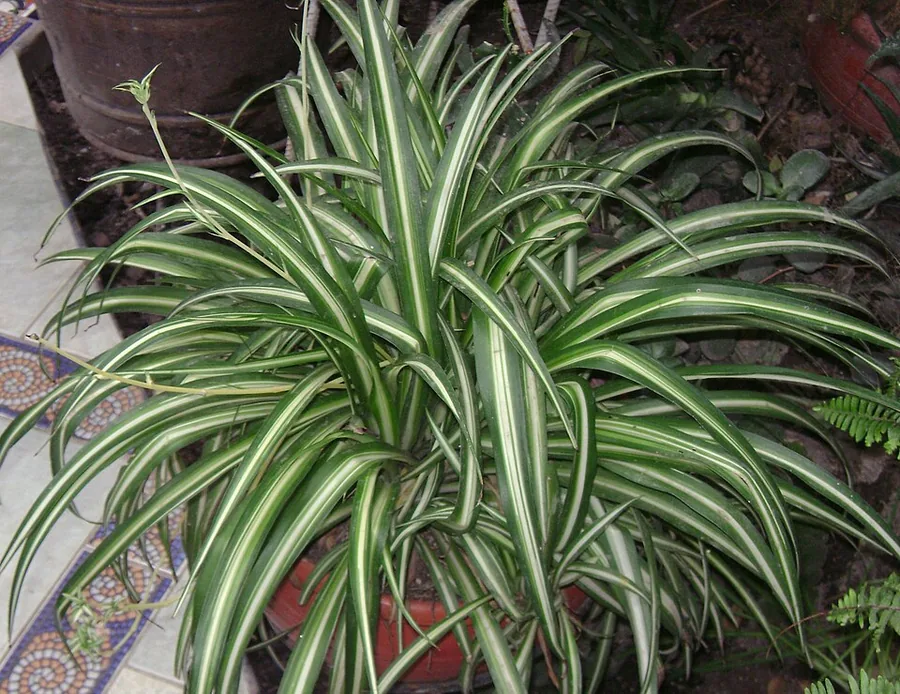
Hardly any houseplant is as easygoing to share a home with, which makes the spider plant a wonderful first plant. Its roots trace back to the shaded woodlands of southern Africa, and that heritage is exactly why a dim corner indoors barely fazes it. Long, ribbon-shaped leaves tumble down past the rim of the pot, so it really shines on a shelf or in a hanging basket.
The real charm is in those little ones it makes. As a plant matures, slender stems reach out carrying tiny plantlets, the spiderettes you may have heard of, swaying on the air like small spiders on silk. Since each takes root with hardly any effort, one happy plant soon becomes a whole row of freebies to give to people you care about.
For a lot of households, the safety is what seals the deal. Being non-toxic to cats and dogs means a pet that paws at the swinging leaves comes away completely unharmed. Treat it to filtered light and a drink whenever the soil dries, and it grows fast while forgiving nearly every slip a new grower might make.
Care
The short version: gentle bright indirect light and no harsh sun, a drink every 7 to 10 days once the upper half of the soil dries out, a potting mix that drains freely, and a comfortable room sitting between 55°F and 75°F (13°C to 24°C).
Light
Treat your spider plant to bright indirect light while sparing it from direct sun, which fades and burns the foliage. Happily, it also copes with medium light, shade, and even a dim spot, though its colors look their best in soft, filtered brightness. A perch beside a window dressed with a sheer curtain comes close to ideal.
Water
Wait until the upper half of the soil feels dry before giving another drink, which tends to land around every 7 to 10 days. Ease back once winter arrives and growth slows, since the soil holds moisture longer then. Thanks to its plump, water-storing roots, your plant copes far more gracefully with a forgotten watering than with feet left sitting in soggy soil.
Soil
Choose a well-draining general-purpose potting mix so moisture passes right through rather than gathering around the roots. All the mix truly needs to do is drain freely, since water that lingers invites root rot. It stays wonderfully relaxed about pH, thriving anywhere across a span of 6.0 to 8.0.
Temperature
Everyday indoor warmth keeps it content, with the happy zone falling between 55°F and 75°F (13°C to 24°C). Shelter it from chilly drafts and anywhere that flirts with freezing, since at heart this is a tender plant. Beyond that, all it asks for is a steady, even room temperature.
Humidity
Regular household air suits it just fine, so there is no figure you need to fuss over. Parched winter air can crisp the leaf tips, and that is the moment a spider mite is most tempted to move in. A gentle leaf rinse or a tray of water set close by goes a long way when your home runs especially dry.
Feeding
Offer food only through the spring and summer growing stretch, and give it a rest in autumn and winter. A half-strength balanced houseplant fertilizer now and again is all it needs. A light touch matters here, because overdoing it scorches the leaf tips brown and trims back the very plantlets you are hoping for.
Pruning
Beyond a bit of tidying, there is barely anything to prune. Snip browned leaf tips on a slant to honor the leaf's natural taper, and clip flower stems away once they have faded. You can lift off plantlets too, whether to grow them on or to keep the plant looking neat.
Repotting
Aim to repot every 1 to 2 years, or sooner if it becomes rootbound. The telltale signs are roots crowding or splitting the pot, the chunky tubers heaving the soil upward, or the plant drying out quickly and easing off on its babies. Just shift it into the next pot size up and freshen the mix.
Size & spacing
A spider plant reaches roughly 12 to 24 inches (30 to 60 cm) in height and fans out from 12 to 35 inches (30 to 90 cm) as the leaves arch over and the little ones dangle below. Allow it space to cascade, since the edge of a shelf or a hanging basket flatters it most. Because it grows fast, it will fill a pot within a single season.
Troubleshooting
When something is off, the leaves are where you will spot it first, and crispy tips top the list. The reassuring part is that catching these signals early lets you sort out a little wobble long before it grows into a real one. Find the picture that matches yours below, then step in while your help still counts.
Yellow leaves above soft, mushy roots
Yellowing foliage paired with wet, heavy soil usually points to root rot from overwatering, and this is the one problem worth acting on quickly. Don't panic, though, because plants often bounce back: lift it out, snip away anything brown and soft, and settle it into fresh, quick-draining soil. From there, water a bit less and double-check that the pot lets water escape.
Fix:
- Unpot and trim rotten roots
- Repot in fresh well-draining mix
- Reduce watering
Pale, faded areas where the leaves look sun-bleached
When the foliage looks faded and scorched, the likely reason is too much direct sun landing right on it. This is an easy fix, since your plant simply prefers gentle, filtered light and gets uncomfortable baking on a sunny sill. Slide it a little further from the window, or hang a sheer curtain, so harsh noon rays never reach the leaves.
Fix:
- Move to bright indirect light
- Shield from midday sun
Little brown lumps that will not wipe off the foliage
Those firm little brown spots that won't brush away are scale insects, and the tacky film nearby is the honeydew they produce. They look unpleasant but are manageable: rub the bumps off using a soft cloth, then treat the foliage with horticultural oil or insecticidal soap. A quick look-over of any newcomer before it sits beside your others spares you the trouble.
Fix:
- Wipe off scales
- Apply horticultural oil or insecticidal soap
Cottony white specks nestled where the leaves come together
Soft white tufts wedged where the leaves meet are mealybugs, one more sap-sipping pest that leaves a sticky trace behind. They clear up with patience: touch each tuft with a cotton bud dipped in rubbing alcohol, then go over the plant again with insecticidal soap. It helps to set a fresh plant aside on its own for a bit until you are sure it is pest-free.
Fix:
- Dab with rubbing alcohol
- Apply insecticidal soap
Thin silky webs and tiny pale speckles across the foliage
Delicate webbing alongside a freckled, dusty surface usually signals spider mites, tiny pests that thrive when the air indoors turns dry. Don't worry, since they are simple enough to send packing: rinse the leaves well at the sink, apply insecticidal soap or a miticide, and bump up the moisture in the air nearby. Once the air feels less parched, the leaves stop being such an inviting spot for them.
Fix:
- Rinse foliage
- Apply insecticidal soap or miticide
- Raise humidity
Brown, dry tips creeping in at the leaf ends
Take heart, because dry brown tips are the most common worry growers have, and they rarely mean anything is wrong with the plant. Most of the time the real culprit is fluoride, chlorine, and salt building up from tap water, occasionally helped along by dry air or a heavy hand with feeding. Try watering with distilled or rainwater, run water through the pot once in a while, and trim the dry ends back at a slant.
Fix:
- Water with distilled or rainwater
- Flush pot to leach salts
- Trim browned tips
- Ease off fertilizer
Small bugs gathering in groups on the tender young shoots
Little soft bugs huddled on tender shoots, with a sticky coating left around them, are aphids. The good news is they come off easily: a firm spray at the sink clears away most of the bunch in a single pass. If a few return, reach for insecticidal soap, and keep checking the young growth where they like to gather.
Fix:
- Rinse off with water
- Apply insecticidal soap
A thriving plant that has not yet offered any plantlets
If your plant looks robust yet refuses to make babies, the reason is usually nothing more than being too young or too cozy in its pot. These plants like to hold off on offshoots until they have filled out and gone a touch snug at the roots. So lighten up on feeding, let it grow into itself, and offer short days with long, unbroken dark nights for around 3 weeks to coax the little ones out.
Fix:
- Let plant mature and become slightly potbound
- Reduce fertilizer
- Give short days and long uninterrupted nights ~3 weeks
Toxicity
You can breathe easy with this one, because it is among the few houseplants that ask for no worry at all. Counted as non-toxic to cats, dogs, and people, it needs no high shelf or hidden corner to stay out of reach. A pet that takes a bite of a leaf faces no danger, and that peace of mind is a big reason it lands in so many homes.
Safe for
People · Cats · Dogs · Horses · Rabbits · Livestock · Birds
Cats Safe
Your cat is welcome to swat and chew on the dangling leaves without any risk. Should one really overdo it, the worst you might see is a touch of mild tummy upset.
Dogs Safe
A dog can mouth the foliage and come away perfectly fine. Among leafy houseplants, few are as worry-free to keep near an inquisitive pup.
Horses Safe
Horses face no poisoning risk from it. If a nosy muzzle samples a leaf, there is nothing to fret about.
Rabbits Safe
Rabbits can have a nibble in safety, just remember that greens of any kind belong as only a modest slice of what they eat.
Livestock Safe
Grazing animals are in the clear with this plant. Cattle, goats, and sheep run no risk of poisoning from it.
Birds Safe
Pet birds and backyard poultry are fine around it. Even a curious peck at the foliage does no harm.
People Safe
It is harmless and gentle enough for little ones, which is why it stands out as a wonderful choice in a house full of curious toddlers.
Varieties
A few named cultivars of the spider plant exist, each told apart by the way its leaves are striped or curled. Below are the ones you are most apt to come across by name.
'Vittatum'
When someone imagines a spider plant, this is usually it, marked by a soft cream stripe running through the heart of every green blade.
'Variegatum'
Here the coloring is reversed, with tidy pale margins outlining each green leaf rather than a single line down the middle.
'Bonnie'
Smaller and playful, its variegated foliage twists into loose curls and waves instead of sweeping out in straight arches.
'Milky Way'
Most of each leaf glows in pale cream, with just a slim rim of green holding on at the outer edge.
'Mandaianum'
A petite, deep-green variety lined with yellow striping, compact enough to tuck onto a narrow shelf or snug corner.
How to propagate
Few plants are this rewarding to multiply, and the dangling babies handle most of the work on your behalf. You can take root from those plantlets, divide a packed clump, or sow seed if patience suits you.
Offsets & pupsEasy
Anytime plantlets present · 2-4 weeks
Here is the rewarding part, and honestly the simplest way to grow your collection. Rest a baby, the spiderette folks often mention, on top of damp soil while it still hangs from its parent, or pop it in a glass of water until little roots appear and then plant it. Whichever route you pick, roots show up in roughly 2 to 4 weeks, and at that point you cut it loose to live on its own.
DivisionEasy
At repotting or spring · Few weeks
Once a hefty clump has packed out its container, dividing it is another easy option. Come repotting season, or in spring, ease the whole plant free and gently tease the chunky, tuber-filled roots into pieces, making sure each holds both foliage and roots. Give every piece its own pot and they find their feet within a few weeks.
SeedModerate
Spring · Several weeks
Raising plants from seed takes patience and is the path fewer growers travel. Sow during spring and allow the little seedlings several weeks to settle in. Just bear in mind that seedlings can stray from their parent, so a striped mother plant might surprise you with all-green offspring.
Myths
A spider plant will noticeably freshen the air in your home.
That cheerful air-purifying claim traces back to a study run inside a sealed box, not anything like an actual living room. Looking at the evidence, researchers reviewing the work concluded a single potted plant removes only a sliver of what fresh outdoor air does. So crack a window when you want cleaner air, and grow this one purely for the joy of it.
Browning tips are a sign the whole plant is failing.
Crispy tips can give a nervous grower a fright, yet the plant itself is almost always doing just fine. Nine times out of ten the trouble is fluoride, chlorine, and salts in tap water, or thirsty air, rather than any real decline. Move over to distilled or rainwater and the fresh leaves arrive clean and green.
Spider plants need bright direct sun.
Harsh, direct rays are about the only condition this plant truly dislikes, and they leave the foliage looking faded. What it really craves is bright indirect light, and it will happily make do in shade or a dim corner as well. Spare it a scorching windowsill and the color stays a rich, steady green.
A spider plant can poison the family cat or dog.
Sadly, this misplaced fear shuts a lovely plant out of countless pet homes for nothing. In truth the ASPCA lists the spider plant as non-toxic to both cats and dogs, and that is exactly what makes it such a treasure. A four-legged friend who chews a leaf will be perfectly all right.
Extra fertilizer encourages a bigger crop of baby plantlets.
Loading on fertilizer actually works against the very thing you are hoping for. Too much feed leaves you with fewer plantlets and scorches the leaf tips brown. The babies arrive when you offer a gentle balanced feed across spring and summer and let the roots grow comfortably snug.
Tap water is fine for spider plants.
Ordinary tap water is most often what turns those leaf ends crispy and brown. Over the months, the fluoride and chlorine inside it gather and burn the tips little by little. Reach for distilled or rainwater instead, and send plain water through the pot now and then to rinse the salts away.
Sources
- ASPCA
- NC State Extension Gardener Plant Toolbox
- University of Wisconsin-Madison Horticulture Extension
- Clemson Cooperative Extension HGIC
- Missouri Botanical Garden Plant Finder
- South Dakota State University Extension
- Royal Horticultural Society
- Journal of Exposure Science & Environmental Epidemiology (Cummings & Waring 2020)
- Drexel University