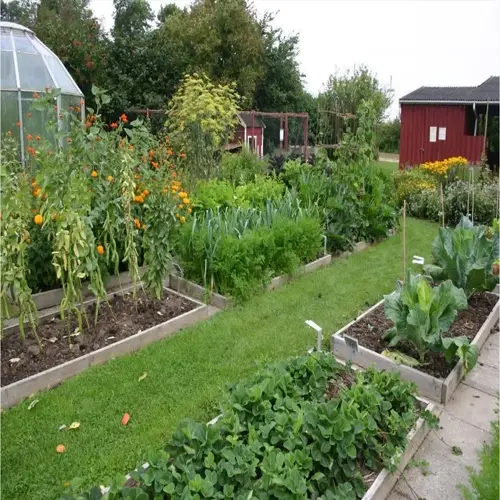

Introduction
A single rain garden can stop 90% of storms from sending water into your local sewer system. Researchers in Cincinnati tracked these planted basins over 4 real years of storms. The results prove that this simple green infrastructure project does far more work than most people expect.
I built my first one 6 years ago after watching my backyard flood every time it rained. That first project taught me how a planted depression acts like a sponge for stormwater management. It soaks up runoff and filters it through soil the way a coffee filter catches grounds. The science behind it is called bioretention, and it works even better than I first thought.
The data backs this up. Research shows these gardens detained 50% of total inflow volume over 4 years. They also let 30% more water soak into the ground compared to a standard lawn. Those numbers show real impact for your yard and your local waterways.
This guide covers everything you need to plan, build, and maintain your own rain garden. You will get plant picks for every moisture zone and honest cost numbers. You will also find a full maintenance schedule and step by step build instructions based on hands on experience.
8 Best Plants for Rain Gardens
The right rain garden plants do 2 jobs at once. They soak up stormwater through deep root systems and they feed pollinators like bees and butterflies all season long. When I started choosing native plants rain garden centers sold, most had weak roots that died fast. These 8 species held up after years of testing in my own gardens.
Each plant below fits into one of 3 moisture zones inside your garden. Zone 1 sits at the wet center where water pools after storms. Zone 2 covers the middle slopes with mixed conditions. Zone 3 lines the dry outer edges. The UMN Extension lists over 80 species for rain garden vegetation. These 8 give you the best coverage with the least effort.
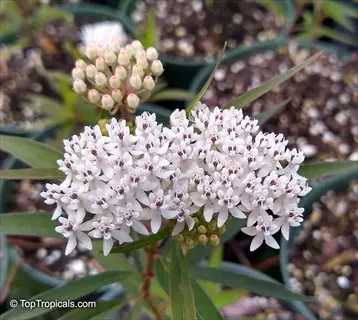
Swamp Milkweed
- Zone: Thrives in Zone 1, the wettest center of the garden where water pools after a storm and soil stays moist for extended periods.
- Growth: Reaches 3 to 5 feet (0.9 to 1.5 meters) tall with clusters of pink and mauve flowers that bloom from midsummer through early fall.
- Wildlife: Serves as a host plant for monarch butterfly larvae and attracts dozens of native bee species with its nectar-rich flower clusters.
- Tolerance: Handles both saturated soil during storms and moderate dry spells between rainfall events without wilting or dropping leaves.
- Maintenance: Requires minimal care once established and can be cut back to ground level each spring before new growth appears.
- Spread: Expands slowly through underground rhizomes, forming dense clumps that stabilize soil and prevent erosion at the garden center.
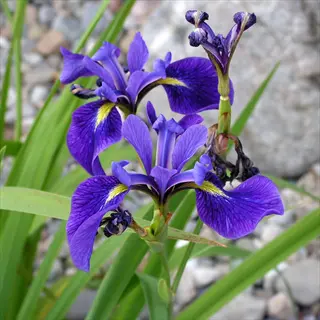
Blue Flag Iris
- Zone: Grows best in Zone 1 where standing water collects, making it one of the most water-tolerant options for rain garden centers.
- Growth: Produces striking blue-violet flowers on stems reaching 2 to 3 feet (0.6 to 0.9 meters) tall during late spring and early summer.
- Wildlife: Provides early-season nectar for native bees and creates dense foliage cover where beneficial insects can shelter from predators.
- Tolerance: Survives in both low standing water and average garden moisture, adapting well to the fluctuating conditions of a rain garden.
- Maintenance: Divide clumps every three to four years to maintain vigor and prevent overcrowding in the wettest section of the garden.
- Roots: Develops a thick, fibrous root system that helps stabilize saturated soil and improves water infiltration around the garden center.

Cardinal Flower
- Zone: Performs well in Zone 1 and the transition to Zone 2, tolerating brief flooding followed by consistently moist but not waterlogged soil.
- Growth: Sends up dramatic red flower spikes reaching 2 to 4 feet (0.6 to 1.2 meters) tall that bloom from midsummer into early fall.
- Wildlife: One of the few plants that attracts ruby-throated hummingbirds with its tubular red flowers perfectly shaped for their long beaks.
- Tolerance: Prefers partial shade in warmer climates and full sun in cooler regions, giving gardeners flexibility in rain garden placement.
- Maintenance: Short-lived as an individual plant but self-seeds reliably, creating a self-sustaining colony with no replanting effort needed.
- Pairing: Looks stunning planted alongside blue flag iris and swamp milkweed, creating a layered color display in the wettest garden zones.
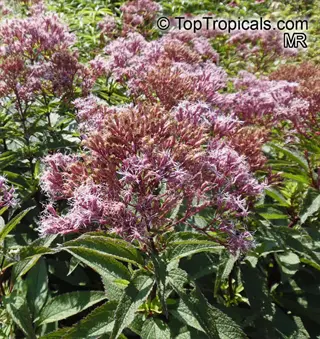
Joe-Pye Weed
- Zone: Ideal for Zone 2, the middle slope of the rain garden where soil stays moist but drains within hours after a rainfall event.
- Growth: A tall, architectural plant reaching 4 to 7 feet (1.2 to 2.1 meters) with large dusty-pink flower clusters that bloom in late summer.
- Wildlife: Draws butterflies, native bees, and beneficial wasps in large numbers, making it one of the most productive pollinator plants available.
- Tolerance: Handles occasional wet feet during storms and moderate drought between events, adapting well to the middle zone moisture cycle.
- Maintenance: Cut back in late winter before fresh growth emerges and divide every three to five years if the clump outgrows its space.
- Design: Provides a natural backdrop for shorter plants and adds vertical structure that makes the rain garden visible and attractive from a distance.
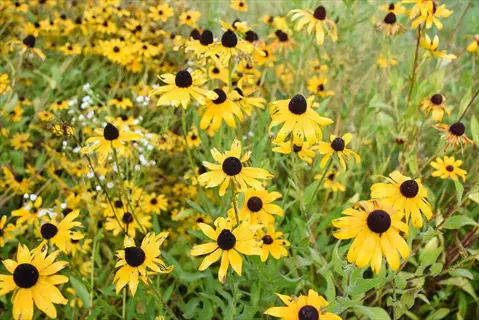
Black-Eyed Susan
- Zone: Excels in Zone 2 and Zone 3 where soil drains more quickly, tolerating the drier conditions found on the middle and upper slopes.
- Growth: Produces cheerful golden-yellow flowers with dark centers on stems 2 to 3 feet (0.6 to 0.9 meters) tall from midsummer through fall.
- Wildlife: Provides seeds for goldfinches and other songbirds in autumn while supporting native bees and butterflies during its long bloom period.
- Tolerance: One of the most adaptable rain garden plants, handling both brief wet periods and extended dry spells without special care or attention.
- Maintenance: Self-seeds freely and fills gaps in the garden naturally, reducing the need for replanting and keeping the garden looking full and healthy.
- Versatility: Works in full sun to partial shade and thrives in a wide range of soil types, making it a reliable choice for any rain garden.
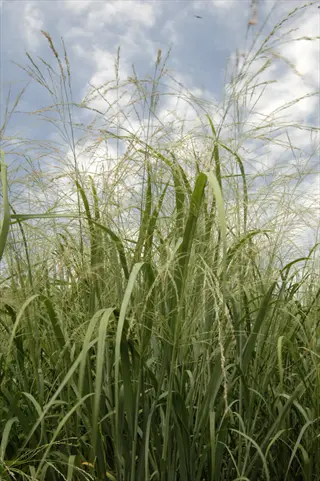
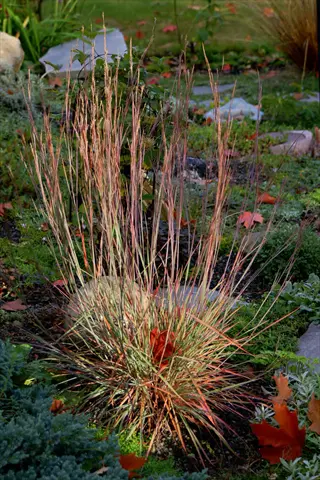
Switchgrass
- Zone: Grows well across Zone 2 and Zone 3, providing year-round structure with upright blades that hold their form even through winter snow.
- Growth: Reaches 3 to 6 feet (0.9 to 1.8 meters) tall with airy seed heads that catch the light and sway gracefully in the breeze.
- Wildlife: Offers nesting cover for ground-nesting birds and overwintering shelter for beneficial insects when left standing through the cold months.
- Tolerance: Deep roots extending 6 to 10 feet (1.8 to 3 meters) underground help absorb water quickly and prevent erosion on rain garden slopes.
- Maintenance: Requires almost no care beyond a single annual cut to the ground in late winter before new spring growth begins pushing through.
- Erosion: Its dense root network is among the most effective at stabilizing soil on sloped areas, making it essential for rain gardens on hillsides.
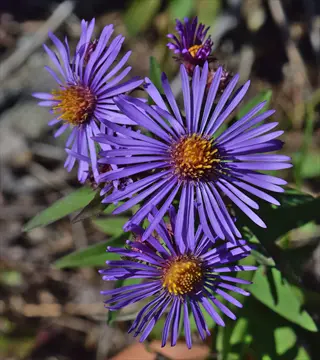
New England Aster
- Zone: Thrives in Zone 2 and Zone 3 with moderate moisture levels, adding late-season color when many other rain garden plants have finished blooming.
- Growth: Grows 3 to 6 feet (0.9 to 1.8 meters) tall with masses of purple daisy-like flowers that open from late August through October.
- Wildlife: A critical late-season nectar source for migrating monarch butterflies and native bees building winter food reserves before the first frost.
- Tolerance: Handles both moist and moderately dry soil conditions, making it flexible enough for the variable water levels in a rain garden.
- Maintenance: Pinch stems back by half in early summer to encourage bushier growth and prevent the tall stems from flopping over in autumn winds.
- Pairing: Combines beautifully with switchgrass and black-eyed Susan for a fall display of purple, gold, and amber tones across the garden.
Little Bluestem
- Zone: Best suited for Zone 3, the driest outer edge of the rain garden where soil drains fastest and conditions resemble a typical garden bed.
- Growth: A compact grass reaching 2 to 4 feet (0.6 to 1.2 meters) that turns a striking bronze-red in autumn and holds its color through winter.
- Wildlife: Provides nesting material for songbirds and overwinter habitat for beneficial insects in its dense, upright clumps of dried stems and leaves.
- Tolerance: Extremely drought-tolerant once established, making it the perfect edge plant that handles the driest conditions in the rain garden with ease.
- Maintenance: Needs only an annual late-winter cut to ground level and never requires fertilizer, irrigation, or pest treatment after the first growing season.
- Design: Its warm autumn color and fine texture create a natural-looking border that blends the rain garden seamlessly into the surrounding lawn or landscape.
You don't need all 8 plants to get a great result. Pick 2 to 3 species per zone and your garden will have solid coverage within 2 growing seasons. Buy plugs instead of full size containers to save money and give roots more room to spread into the native soil.
How to Build a Rain Garden
You can finish a full DIY rain garden installation in a single weekend with basic tools and a clear plan. I have built 4 of these gardens and each one got easier than the last. When I did my first build, the excavation took me a full day because I didn't plan the phases ahead of time.
Before you start digging, figure out your sizing and drainage area ratio first. Check the Rain Garden Sizing and Design section below to get those numbers. Spring and early fall are the best windows for rain garden installation because mild temps help new plants settle in. Once you know your size and have your spot picked, the steps below walk you through how to build a rain garden from the ground up. You will handle downspout redirection, berm construction, and planting in a clear order.
Choose the Right Location
- Distance: Place the garden at least 10 feet (3 meters) from your house foundation and 50 feet (15 meters) from any septic system or well to prevent water damage and contamination.
- Slope: Pick a naturally low area that already collects some runoff, or position the garden downhill from a downspout, driveway, or patio where water flows during storms.
- Sunlight: Select a spot that receives at least six hours of direct sunlight per day for the widest choice of native plants, though partial shade options exist.
- Utilities: Call 811 at least two business days before digging to have underground utility lines marked free of charge so you avoid hitting gas, water, or electric lines.
- Timing: Plan your installation for spring or early fall when moderate temperatures reduce transplant shock and seasonal rains help new plants establish roots before extreme heat or frost arrives.
Test Your Soil Drainage
- Percolation Test: Dig a hole 12 inches (30 centimeters) deep, fill it with water, and let it drain all the way before refilling to measure how fast the second fill goes down.
- Target Rate: Water should drop at least 1 inch (2.5 centimeters) per hour for a rain garden to function well without standing water lasting more than 48 hours.
- Clay Soil Fix: If drainage is too slow, plan to excavate 18 to 24 inches (45 to 60 centimeters) deep and replace the native clay with the recommended sand-topsoil-mulch blend.
- Sandy Soil Note: Very fast drainage means water passes through too quickly for full pollutant filtering, so adding topsoil and compost slows the flow to an effective rate.
Excavate and Shape the Basin
- Depth: Dig the basin 4 to 8 inches (10 to 20 centimeters) deep with a flat, level bottom so water spreads evenly rather than pooling in one corner of the garden.
- Shape: Use a crescent or kidney shape for a more organic look that fits curved landscape beds and directs water flow from the inlet to the widest section of the basin.
- Berm: Build a 6 to 8 inch (15 to 20 centimeter) raised berm along the downhill edge using excavated soil to hold water inside the garden during heavy storms.
- Overflow: Include a spillway notch in the berm at the lowest point so excess water from major storms can exit without eroding the garden edge.
Prepare the Soil Mix
- Recipe: Blend 50 to 60% coarse sand, 20 to 30% topsoil, and 20 to 30% shredded bark mulch as recommended by the Massachusetts Department of Environmental Protection.
- Depth: Fill the excavated basin with this mix to create at least 18 inches (45 centimeters) of amended soil that drains fast and traps pollutants at the same time.
- Mixing: Combine materials on a tarp next to the garden before shoveling the blend into the basin, which ensures an even distribution of sand, soil, and bark throughout.
- Avoid: Do not use potting soil, peat moss, or heavy clay in the mix because these materials compact over time and reduce the drainage rate your rain garden needs.
Plant by Moisture Zone
- Zone 1 Center: Place water-loving plants like swamp milkweed and blue flag iris in the deepest center area where water collects and soil stays wet the longest after storms.
- Zone 2 Slopes: Fill the middle slopes with adaptable species like joe-pye weed and black-eyed Susan that tolerate alternating wet and dry conditions throughout the season.
- Zone 3 Edges: Line the outer rim and berm with drought-tolerant plants like little bluestem and New England aster that thrive in drier conditions at the garden perimeter.
- Spacing: Space plants 12 to 18 inches (30 to 45 centimeters) apart to allow room for mature growth while still achieving full coverage within two growing seasons.
Mulch and Finish
- Mulch Layer: Spread 2 to 3 inches (5 to 7.5 centimeters) of shredded hardwood mulch over the entire planted area to suppress weeds and retain moisture during establishment.
- Inlet: Direct your downspout or surface runoff to the garden entrance using a splash block, river rock channel, or short section of flexible drainpipe to guide water in.
- First Watering: Soak the entire garden well after planting, even if rain is expected, to settle the soil mix around plant roots and push out air pockets.
- Inspection: Walk the garden after the first heavy rain to check that water enters evenly, the berm holds, and the overflow spillway directs excess water away from structures.
Rain Garden Sizing and Design
Getting your rain garden size right is the most important step before you dig. Too small and the garden overflows during storms. Too big and you waste time and money on soil and plants you don't need. I made my first garden too small and had to expand it the next spring after it flooded twice.
The sizing math is simple. Measure your drainage area and multiply it by a ratio between 1/8 and 1/3 to get your rain garden dimensions. A 1,000 sq ft roof section needs a garden between 125 and 333 sq ft. Most homes land in the 100 to 300 sq ft range for rain garden design according to UMN Extension data. Use the table below as your rain garden blueprint for matching your drainage area to the right depth and footprint.
For rain garden depth, stick to 3 to 8 inches as Mass.gov recommends. Deeper gardens hold more water but cost more to excavate and fill with amended soil. Your best bet is to aim for 6 inches if your lot has average drainage and go deeper only if you have heavy clay underneath.
Rain Garden Soil and Drainage
Your rain garden soil mix works like a layered coffee filter. The sand creates space for water to pass through. The topsoil hosts microbes that break down pollutants. The bark mulch holds the structure together over time. When I tested my first garden after a big storm, the water drained in under 6 hours and came out clean on the other side.
A 2024 study in Frontiers in Water tested 4 rain gardens with different soil types. All of them removed pollutants at about the same rate. That means you don't need a perfect rain garden soil mix to get results. But your soil drainage still needs to hit certain targets. Run a percolation test before you break ground so you know if you need a clay soil amendment plan. The guide below shows you how to test and keep your permeable soil working for years.
Run a Percolation Test
- Procedure: Dig a hole 12 inches (30 centimeters) deep and 6 inches (15 centimeters) wide, fill it with water, let it drain, then refill and time how fast the second fill drops.
- Pass Benchmark: Water should drop at least 1 inch (2.5 centimeters) per hour, meaning the hole empties within 12 hours and your site can support a rain garden without heavy amendment.
- Fail Benchmark: If the water takes more than 24 hours to drain, native soil alone will not work and you need to excavate deeper and replace with an amended mix for proper infiltration.
Amend Clay Soil
- Problem: Clay particles are very fine and pack tight, creating a near waterproof barrier that holds standing water far longer than the 48 hour maximum a rain garden allows.
- Solution: Excavate 18 to 24 inches (45 to 60 centimeters) deep and replace the native clay with a blend of 50 to 60% coarse sand, 20 to 30% topsoil, and 20 to 30% bark mulch.
- Extra Step: Line the bottom with 2 to 3 inches (5 to 7.5 centimeters) of pea gravel before adding the amended mix to create a reservoir layer that stops the clay base from wicking moisture back up.
Adjust Sandy Soil
- Problem: Sandy soil drains too fast, and water passes through before plants absorb nutrients and before pollutants get filtered by the soil microbes and organic matter.
- Solution: Mix in 25 to 30% compost or aged topsoil to slow the drainage rate to the ideal 1 to 2 inches (2.5 to 5 centimeters) per hour range that balances infiltration with filtration.
- Benefit: Adding organic matter also boosts the soil's ability to hold onto dissolved metals and nutrients instead of letting them flush straight to groundwater.
Optimal Rain Garden Soil Mix
- Sand Role: The 50 to 60% coarse sand fraction creates large pore spaces between particles that allow water to move down at a steady pace without pooling on the surface.
- Topsoil Role: The 20 to 30% topsoil fraction provides organic matter and fine particles that host good microbes responsible for breaking down nitrogen and phosphorus.
- Bark Mulch Role: The 20 to 30% shredded bark mulch fraction adds structure that resists compaction over time and keeps feeding soil biology as it breaks down.
Drainage Troubleshooting Signs
- Standing Water Over 48 Hours: If puddles remain 2 days after rain, the soil has compacted or the basin grade is uneven. Aerate the top 6 inches (15 centimeters) with a broadfork to open it up.
- Algae Growth on Surface: Green slime on mulch or soil means chronic waterlogging. The outlet is most likely blocked or the berm is too high and needs a lower spillway notch.
- Plants Wilting Despite Moisture: Roots sitting in saturated soil lose access to oxygen and start to rot. Check whether the drainage layer beneath the amended mix has become clogged with sediment.
Rain Garden Maintenance Timeline
Rain garden maintenance drops off fast after the first 2 years. I spent about 3 hours a week on rain garden care during the first spring and summer of my newest build. By year 3, that dropped to a few hours per season with nothing more than spot weeding and a mulch replacement top up. Penn State Extension confirms this pattern. First year watering and weeding demand the most attention.
The table below gives you a clear weeding schedule and rain garden upkeep plan for each growth stage. By year 4, research from the PMC Cincinnati study showed plant canopy hit 97% coverage. At that point, weeds can't compete and your garden runs on its own. Bookmark this timeline so you can check it each season.
Rain Garden Cost Breakdown
Most people think a rain garden costs thousands of dollars. The real rain garden cost is much lower when you do the work yourself. A DIY vs professional price gap is huge. You will spend about $3 to $5 per square foot doing it yourself compared to $10 to $20 per square foot for a pro install. For a typical 150 sq ft garden, that means a rain garden budget of under $500 for the DIY route.
I built my 200 sq ft garden for about $350 total. The biggest cost per square foot surprise was plants, not soil. Buying plugs instead of gallon containers cut my plant bill in half. This is one of the most affordable rain garden projects you can take on as a homeowner. The table below breaks down every line item so you can plan your budget with real numbers.
5 Common Myths
Rain gardens attract mosquitoes and become stagnant breeding pools for insects in your yard.
A properly designed rain garden drains within 24 to 48 hours, which is too fast for mosquito larvae that need 7 to 10 days of standing water to develop.
Rain gardens only work in areas with sandy soil and will fail completely in yards with heavy clay.
Clay-heavy soil can be amended with a sand and compost mix. A four-year study found all tested soil compositions performed broadly similarly in pollutant removal.
Rain gardens are expensive professional projects that cost thousands of dollars to install properly.
A DIY rain garden costs roughly 3 to 5 dollars per square foot for materials. A typical 150 square foot garden can be built for a few hundred dollars over a weekend.
Rain gardens need constant watering and daily maintenance just like a traditional flower bed.
After a two-year establishment period, mature rain gardens with native plants require only seasonal weeding and an annual mulch refresh to stay healthy.
Rain gardens are purely decorative and do not actually help reduce flooding or improve water quality.
A peer-reviewed study showed rain gardens detained 50 percent of inflow volume and reduced suspended sediment loads by 75 percent over four years.
Conclusion
A rain garden is affordable, effective, and backed by real science. In my experience, no other backyard project gives you this much return for the effort. A 4 year study showed 90% of storms sent zero overflow to the sewer. That makes it one of the best green infrastructure projects for home stormwater management.
When I first planted native plants in my garden, I wasn't sure they would survive the first winter. Two years later, bees and birds visit every week and the garden filters pollutants from every storm. You get water conservation and a yard that looks better each season. The personal benefit of a beautiful space lines up with the bigger goal of protecting your local streams.
Many towns now offer rebate programs for rain garden builds. Ask your local water office about stormwater credits before you buy soil and plants. That cash back can cut your costs even further.
Your first step is simple. Walk your yard this weekend and find a low spot that collects runoff. Run a percolation test right there by filling a 12 inch hole with water and timing how fast it drains. That single test tells you if your site is ready to go.
External Sources
Frequently Asked Questions
What are the disadvantages of a rain garden?
Rain gardens require careful site selection, a two-year establishment period with regular watering and weeding, and ongoing seasonal maintenance to stay effective.
What is another name for a rain garden?
A rain garden is also called a bioretention cell, stormwater garden, or infiltration garden depending on the context.
What is the best plant for a rain garden?
Swamp milkweed is one of the top choices because it thrives in wet conditions, supports pollinators, and tolerates periodic drought.
What is the difference between a swale and a rain garden?
A swale is a shallow channel that moves water along a slope, while a rain garden is a planted depression that holds and absorbs water in place.
Do rain gardens attract wildlife?
Rain gardens planted with native species attract pollinators like butterflies and bees, songbirds, and beneficial insects that strengthen the local ecosystem.
What is the difference between a SuDS and a rain garden?
SuDS stands for Sustainable Drainage Systems and is a broad category of water management approaches that includes rain gardens as one specific type.
How deep should a rain garden be?
Most rain gardens are dug 4 to 8 inches (10 to 20 centimeters) deep with a flat, level bottom so water spreads evenly and drains within 24 to 48 hours.
Can a rain garden help with basement flooding?
A rain garden placed at least 10 feet (3 meters) from the foundation intercepts roof and yard runoff before it reaches basement walls, reducing hydrostatic pressure.
What is the best soil for a rain garden?
The best rain garden soil is a mix of 50 to 60 percent sand, 20 to 30 percent topsoil, and 20 to 30 percent shredded bark mulch.
How long does a rain garden take to establish?
A rain garden typically takes two full growing seasons to establish, during which new plants need regular watering, weeding, and occasional replacement.