Bulb · Iridaceae
Bearded Iris
Iris germanica
Set the rhizome shallow in full sun, keep it lean and dry, and your bearded iris will come back faithfully every spring.
Full sun
Every 7–14 days
USDA 3–10
1–3 ft · 0.2–1 m
Overview
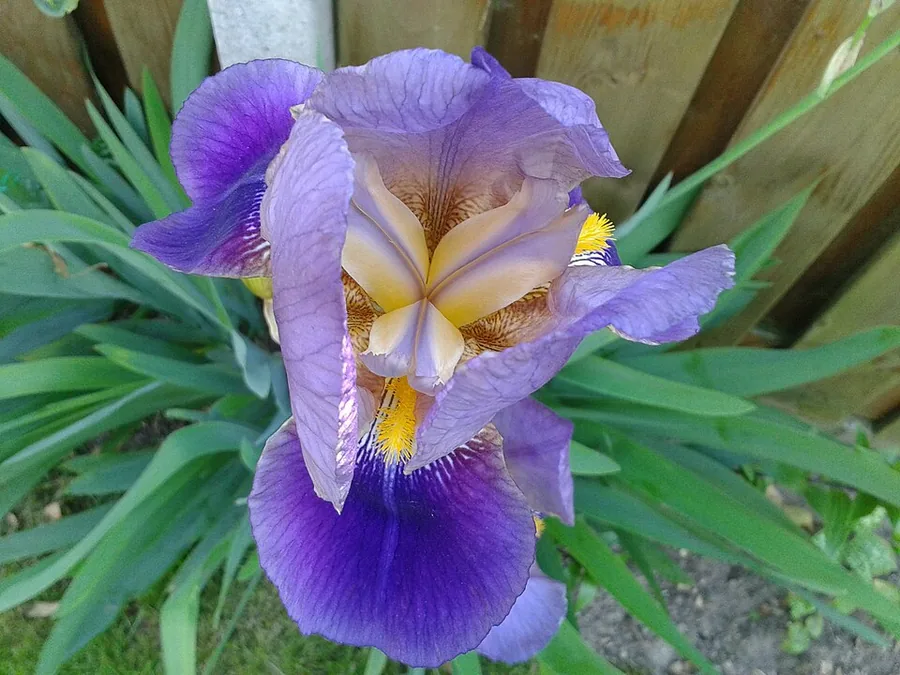
If you are new to perennials, the bearded iris is a wonderful place to begin, because it is among the most forgiving flowers a garden can hold. It grows from a plump surface rhizome rather than a buried bulb, and from that simple root it sends up sword-shaped leaves and tall stalks crowned with ruffled blooms in late spring. The soft fuzzy strip on each lower petal is the beard that gave the plant its name.
There is real comfort in how little this plant asks. Bearded iris takes cold all the way down to -40°F (-40°C) and heat past 100°F (38°C) in its stride, copes with drought once it has settled in, and otherwise leaves you free to relax. The only things it truly dislikes are wet feet and being planted too deep, and both are easy mistakes to avoid once you know to.
Choose a sunny spot with soil that drains, rest the rhizome shallow, and let it do its thing. Every few years you gently lift the clump and pull it apart, which keeps the flowers coming and quietly hands you free new plants to spread around the garden or share with friends.
Care
The short version: full sun and soil that drains freely, the rhizome set shallow with its back near the surface, watered sparingly once it has settled in, and fed lightly. Divide the clump every few years and the blooms keep coming, no fuss required.
Light
Bearded iris loves full sun, ideally six or more hours a day, and that is what brings the best blooms. A little afternoon shade is fine, but too much shade trades the flowers for floppy leaves, so lean toward the brighter spot.
Water
Once it has settled in, this is a drought-tolerant plant that is happiest a bit on the dry side. Let the top half of the soil dry between waterings, roughly every 7 to 14 days, and skip overhead watering, since that is what invites rhizome rot.
Soil
The thing that matters most by far is drainage. A well-drained loam with a little organic matter is ideal, sand works nicely, and heavy clay just needs some sand or compost mixed in. Keep the pH somewhere between 6.0 and 7.0 and it will be content.
Temperature
This is a remarkably hardy perennial, at ease anywhere from -40°F to 100°F (-40°C to 38°C), which spans USDA zones 3 through 10. Cold winters hold no fear for it, and most summers pose no trouble at all.
Humidity
Ordinary outdoor humidity suits it perfectly, so there is no number to chase. Air movement matters far more than moisture in the air, because still, damp pockets around crowded clumps are what bring on leaf spot.
Feeding
Feed lightly with a low-nitrogen fertilizer such as 5-10-10, once after the blooms fade and again in early spring. Scatter it around the clump rather than over the rhizomes, because too much nitrogen feeds soft rot instead of flowers.
Pruning
Snip off the spent flower stalks after bloom so the plant does not spend its energy setting seed. In late fall, trim the foliage back to 3 to 6 inches (8 to 15 cm) to clear away leaf spot and any borer eggs tucked in the leaves.
Repotting
Iris is not a houseplant, but the clumps do appreciate lifting every 3 to 5 years in late summer once they crowd together. Fewer flowers, packed clumps, and dead old centers that no longer bloom are the gentle signs it is time to divide.
Size & spacing
Plants stand anywhere from about 9 to 39 inches (23 to 100 cm) tall depending on the class you choose. Set them 12 to 24 inches (30 to 61 cm) apart so air can drift between the fans and leaf spot stays away.
When to plant
Bearded iris goes in as a rhizome in late summer to early fall, which gives the roots a relaxed head start before winter arrives. Your reward comes the following spring to early summer, when the stalks bloom around May, and a lucky few cultivars surprise you with a second flush later on.
Northern hemisphere
Southern hemisphere
Typical months for a temperate climate: start earlier in warm zones, later where spring frosts linger.
- Plant: Plant rhizomes in late summer to early fall
- Harvest: Spring to early summer (May), some cultivars rebloom
Hardiness
USDA hardiness zones: 3–10
Temperature: down to -40°C
Troubleshooting
Most iris troubles begin quietly underground or at the base of the leaves, so they slip by until something looks a little off. The good news is that catching the borer or the rot early usually saves the whole clump. Find what matches below, take a calm step, and you will head it off before it spreads.
Leaf tips browning with gritty grains gathering at the base
Try not to panic if you spot this, because catching it early really does save the plant. The culprit is the iris borer, a caterpillar that hatches in spring and eats its way down the leaves before burrowing into the rhizome. When you notice the sawdust-like specks near the leaf bases, gently squeeze the foliage to crush the small larvae still hiding inside. If a rhizome has already turned soft and tunneled, simply dig it out and dispose of it, and the rest of the clump can carry on.
Fix:
- Crush infected leaves early in the season
- Dig up and destroy affected rhizomes
Mushy rhizomes that smell bad and cave in
A rhizome that has gone soft and gives off a sour smell has bacterial soft rot, which usually shows up when the ground stays soggy, the rhizome sits too deep, or mulch and rich food smother it. A rotted piece sadly cannot be rescued, so cut it away and throw it out without guilt. Then loosen the drainage and tuck the firm, healthy pieces back in shallow, with their tops resting right at or just above the soil, and you will be back on track.
Fix:
- Remove and destroy infected plants entirely
- Improve drainage and replant healthy rhizomes shallowly
Speckled leaves on a clump that looks tired
Spots dotting the leaves usually mean fungal leaf spot, and it travels quickly when a clump grows so dense the air cannot reach in. Pick off the marked leaves and bin them as you find them, which keeps things in check. If the planting has turned thick and tangled, lift it and divide it so each fan can enjoy light and a gentle breeze, and your iris will feel much happier.
Fix:
- Remove and destroy affected foliage
- Divide overcrowded clumps to improve air circulation
Toxicity
Bearded iris is lovely to look at but not a plant to eat. The whole thing is mildly toxic and the rhizome is the strongest part of all, holding irritant terpenoids that upset the stomach if swallowed and can leave skin a touch red or itchy on contact. Keep the rhizomes away from pets and children, and slip on gloves before you dig or divide, and all will be well.
Toxic to
Cats · Dogs · Horses · Rabbits · Livestock · Birds · People
Cats Mild
A curious cat that nibbles a leaf or paws at a rhizome will often drool, bring up its food, and go quiet and uninterested in eating for a little while. Loose stools can show up too. The rhizome is the part to tuck safely out of reach, and most cats bounce back.
Dogs Mild
Dogs are drawn to the rhizome, which is the most irritating part, so a chew there can leave a dog drooling, queasy, and a bit listless with no appetite. A spell of loose stools is common as well. The upset is usually mild and passes.
Horses Moderate
Those same irritant compounds unsettle a horse's stomach, bringing drooling and diarrhea. Horses rarely go looking for iris, but it helps to keep clumps away from paddock edges where a bored animal might have a browse.
Rabbits Moderate
Iris simply is not rabbit food. The terpenoids in the rhizome and leaves irritate a rabbit's gut, so fence the plants off and never hand over trimmings as a treat, just to be safe.
Livestock Moderate
Cattle, sheep, and goats can end up with a sore mouth and a churning belly if they nibble the foliage or dig up a rhizome. The good news is most leave it well alone unless the pasture runs thin.
Birds Caution
There is not much settled either way for birds, and since the rhizome is an irritant it is kindest to treat iris as off-limits. Keep poultry and pet birds from pecking at the roots or foliage and there is nothing to worry about.
People Caution
No part of a bearded iris belongs on the dinner plate, and the rhizome is the most irritating piece if swallowed. Handling it can leave skin a little red or itchy, so slip on gloves when you dig or divide and keep small children from chewing the leaves.
Wear gloves when handling rhizomes, as the sap can cause minor skin irritation or contact dermatitis.
Helpline numbers

United States
ASPCA Animal Poison Control: (888) 426-4435 (fee applies)
Poison Control: (800) 222-1222



Canada
Poison Centres: 1-844-764-7669
Varieties
Bearded iris is grouped into classes by height, from ankle-high dwarfs up to stalks that reach past your knee. Choosing the right one is really just a happy decision about how tall you would like the flowers to stand.
Tall Bearded
This is the tallest and most popular class, rising to 2.5 to 3 feet (71 to 97 cm) and bearing the big, ruffled blooms most of us picture the moment someone says bearded iris.
Intermediate Bearded
A friendly mid-height group at 16 to 27 inches (41 to 69 cm) that sits comfortably between the little dwarfs and the tall types, and it tends to open its flowers a little sooner.
Standard Dwarf Bearded
A neat, compact class at 8 to 15 inches (20 to 38 cm) that is perfect tucked along the front of a border or into a rock garden.
Miniature Dwarf Bearded
The smallest of them all, reaching only about 8 inches (20 cm), and the cheerful first to bloom each spring.
How to propagate
Bearded iris is generous and nearly multiplies on its own, since a thriving clump outgrows its space and practically asks to be split. Division is the easy, dependable route that any beginner can manage, while seed is a slow path best saved for breeders.
DivisionEasy
Mid to late summer, after flowering · Blooms typically resume the following season
Dividing is the easy, friendly way almost everyone makes more bearded iris, and the moment to do it is mid to late summer once the flowers have faded. Lift the clump and simply break the rhizomes apart with your hands, keeping the young, firm pieces from the edges and letting go of the tired old centers that no longer bloom. Trim each fan of leaves down, replant shallow with the top showing, and the new divisions settle in and flower again the very next season.
SeedModerate
Sow after seed ripens; named cultivars do not come true from seed · Several years to flowering
Growing from seed is really a breeder's adventure, since a named cultivar will not come true from its own seed. If you would like to try, sow the seed once it ripens and be patient, because a seedling can take several years to reach its first bloom. If breeding is not your aim, do not worry, just snip off the spent flower stalks to keep the plant from setting seed at all.
Myths
Bearded iris should be planted deep like a tulip or daffodil bulb.
Here is a reassuring fix for a common slip: bearded iris grows from a rhizome, not a true bulb, so it likes to rest shallow with its back at or just below the surface. Bury it deep like a tulip and it tends to rot and sulk instead of flowering. Plant it shallow and let the top soak up the sun, and it will reward you.