

Introduction
You planted your seed potatoes months ago and now the green tops make you wonder what comes next. This guide on when to harvest potatoes: 6 key signs will help you dig at the right time. You can eat them fresh or store them for months in a cool dark space like a basement or root cellar.
I have grown potatoes for over 15 years in my backyard beds and learned the hard way what works. Most varieties mature between 90 to 120 days after planting based on Iowa State research. The foliage above ground tells you what happens below the soil. You cannot see the tubers forming but the leaves give you clues about their progress.
Many new growers panic when they see a potato plant dying back or foliage yellowing on the leaves. I made this mistake my first year in the garden. Yellow leaves often mean trouble with tomatoes or peppers. But potatoes work different and that color shift can signal good news about what happens underground in the dirt.
Home gardening has grown popular with more families trying to grow their own food each year. Potatoes reward good potato harvest timing with months of fresh eating from your own patch of soil. The signs below teach you what to watch for in your garden beds. You can dig up great tasting spuds every time you grow them at home in your backyard.
6 Key Signs Your Potatoes Are Ready
These six potato harvest signs tell you when tubers have finished growing and are ready for digging. I check all six each season in my garden because no single sign gives you the full picture on its own.
Your seed packet lists the days to maturity for each variety you planted in the ground. University of Florida research shows you should wait 7 to 21 days after vine kill before you dig. Rushing this step gives you thin skin potatoes that rot fast. Patient growers get thick skin potatoes that store for months.
How fast your foliage dies back tells you more than the color alone about what happens underground. I learned this the hard way when fast patchy yellowing hit my crop one year. That was disease, not maturity. Slow even color change from the bottom up means your potato plant flowering stage has ended and tuber growth has stopped.

Days to Maturity Have Passed
- Timeline Check: Early varieties mature in 60 to 80 days, mid-season varieties in 80 to 100 days, and late varieties in 100 to 130 days after planting.
- Record Keeping: Mark your planting date on a calendar and count forward to estimate your earliest possible harvest window.
- Variety Matters: Check seed potato packaging or supplier information for specific days-to-maturity for your chosen cultivar.
- Climate Influence: Warmer climates may speed maturity by 1 to 2 weeks, while cooler regions may extend the growing period slightly.
- Florida Benchmark: University of Florida research confirms commercial potatoes typically require 90 to 105 days from planting to full maturity.
- Planning Tip: Plant multiple varieties with staggered maturity dates to extend your fresh potato harvest window throughout the season.
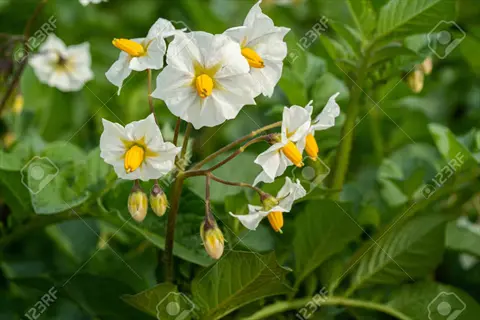
Flowering Stage for New Potatoes
- Early Harvest Signal: Potato flowers indicate tubers have begun forming underground, signaling you can harvest small new potatoes.
- Timing Window: New potatoes are ready approximately 7 to 8 weeks after planting when you spot the first flower blooms.
- Size Expectation: Harvest new potatoes when they exceed 1.5 inches (3.8 centimeters) in diameter for the best eating experience.
- Gentle Harvesting: Reach carefully into the soil beside the plant to remove a few small tubers without disturbing the main root system.
- Not Universal: Some potato varieties produce few or no flowers, so flowering alone should not be your only harvest indicator.
- Flavor Peak: New potatoes offer thin skins and creamy texture, perfect for immediate consumption rather than long-term storage.

Foliage Begins Yellowing
- Natural Process: Yellowing leaves indicate the plant is redirecting energy from foliage to tuber development underground.
- Gradual Progression: Healthy senescence spreads gradually from lower leaves upward over 1 to 2 weeks, not all at once.
- Disease Distinction: Sudden, patchy yellowing with brown spots may indicate late blight or Verticillium wilt rather than natural maturity.
- Nitrogen Connection: University of Delaware notes that stopping nitrogen fertilizer by mid-season promotes timely foliage senescence and better skin set.
- Watch Carefully: The transition from yellow to brown signals you are approaching the final harvest countdown period.
- Climate Factor: Hot, dry conditions may cause premature yellowing, so consider recent weather when interpreting this sign.
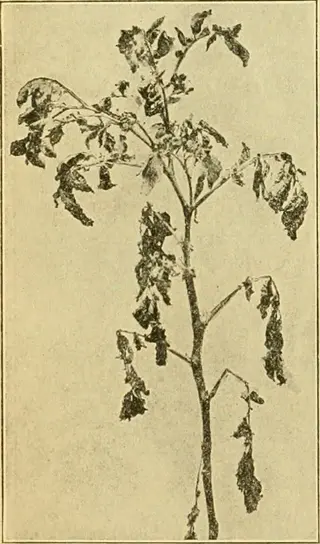
Plant Tops Have Died Back
- Clear Indicator: Once potato vines turn brown and papery, the plant has stopped growing and tubers have reached maximum size.
- Waiting Period: University sources recommend waiting 2 to 3 weeks after complete foliage death before harvesting for storage.
- Skin Development: This waiting period allows tuber skins to thicken and adhere properly to underlying tissue for storage durability.
- Visual Confirmation: Michigan State University Extension advises waiting until tops have completely died, not just partially wilted.
- Cut Test Option: Commercial growers sometimes cut vines 7 to 21 days before harvest to initiate skin set in controlled timing.
- Ground Check: After die-back, gently brush soil away from one plant to check tuber size before committing to full harvest.
Skin Passes the Rub Test
- Simple Method: Press your thumb firmly against the potato skin and rub; mature potatoes resist peeling while immature skins slip off easily.
- Iowa State Guidance: The extension confirms that thin skin rubbing off easily indicates potatoes are not fully mature and will not store well.
- Repeat Weekly: If skins still peel during testing, wait another 7 days and test again until skins remain firmly attached.
- Storage Predictor: Potatoes passing the skin test can store for 4 to 6 months, while those failing may last only 2 to 4 weeks.
- Sample Multiple: Test 2 to 3 potatoes from different plants to ensure consistent maturity across your entire crop.
- Handling Matters: Even mature-skinned potatoes bruise when harvested above 85 degrees Fahrenheit (29 degrees Celsius) or below 50 degrees Fahrenheit (10 degrees Celsius).

Frost Date Approaches
- Hard Deadline: All potatoes must be harvested before a hard frost, which damages tubers and makes them watery and unusable.
- Temperature Threshold: A hard frost occurs when temperatures drop below 28 degrees Fahrenheit (minus 2 degrees Celsius) for several hours.
- Light Frost Okay: Light frosts above 28 degrees Fahrenheit may kill foliage but typically do not damage tubers still protected by soil.
- Emergency Harvest: If hard frost threatens before plants die naturally, dig immediately; imperfect timing beats frozen potatoes.
- Mulch Protection: Adding 4 to 6 inches (10 to 15 centimeters) of straw mulch can buy extra days of protection in borderline conditions.
- Regional Planning: Know your average first frost date and work backward 2 to 3 weeks to schedule your final harvest deadline.
The potato skin test works like checking if bread dough springs back under gentle pressure. A firm skin that stays put means ready for storage. A skin that slips off tells you to wait another week before digging.
New Potatoes vs Storage Potatoes
New potatoes and storage potatoes come from the same plants. You just harvest them at different times for different uses. I grow both types each year in my garden. My family enjoys fresh baby potatoes all summer and mature potatoes through the cold winter months.
New potatoes are ready about 7 to 8 weeks after you put seed pieces in the ground. State college research confirms this timing works in most climates. Plants start blooming around this point. These early potatoes have thin skin you can rub off with your thumb. They taste sweet and creamy but only last 2 to 3 weeks.
Storage potatoes need more time in the ground. Wait until the plants have dried and died back above the soil. These mature potatoes develop a thick skin that guards the flesh from rot and disease. That tough outer layer lets them store for 4 to 6 months.
The skin difference comes down to simple plant chemistry. When foliage dies the potato stops pulling water and food from roots. The tuber builds up a waxy layer called suberin. This substance seals and toughens the skin over the next few weeks.
UK growers sort crops into first early, second early, and maincrop groups. For US gardeners think of it as early potatoes you eat right away and late ones for winter storage.
I learned to plant a mix of both types to spread out my harvest window. You dig a few baby potatoes for dinner in July. The main crop keeps growing bigger underground for fall storage when the weather turns cold.
Understanding Potato Skin Set
Skin set makes the key difference between potatoes that store well and ones that rot within weeks. I lost half my crop one year before I learned what this term means. The potato skin test only works when you understand the science behind it.
Skin set works like a wound healing on your own body. After vine kill the potato builds protective layers that seal and get stronger over time. State research shows this tuber maturation process takes 14 to 21 days to finish in good weather.
The key substance is suberin. This waxy compound fills the outer cell walls and makes the skin tough and water resistant. Without proper buildup your potatoes will lose moisture and catch disease in storage. Harvest timing matters because digging too soon stops this process before it finishes.
The Three Skin Layers
- Phellogen Layer: This is the actively dividing cell layer that produces new skin cells and responds to signals when the vine dies.
- Phellum Layer: Composed of 5 to 6 tiers of protective cells that form the outer barrier you see and feel on mature potatoes.
- Phelloderm Layer: The innermost skin layer that connects the protective outer skin to the potato flesh beneath.
What Triggers Skin Set
- Vine Death Signal: When potato foliage dies, either naturally or through chemical desiccation, it signals tubers to begin hardening their skins.
- Suberin Development: Potatoes produce suberin, a waxy substance that waterproofs the skin and creates the firm texture you test with your thumb.
- Time Requirement: University of Florida research shows optimal skin set requires 14 to 21 days after vine death before harvest.
Factors That Delay Skin Set
- Wet Conditions: Rain or irrigation after vine kill can reactivate phellogen cells, causing the skin development process to restart.
- Late Nitrogen: Applying nitrogen fertilizer too late in the season keeps vines growing longer and delays the skin-hardening process.
- Variety Differences: Early red-skinned varieties struggle with skin set more than russet types, which naturally develop tougher skins faster.
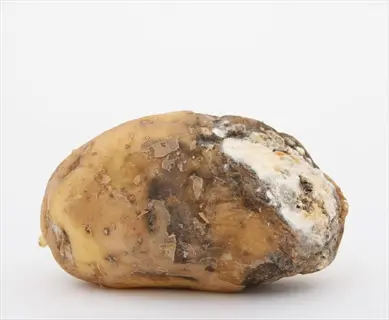
Why Skin Set Matters
- Storage Success: Potatoes with proper skin set can store 4 to 6 months, while poorly set potatoes may rot within weeks.
- Harvest Protection: Firm skins resist damage during digging, handling, and transport, reducing waste from bruising and cuts.
- Disease Resistance: The suberin layer acts as a barrier against pathogens that cause storage rots and decay.
University of Delaware warns that wet weather after vine kill can restart the whole skin set process. Rain reactivates the growing cells and you have to wait another 2 weeks before digging. Check the forecast and plan your harvest timing around dry spells.
How to Harvest Potatoes Safely
Learning how to harvest potatoes the right way keeps your tubers safe from cuts and potato bruising that leads to rot. When I first started gardening I ruined dozens of spuds by being careless with my tools. The method below protects your crop from harvest to storage.
Temperature matters more than most guides tell you when digging potatoes from the ground. Oklahoma State research shows tubers bruise much easier above 85°F (29°C) and below 50°F (10°C). Plan your harvest for morning hours in summer when soil stays cool. Wait until afternoon in fall when frost burns off.
A garden fork or spading fork works better than a shovel for this job. Push the tines into the soil about 12 inches from the plant stem. This distance protects the tubers hiding below. Angle the fork under the root ball and lift up in one smooth motion.
The key to harvest without damage is gentle handling at every step. Let potatoes fall from the soil instead of pulling them off by hand. Place each tuber in your basket rather than tossing or dropping them. Even small invisible bruises show up as dark spots after curing.
Brush loose dirt off with your hands right after digging. Do not wash potatoes you plan to store because moisture invites rot. Let them air dry in the shade for 2 hours before moving them to a dark space for curing. Sun exposure turns the skins green and makes them taste bitter.
I now check one plant first to judge tuber size and depth before digging the whole row. This test dig shows you where to place your fork for clean harvests. You avoid stabbing through your best potatoes when you know what waits underground.
Curing and Storage Tips
Proper steps to cure potatoes and set up potato storage will keep your harvest fresh for 4 to 6 months or longer. When I first started growing potatoes I skipped curing and lost half my crop to soft rot. The curing temperature and storage humidity both matter a lot. Hit the right targets for potato preservation to work.
Iowa State research gives us the exact numbers that work. Cure your potatoes at 50°F to 65°F (10°C to 18°C) with 85% to 95% humidity for 10 to 14 days after harvest. This step heals small wounds and toughens skins before long term storage begins.
Keep potatoes for frying at slightly warmer temps than other types. Cold storage below 40°F (4°C) converts starches to sugars. These extra sugars turn your fries and chips brown and give them a strange sweet taste when you cook them.
Keep your storage space dark at all times to stop sprouting. Potato sprouts contain toxic compounds. They can make you sick if you eat them. Toss any potato with green skin or long sprouts growing from the eyes.
5 Common Myths
You must wait for potato flowers to appear before harvesting any potatoes from your garden.
Many potato varieties produce few or no flowers, and flower presence is not a reliable harvest indicator for all cultivars.
Potatoes continue growing larger indefinitely as long as you leave them in the ground.
Potato growth stops once the foliage dies back, and leaving them too long risks pest damage, disease, and frost injury.
Washing potatoes immediately after harvest helps them store longer and stay fresher.
Washing removes the protective skin layer and introduces moisture, which promotes rot and significantly reduces storage life.
All potato varieties require the same number of days to reach harvest maturity.
Early varieties mature in 60 to 80 days, mid-season in 80 to 100 days, and late varieties need 100 to 130 days.
You can tell potatoes are ready simply by looking at the size of the plant above ground.
Plant size varies by variety and growing conditions; the skin rub test and foliage die-back are more reliable indicators.
Conclusion
Knowing when to harvest potatoes comes down to watching for the 6 key signs we covered in this guide. Check your days to maturity, watch for flowering, look for foliage die-back, wait for dead tops, run the skin test, and track frost dates. Each sign builds on the others to give you the full picture.
The skin test tells you more than any other potato harvest signs about storage readiness. Iowa State research is clear on this point. If the skin is thin and rubs off easy the potatoes are not mature. They will not store well and may rot within weeks instead of lasting through winter.
You now have the knowledge to time your harvest with real confidence. In my experience storage potatoes need patience but the reward is fresh eating for months. Trust the signs your plants give you and let the tubers tell you when they are ready to dig.
Few garden tasks beat the feeling of digging up a basket full of homegrown potatoes from your own soil. Get the whole family involved in harvest day. Kids love searching for tubers hidden in the dirt. You worked hard all season and now you get to enjoy the results of that effort on your dinner table.
External Sources
Frequently Asked Questions
How do I know when potatoes are ready to harvest?
Check for foliage die-back, perform the skin rub test, and count days since planting to determine readiness.
What happens if I harvest potatoes too early?
Early-harvested potatoes have thin skins that peel easily, shorter storage life, and may be undersized.
Can I leave potatoes in the ground after plants die?
Yes, potatoes can remain in the ground for 2 to 3 weeks after foliage dies, but harvest before hard frost.
How should I handle green potatoes after harvest?
Cut away green portions before cooking, as they contain solanine which can cause digestive discomfort.
What's the proper way to cure potatoes after digging?
Cure in darkness at 50 to 65 degrees Fahrenheit (10 to 18 degrees Celsius) with high humidity for 10 to 14 days.
Is it safe to eat potatoes immediately after harvesting?
Yes, freshly dug potatoes are safe to eat but taste best after curing for improved flavor and texture.
What are ideal storage conditions for potatoes?
Store at 32 to 40 degrees Fahrenheit (0 to 4 degrees Celsius) with 90 to 95 percent humidity in complete darkness.
Should I water potatoes before harvesting?
Stop watering 2 to 3 weeks before harvest to help skins toughen and reduce disease risk during storage.
How do frost warnings affect harvest timing?
Harvest all potatoes before a hard frost as frozen tubers become watery and will not store properly.
What tools prevent damage during potato harvesting?
Use a spading fork or garden fork inserted 12 inches (30 centimeters) from the plant to lift tubers gently.