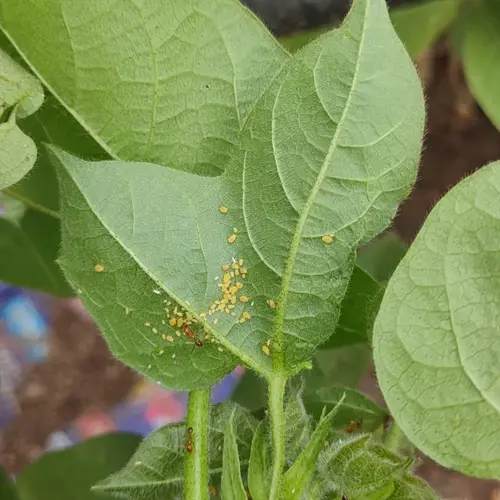

Signs of orchid fertilizer stress include black leaf tips, yellow leaves, and stunted growth. Your plant shows these warnings when feeding goes wrong. Catching problems early helps you fix them before real damage sets in.
I noticed black tips on my favorite orchid last spring and panicked at first. After some research I traced the problem to too much potassium in my fertilizer mix. Cutting back on feeding and flushing the pot saved the plant from more harm.
Orchid experts have found that black leaf tips point to potassium excess rather than general salt burn. This finding helps you pinpoint the exact cause of the damage. Knowing the source makes fixing the problem much easier than just guessing.
Yellow leaves often signal nitrogen problems in your feeding routine. Too much nitrogen makes leaves dark green then yellow from the tips. Too little nitrogen turns the whole leaf pale yellow over time. Watch the pattern to tell which issue you face.
The overfertilizing orchids signs you see first are usually on older leaves. Salts build up in the pot over time and burn roots. The damage shows up as brown edges that spread inward. Younger leaves may look fine while old ones suffer.
I lost several bottom leaves on one plant before I figured out my water was too hard. The minerals in tap water added to my fertilizer created salt overload in the pot. Switching to rain water solved the issue within months.
Stunted growth points to calcium deficiency in most cases. New leaves come in small and twisted without enough calcium. Root tips may turn brown and stop growing too. Your plant needs this mineral for building strong cell walls.
An orchid nutrient deficiency shows up slower than excess problems do. Your plant may look okay for months before symptoms appear. Pale color and weak growth are the first signs to watch for. These hints tell you to boost your feeding routine.
Purple or red tints on leaves suggest phosphorus shortage in your mix. This color change often starts on the undersides of leaves. Move the plant to brighter light and check your fertilizer ratios. Both factors affect how your orchid uses this nutrient.
White salt crusts on the pot rim warn of buildup inside. These deposits mean salts are piling up faster than you flush them out. Water with plain water every fourth watering to wash out the excess. This simple step prevents many stress problems.
Root health tells you more than leaf color in many cases. Pull the plant from its pot and look at the roots. Healthy roots are green or white and plump. Brown mushy roots mean something has gone wrong with your care routine.
I check my orchid roots every few months now as part of my routine. This quick look catches problems before they show on the leaves above. Five minutes of checking saves weeks of worry and treatment later on.
Fixing orchid fertilizer stress starts with stopping all feeding right away. Flush the pot with clean water three or four times to wash out salts. Wait two weeks before you start feeding again. Use half strength when you restart to avoid more damage.
Match your fix to the symptom you see on your plant. Black tips mean cut potassium levels in your next feeds. Yellow leaves need a nitrogen boost or reduction depending on the pattern. Stunted growth calls for calcium and magnesium supplements added to your routine.
Your orchids will bounce back from most stress if you act fast enough. Watch for warning signs each time you water and feed. Early action prevents small problems from becoming big ones. Healthy plants reward your attention with strong growth and beautiful blooms.
Read the full article: How to Fertilize Orchids: Ultimate Guide