
Introduction
Mastering Grafting Fruit Trees: A Complete Guide begins with a fact that may shock you. Chinese farmers first joined two trees into one back in 1560 BC. This makes the technique older than most cultures still around today. The practice remains the core method of fruit tree propagation across the globe because it works so well.
I think of grafting fruit trees as plant surgery where you connect the rootstock of one tree to the scion wood of another. Success depends on making contact between the thin green tissue just below the bark called the cambium layer. When these green layers touch and fuse at the graft union, they bond two trees into one living plant. Skilled grafters who master this process achieve 85% to 100% success rates in their work.
Home orchards have grown fast since 2020 as more people want to grow their own food. When I started grafting 8 years ago, I wanted disease resistant apples that would fit in my small yard. This skill gave me trees that resist local diseases, fit tight spaces, and handle my climate. You can take a hardy rootstock and join it with scion wood from any variety you want to grow.
The sections ahead will show you six proven techniques for this work. You will learn how to pick the right rootstock for your area and care for your grafts until they bear fruit. Every skill you need to create your own trees waits in the guide below.
6 Essential Grafting Techniques
Success in the orchard depends on mastering grafting. The whip and tongue graft gives you the highest success rates because it creates the most cambium contact. I learned this after failing my first dozen grafts by using the wrong methods. These six grafting techniques below will cover every situation you face.
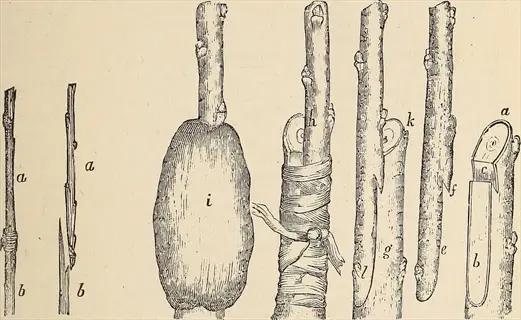
Most experts suggest you start with cleft grafting before moving to harder methods. Bench grafting works great for indoor practice during winter months. T-budding and other forms of bud grafting open up summer windows for your work. Bark grafting lets you renew old trees when the bark slips in spring.
Research from Habibi in 2022 shows why these methods work at the cell level. Grafts need tissue adhesion, callus bridges, and vascular links to take hold. Techniques that create more cambium contact give cells more chances to connect. Study these options to find what fits your trees and your skill level.
Whip and Tongue Graft
- Best For: Matching diameter scion and rootstock, typically pencil thickness or smaller, making this ideal for young trees and bench grafting operations.
- Technique: Cut matching diagonal slices on both scion and rootstock, then create interlocking tongues that increase cambium contact by forty percent over simple whip grafts.
- Success Rate: Highest success rates among all methods due to maximum cambium contact area and mechanical strength from interlocking cuts.
- Timing: Perform during late winter dormancy from February through early April before sap flow begins in northern climates.
- Difficulty: Intermediate skill level requiring practice to create matching angles and properly sized tongues without splitting the wood.
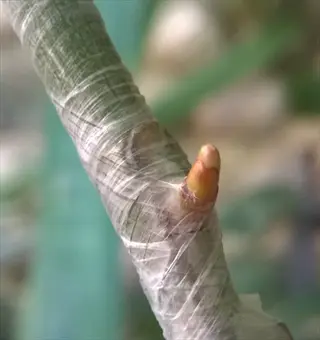
- Healing: Callus tissue forms within one week with complete structural healing occurring over one to two years.
Cleft Graft
- Best For: Attaching smaller scions to larger diameter rootstocks, topworking established trees, and situations where rootstock is significantly thicker than available scion wood.
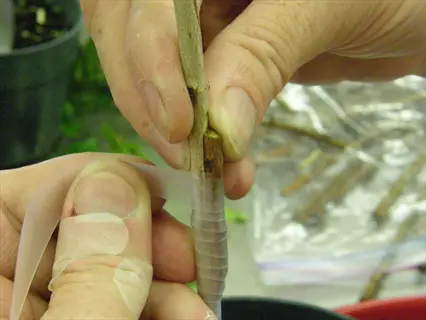
- Technique: Split the rootstock down the center and insert wedge-shaped scions into each side of the cleft, positioning cambium layers for contact on outer edges.
- Success Rate: Moderate to high success rates with proper cambium alignment, though only outer edges make contact rather than full surface area.
- Timing: Late February through March while trees remain dormant, with tape removal after six to eight weeks once callus forms.
- Difficulty: Beginner-friendly technique because visual cambium alignment is straightforward and cuts are simpler than tongue matching.
- Healing: The split gradually closes as callus tissue fills the gap, though larger diameter stocks may require grafting wax to prevent drying.

Bark Graft
- Best For: Large diameter rootstocks and mature tree renovation where the bark separates from the wood during active spring growth.
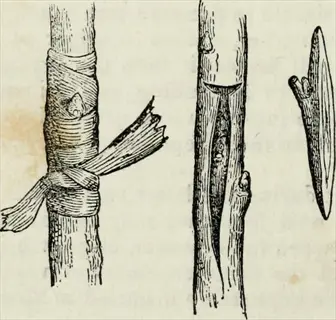
- Technique: Slice through bark, peel back flaps, insert tapered scion beneath the bark layer, and secure with tape and sealing compound.
- Success Rate: High success when performed during the brief window when bark slips, often late spring in most regions.
- Timing: Late spring when bark peels from cambium, usually several weeks after cleft grafting season ends.
- Difficulty: Moderate skill level with timing being the critical factor rather than cut complexity.
- Healing: Multiple scions can be inserted around large stumps, with the strongest selected after first season growth.
T-Budding
- Best For: Summer propagation when bark slips, allowing single buds to be inserted with minimal scion material required.
- Technique: Cut a T-shaped incision through rootstock bark, lift flaps, slide shield-shaped bud beneath, and wrap firm while leaving bud exposed.
- Success Rate: Excellent success rates in commercial nurseries where timing and technique are optimized for each species.
- Timing: Peach budding runs Memorial Day to July first, apple June 22 to August first, and pear July fourth to September fifteenth.
- Difficulty: Intermediate level requiring clean cuts and proper bud handling to prevent drying during insertion.
- Healing: Bud remains dormant until following spring when it pushes growth and rootstock above is removed.
Chip Budding
- Best For: Situations where bark does not slip, extending the budding season beyond traditional T-budding windows.
- Technique: Remove chip-shaped piece from rootstock and replace with matching chip containing single bud from scion variety.
- Success Rate: Comparable to T-budding with the advantage of working when bark is tight against the wood.
- Timing: Can be performed from late summer through fall and even during dormant season in mild climates.
- Difficulty: Requires precise matching of chip angles and sizes for cambium alignment on multiple surfaces.
- Healing: Chip integrates by following spring with growth pushing from the inserted bud.
Side Veneer Graft
- Best For: Container grown rootstocks, greenhouse propagation, and situations where rootstock top should remain for sap draw.
- Technique: Make angled cut into side of rootstock without severing, insert matching wedge-shaped scion, wrap secure while maintaining rootstock top.
- Success Rate: High success in controlled environments where humidity and temperature support callus formation.
- Timing: Late winter through early spring in greenhouse settings, though timing is less critical than field grafting.
- Difficulty: Moderate skill level with attention needed for angle matching and secure wrapping without movement.
- Healing: Rootstock top is removed as scion establishes, reducing transplant shock during the transition.
Rootstock Selection Guide
Nothing matters more to your grafted tree than rootstock selection. Penn State Extension found that Bud 9 rootstock creates trees 25% to 35% smaller than M9 rootstock. Bud 9 also handles cold winters far better. I lost a whole row of trees on M9 in a harsh winter while my Bud 9 trees came through just fine.
Dwarf rootstock works great when you want trees that stay small and start bearing fruit fast. Sweet cherry on dwarf Gisela 5 produces almost double the yield per size compared to vigorous stock. Semi-dwarf rootstock gives you a middle path with trees around half standard size but more stable in wind.
The Geneva rootstock series brought huge gains in disease resistant rootstock for home growers. G.41 and other Geneva types fight fire blight and crown rot far better than M9 rootstock. The table below shows how each option performs across climate zones.
Tools and Materials for Grafting
The right grafting tools make all the difference between clean cuts that heal fast and ragged wounds that fail. A sharp grafting knife slices through plant cells without crushing them. Crushed cells at the cut surface block cambium contact and invite disease into the wound. I spent years using dull blades before I learned why my success rates stayed low.
You need to gather your grafting supplies before the season starts so you can work fast once trees wake up. The basics include a grafting knife, pruning shears, grafting tape, and grafting wax or sealant. Parafilm-M works great as both wrap and seal in one step. Clean your tools with alcohol between each cut to stop disease spread.
Sphagnum moss has natural antifungal properties that keep scion wood fresh longer. You can find budget options for most grafting supplies. The list below covers every tool you need with tips on quality for each item.
Grafting Knife
- Purpose: Creates the precise, smooth cuts essential for cambium alignment. A dedicated grafting knife has a straight blade designed for controlled slicing rather than general pruning tasks.
- Quality Matters: Dull blades crush plant cells instead of cutting clean, reducing cambium contact and increasing infection risk at the wound site.
- Maintenance: Sharpen before each grafting session using a fine whetstone. The blade should slice paper without tearing.
- Budget Option: A quality utility knife with fresh blades works well for beginners learning basic techniques.
Pruning Shears
- Purpose: Harvests scion wood and prepares rootstock by removing unwanted growth. Bypass shears create cleaner cuts than anvil types.
- Selection: Choose shears sized for scion diameter. Most fruit tree scions need shears rated for branches up to 19mm.
- Sanitation: Clean blades with isopropyl alcohol between trees to prevent spreading bacterial and fungal diseases through cuts.
- Investment: Quality bypass pruners from reputable makers last decades with proper maintenance and blade replacement.
Grafting Tape and Wrapping
- Purpose: Holds scion and rootstock together while preventing moisture loss during the critical healing period when callus tissue forms.
- Options: Grafting tape, Parafilm-M, rubber budding strips, and even electrical tape each have advantages depending on technique and climate.
- Application: Wrap firm enough to hold components together without cutting into bark. The goal is contact pressure, not constriction.
- Removal: Most tapes require removal after six to eight weeks once callus forms. Some biodegradable options break down on their own.
Sealing Compound
- Purpose: Covers exposed cut surfaces to prevent drying and pathogen entry while the graft union heals over one to two years.
- Commercial Options: Grafting wax, tree wound grafting sealant, and water based compounds each provide good protection when applied right.
- Application: Cover all exposed wood surfaces but avoid getting sealant between the cambium layers where healing occurs.
- Storage: Keep compounds at room temperature. Cold wax becomes too stiff to spread on cut surfaces.
Scion Storage Materials
- Purpose: Maintains scion wood health between collection during dormancy and grafting several weeks later.
- Method: Wrap scion bundles in moist sphagnum moss, which has natural antifungal properties, then seal in plastic bags.
- Temperature: Store just above freezing at 32 to 34 degrees Fahrenheit in a refrigerator away from fruits that emit ethylene.
- Duration: Stored scion wood can stay good for several months, allowing flexible grafting schedules.
Labels and Records
- Purpose: Tracks variety names, grafting dates, and techniques used for evaluating success rates and planning future work.
- Materials: Weatherproof plant labels, permanent markers, and a grafting journal or digital spreadsheet organize information long term.
- Timing: Label right after grafting while details are fresh. Include rootstock variety, scion variety, date, and technique used.
- Value: Records reveal which techniques and timing work best for your specific conditions over multiple seasons.
Seasonal Grafting Calendar
Knowing when to graft fruit trees makes all the difference between success and failure. The best time to graft depends on your region and which technique you plan to use. I learned this lesson after losing a batch of grafts by starting too late one spring. Late winter grafting works great for whip and tongue work during the dormant season.
Your grafting season runs longer than most people think because different methods work at different times of year. Penn State guides say to collect scion wood from January through February and graft in late March to early April. Budding methods on trees with slipping bark open the door to summer grafting.
Northern regions often graft in mid to late April while southern growers start two to four weeks sooner. The calendar below shows when each activity and method works best across the growing year. Match your plans to these windows for the highest success rates.
Aftercare for Grafted Trees
Caring for grafted trees takes patience and close watching during the first two years after you join scion and rootstock. Penn State research shows callus tissue starts forming within the first week after grafting. Complete healing takes one to two years as vascular tissue connects and wood matures. I check my grafts every few days in that first month.
Good graft aftercare means protecting grafts from damage and removing rootstock suckers that steal energy. You also need to know when to remove grafting tape. G.41 rootstock makes about 50% fewer suckers than older types. This cuts down on time spent maintaining grafts over the long run.
The timeline below walks you through each stage of graft aftercare from day one through the second year. Watch for signs of trouble at each checkpoint so you can act fast if something goes wrong. Good aftercare turns a fragile new graft into a strong tree that bears fruit for decades.
Week One: Initial Monitoring
- Inspection: Check wrapping security each day during the first week. Wind and animals can shift parts before callus formation begins.
- Protection: Install physical barriers around grafted trees to prevent deer browse, rabbit damage, and bumps during yard work.
- Watering: Maintain consistent soil moisture without overwatering. Stressed rootstocks redirect energy away from healing.
- Signs: Callus tissue begins forming within this first week as cells grow at the cut surfaces.
Weeks Two to Four: Callus Development
- Growth Signs: Look for slight swelling at the graft union indicating callus formation beneath the wrapping material.
- Sucker Removal: Remove any shoots emerging from the rootstock below the graft. These compete with the scion for resources.
- Bud Activity: Scion buds may begin swelling as vascular connections form between rootstock and scion.
- Patience: Avoid the urge to unwrap and inspect. Disturbing the union during this critical period risks failure.
Weeks Six to Eight: Tape Removal
- Timing: Remove grafting tape once callus tissue surrounds the union, often six to eight weeks after grafting.
- Method: Cut tape with care to avoid damaging new callus tissue. Some biodegradable tapes may be breaking down.
- Assessment: Inspect the union for complete callus coverage. Gaps indicate areas needing more sealing compound.
- Growth: Strong grafts show active scion growth by this point with leaves expanding and shoots getting longer.
First Growing Season
- Training: Begin directing scion growth with gentle staking if needed. Vigorous growth on weak unions risks breakage.
- Sucker Vigilance: Continue removing rootstock suckers throughout the season. Some rootstocks produce suckers often.
- Water Management: Provide consistent water during drought periods to support both healing and new growth.
- Fertilization: Light feeding supports growth without pushing too much soft tissue that could freeze in winter.
Year One to Two: Structural Development
- Union Strength: The graft union continues getting stronger as vascular tissue grows and wood matures over twelve to twenty four months.
- Pruning: Begin shaping the tree structure through selective pruning once the union shows good structural strength.
- Support: Maintain staking for dwarf trees on weak rootstocks that may never develop enough anchorage.
- Monitoring: Watch for delayed problems including poor growth, yellowing, or visible lines at the union.
Long-Term Vigilance
- Warning: Delayed graft problems can show up fifteen or more years after the graft looked successful.
- Signs: Gradual decline, overgrowth at the union line, bark cracking, or reduced vigor may indicate developing issues.
- Documentation: Maintain records of variety combinations to identify patterns if problems emerge across multiple trees.
- Intervention: Some declining grafts can be bridge grafted to bypass failing unions if caught fast enough.
5 Common Myths
You can graft any fruit tree to any other fruit tree regardless of species or genus.
Grafting only works within compatible botanical families. Apples graft to apples and crabapples, pears to pears and quince, but apples cannot graft to pears or stone fruits.
Grafted trees are somehow artificial or produce lower quality fruit than seed-grown trees.
Grafted trees produce identical fruit to the parent variety. Nearly every commercial fruit tree sold is grafted because seeds do not grow true to the parent characteristics.
You need expensive specialized equipment and years of training to successfully graft fruit trees.
Home gardeners achieve excellent success rates with basic tools costing under thirty dollars. The fundamental techniques can be learned and practiced within a single afternoon.
Summer is the best time for all grafting because the trees are actively growing and healing faster.
Most grafting occurs during late winter dormancy when stored carbohydrates support healing. Summer budding is one specific technique, but most methods require dormant wood.
Once a graft takes and grows for a year, the union is permanent and cannot fail later.
Delayed graft incompatibility can manifest fifteen or more years after initial success. Some rootstock and scion combinations show gradual decline over decades.
Conclusion
Grafting fruit trees connects you to a practice that started over 3,500 years ago in ancient China. This same technique still forms the backbone of fruit tree propagation around the world today. The basics have not changed much because they work so well at joining two trees into one.
Your success comes down to a few key factors you can control. Line up the cambium layers at the graft union with care. Choose your rootstock selection based on your climate zone and the tree size you want. Time your grafts for when conditions favor healing. Then give your trees patient aftercare through that one to two year healing period.
Home orchardists who practice these skills reach 85% to 100% success rates just like the professionals. When I first started grafting, I failed more than I won. After 8 years of practice, my success rate now sits above 90%. Your first grafts will show you exactly what to improve next time.
Each graft you make today could produce fruit for decades to come in your home orchard. A single afternoon of grafting work can establish trees that feed your family for generations. Take what you learned here and get started. Your future self will thank you when those first grafted fruits ripen on the branch.
External Sources
Frequently Asked Questions
Which fruit tree combinations are compatible for grafting?
Grafting works within the same botanical genus. Apples graft to apples, pears to pears, and stone fruits like peaches, plums, and cherries share compatibility within their group.
What's the simplest grafting technique for beginners?
The cleft graft is most forgiving for beginners because:
- Requires only basic cuts without intricate tongue matching
- Works on rootstocks larger than the scion
- Provides visual confirmation of cambium alignment
When is the optimal time to graft fruit trees?
Late winter to early spring during dormancy is ideal. Collect scion wood in late February or March and perform grafts from mid-March through April before bud break.
Can household products replace grafting wax?
Several household alternatives seal grafts effectively:
- Electrical tape wrapped firmly around the union
- Petroleum jelly applied over the cut surfaces
- Plastic wrap secured with rubber bands
How long until grafted trees produce fruit?
Grafted trees typically produce fruit two to four years earlier than seed-grown trees. Most grafted apple and pear trees bear fruit within three to five years after grafting.
What indicates a failed graft?
Signs of graft failure include:
- Scion wood turning brown or black within weeks
- No bud swelling when rootstock shows spring growth
- Visible gap or separation at the graft union
- Scion bark shriveling or peeling away
Which tools are essential for grafting?
Basic grafting requires a sharp grafting knife, pruning shears, grafting tape or rubber strips, and sealing compound. A sharpening stone keeps blades razor-sharp for clean cuts.
Do all fruit trees require grafting?
Not all fruit trees require grafting. Figs grow well from cuttings, and some fruits like pawpaws can grow from seed. However, most commercial fruit varieties need grafting to maintain exact characteristics.
What are common grafting mistakes to avoid?
Frequent mistakes that cause graft failure:
- Misaligning cambium layers between scion and rootstock
- Using dull knives that crush rather than cut tissue
- Grafting when temperatures exceed optimal range
- Allowing scion wood to dry out before use
How does rootstock selection impact trees?
Rootstock determines tree size, cold hardiness, disease resistance, and yield efficiency. Dwarfing rootstocks like M.9 produce smaller trees with higher yield per square foot than vigorous rootstocks.