
Introduction
You planted native wildflower seeds with good soil, water, and sunshine, yet nothing came up after weeks of waiting. I made this same mistake for years. Then I found out about seed stratification. It fixed all my problems. This guide on How to Stratify Seeds: Ultimate Methods Guide shows you what went wrong and how to fix it so your seeds sprout strong next spring.
Cold stratification mimics the winter chill that many seeds need before they wake up and start growing. Research from Cheng et al. found that this simple process can boost germination rates from under 10% to over 75% for species that need cold treatment. That means dozens more plants from the same seed packet you already own sitting in your drawer right now.
Seeds have a built in timer that keeps them asleep until winter passes through the soil and warms up again. Cold triggers hormonal shifts that break seed dormancy and unlock the growth process inside each seed coat. Without this cold snap, perennial and native seeds stay locked up no matter how nice your garden setup looks outside your window.
You will learn 7 proven methods to stratify seeds at home with items you already own. Paper towels, plastic bags, and your fridge are all you need to get started today. By the end of this guide, you will know which method fits your seeds and planting schedule this growing season ahead.
7 Seed Stratification Methods
These methods work like cooking styles. Each gives you the same result but fits different skill levels. The paper towel method is perfect for beginners who want to watch seeds. Sand method stratification works best for big batches. Vermiculite stratification is great for fine seeds.
Studies from the IFAS show that stratification takes 1 to 4 months for most seeds. Sand, vermiculite, moss, or peat all work as your cold moist stratification medium. These materials hold water well and keep seeds happy in your fridge for the full duration.
I tested all these methods on many seed types over the past 5 years in my garden. Winter sowing and natural stratification gave me the strongest plants. They needed no indoor space at all. Refrigerator stratification let me pick my planting date and start time.
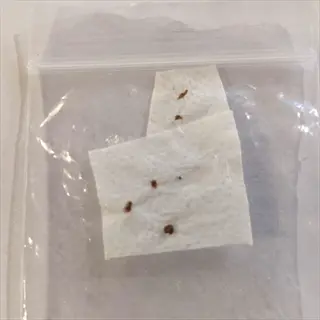
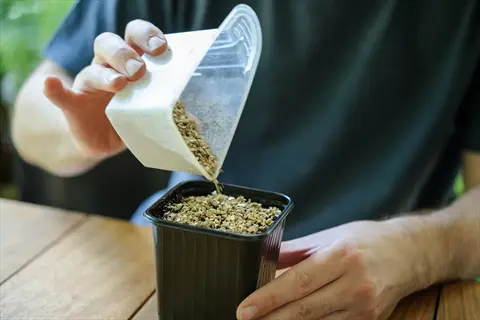
Paper Towel Method
- Best For: Small seed quantities and beginners who want to monitor progress easily throughout the stratification period.
- Process: Place seeds between two damp paper towels inside a sealed plastic bag, squeezing out excess air before refrigerating at 33-41 degrees Fahrenheit.
- Duration: Check weekly for moisture levels and signs of mold, adding a few drops of water if towels begin drying out during the 30-120 day period.
- Advantages: Allows visual inspection without disturbing seeds, easy to tell when seeds begin swelling or showing radicle emergence indicating readiness.
- Precautions: Avoid oversaturation which promotes fungal growth, and label bags clearly with species name and start date for tracking purposes.
- Success Rate: Highly effective for most perennials and native wildflowers when moisture levels are maintained consistently without temperature fluctuations.
Sand Stratification Method
- Best For: Larger seed quantities and gardeners who prefer a more hands-off approach with less frequent monitoring requirements.
- Process: Mix seeds with moist sand at a ratio of 1 part seeds to 3 parts sand in a sealed container, storing in the refrigerator at optimal temperatures.
- Duration: Sand maintains consistent moisture better than paper towels, typically requiring only monthly checks rather than weekly inspections.
- Advantages: Sand prevents seeds from clumping together and can be planted directly into soil with the seeds without separating individual seeds afterward.
- Precautions: Use clean, coarse sand rather than fine beach sand which compacts too tightly and may contain salt residue harmful to germination.
- Success Rate: Excellent for tree seeds, shrub seeds, and larger native plant seeds that benefit from the natural feel of mineral substrate.
Vermiculite Method
- Best For: Seeds requiring excellent moisture retention combined with good airflow to prevent anaerobic conditions during extended stratification.
- Process: Moisten vermiculite until it holds together when squeezed but releases no water, then mix seeds throughout and seal in container.
- Duration: Vermiculite's moisture-wicking properties mean checking every two weeks is usually sufficient for maintaining proper hydration levels.
- Advantages: Lightweight material makes it easy to sow seeds directly with the vermiculite medium, reducing transplant stress on delicate radicles.
- Precautions: Purchase horticultural-grade vermiculite rather than construction-grade which may contain contaminants unsuitable for seed germination.
- Success Rate: Particularly effective for fine seeds that might get lost in sand and for species sensitive to moisture fluctuations during dormancy breaking.
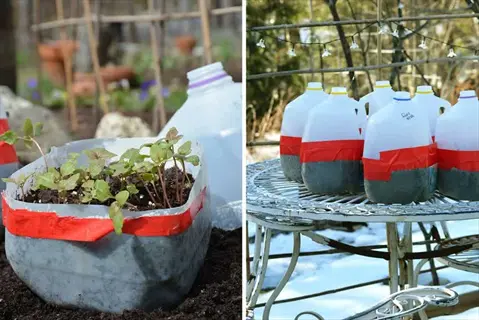
Winter Sowing Outdoors
- Best For: Gardeners wanting the most natural approach by letting outdoor temperatures handle stratification automatically through real winter conditions.
- Process: Plant seeds in milk jugs or clear containers with drainage holes in late fall, placing outdoors to experience natural freeze-thaw cycles.
- Duration: Seeds stratify naturally from fall through winter, germinating on their own schedule when spring temperatures trigger growth.
- Advantages: Requires minimal monitoring since nature provides temperature fluctuations, and seedlings emerge already hardened to outdoor conditions.
- Precautions: Protect containers from heavy snow accumulation and hungry wildlife, and ensure drainage holes prevent waterlogging during winter rains.
- Success Rate: Mimics wild conditions perfectly, producing vigorous seedlings for native plants, perennials, and cold-hardy species adapted to your climate.

Peat Moss Method
- Best For: Acid-loving plant seeds and species that naturally germinate in forest floor conditions with decomposing organic matter.
- Process: Mix seeds with moistened peat moss in sealed containers, using approximately 3 parts peat to 1 part seeds for adequate spacing.
- Duration: Peat moss holds moisture exceptionally well, requiring checks only every 2-3 weeks to ensure it remains damp but not waterlogged.
- Advantages: Naturally acidic pH benefits rhododendrons, blueberries, and woodland wildflowers while providing antimicrobial properties that reduce mold risk.
- Precautions: Pre-moisten peat thoroughly before mixing since dry peat moss is hydrophobic and difficult to wet evenly once seeds are added.
- Success Rate: Outstanding for woodland natives, ericaceous plants, and seeds that evolved in forest understory environments with organic-rich soils.
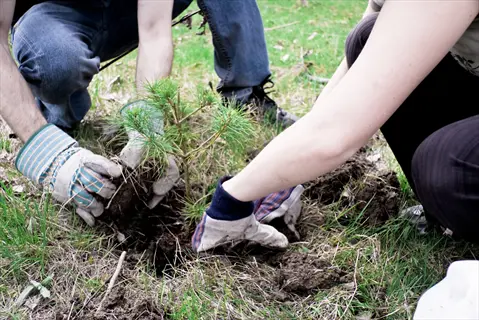
Direct Fall Planting
- Best For: Gardeners with established beds who want seeds to stratify in their permanent growing location without any transplanting required.
- Process: Sow seeds directly in prepared garden beds in late autumn, covering lightly with soil and marking locations clearly for spring identification.
- Duration: Seeds experience natural winter cold in the ground, with germination occurring automatically when soil temperatures rise in spring.
- Advantages: Eliminates transplant shock entirely and allows taprooted species to establish deep root systems without container restrictions.
- Precautions: Heavy clay soils may heave seeds during freeze-thaw cycles, and mulching helps regulate soil temperature fluctuations for better results.
- Success Rate: Highly effective for native wildflowers, prairie plants, and any species naturally adapted to germinate after winter dormancy in your region.
Warm Stratification Method
- Best For: Tropical seeds, palms, and species with complex double dormancy requiring warm temperatures before or after cold treatment periods.
- Process: Place seeds in moist medium at 68-85 degrees Fahrenheit (20-29 degrees Celsius) for 1-3 months, often using heat mats for consistency.
- Duration: Duration varies by species, with some requiring warm-then-cold sequences and others needing cold-then-warm for proper dormancy release.
- Advantages: Essential for breaking epicotyl dormancy in species like trillium and some tree seeds that require two-stage temperature treatments.
- Precautions: Monitor carefully for premature germination since warm temperatures can trigger growth, and maintain moisture without creating soggy conditions.
- Success Rate: Critical for seeds from warm climates and double-dormancy species that will not germinate with cold stratification alone.
Pick whichever method fits your schedule and seed quantity best. All seven approaches work well when you keep moisture levels right and temps in the safe zone. Start with one method on a small batch of seeds to build confidence before scaling up your stratification projects next season.
Understanding Seed Dormancy Science
Seeds have a built in alarm clock run by two hormones. One hormone keeps them asleep while the other wakes them up. Cold resets the balance between these two so germination can start. This is the science behind seed dormancy and why cold treatment matters so much.
When I first learned about this, the hormone names confused me at first. The sleep hormone is called abscisic acid and it blocks growth signals inside the seed coat. The wake up hormone is called gibberellin and it tells the seed to start pushing out roots. Research from Bentsink and Koornneef found that cold triggers the seed to make more gibberellin.
This hormonal shift is the key to dormancy breaking in seeds with physiological dormancy. Without weeks of cold, the balance stays tipped toward sleep mode. The seed stays locked up even in warm, moist soil that should be perfect for growth.
I find this helps me plan my stratification timing much better now that I understand the process. Seeds need enough cold days to fully shift their hormone balance before dormancy release happens. Cut the cold period short and you get weak sprouts or no sprouts at all.
The good news is you do not need a lab to make this work. I did all my tests in a regular kitchen with basic supplies. Your fridge holds temps in the sweet spot for triggering these changes. Paper towels and plastic bags give you all the tools to break seed dormancy right at home.
Seeds That Require Stratification
When I first started growing native plants, I had no idea which seeds need stratification and for how long. You can plan backward from your planting date once you know the timing. I sort my seeds into three groups based on how long they need cold treatment. This makes your planning much easier.
Your first group needs 8 to 12 weeks of cold and includes most tree seeds stratification species. Flowering Dogwood, Redbud, and native oaks fall into this category. These seeds have deep dormancy that takes months to break down for you.
The middle group needs 4 to 8 weeks of cold and covers most perennial seeds stratification needs. Milkweed stratification works best at about 6 weeks in my tests. Echinacea stratification does well in this range too. False Indigo likes this timing. These native seeds stratification periods match what they get in nature.
Your shortest group only needs 1 to 2 weeks of cold and includes many wildflower seeds. Black Eyed Susan and some asters sprout fine with just a quick chill. I still give them the full two weeks to be safe in my garden.
When you are not sure about a species, check the seed packet or look up the plant's native range. I do this all the time for new seeds. Seeds that need stratification come from climates with cold winters. If your plant grows wild where snow falls, it most likely needs cold treatment before you plant it.
Stratification Temperature Guide
Your stratification temperature makes the difference between seeds that sprout and seeds that rot. I learned this the hard way when my first batch failed due to temps that were too warm. Now I check my fridge with a cheap thermometer to catch problems early.
The optimal stratification temperature for most seeds falls between 33-41°F (1-5°C) in your fridge. This cold stratification temperature range triggers the hormone changes seeds need to wake up. Go too cold and you risk ice damage to seed cells. Go too warm and the seeds may start growing too soon or grow mold.
Warm stratification temperature needs are different at 68-85°F (20-29°C) for tropical seeds. Some species with double dormancy need both temps in sequence. A heat mat helps you hold the warm phase steady. Then you use fridge temperature stratification for the cold phase.
Place a cheap thermometer in your fridge crisper drawer to make sure you stay in the sweet spot. Most fridges run colder near the back and warmer near the door. I put my seeds in the middle of the crisper shelf for the most stable temps during storage.
Troubleshooting Stratification
When I first started, I threw out seeds that could have been saved from failed stratification. Before you assume your seeds are bad, work through this checklist of stratification problems first. Most issues come down to moisture control stratification errors. You can fix them fast.
Research from Liu et al. found that wet conditions produce 60% germination while dry conditions only hit 33%. That gap shows why moisture matters so much during the process. Too wet and you get mold during stratification. Too dry and your seeds never wake up at all.
The most common reasons for stratification not working include wrong temps, not enough time, and bad moisture balance. You can prevent mold seeds by using damp media instead of soaking wet. Check your setup weekly to catch problems early before they ruin your whole batch.
Mold Growth on Seeds
- Cause: Excessive moisture combined with poor air circulation creates perfect conditions for fungal growth that can destroy entire seed batches during stratification.
- Prevention: Use damp rather than wet medium, ensure slight air exchange by not sealing containers completely airtight, and check seeds weekly.
- Solution: Remove affected seeds immediately, treat remaining seeds with diluted hydrogen peroxide solution, and reduce moisture levels in the medium.
- Recovery: If caught early, most seed batches can be saved by removing moldy seeds and transferring healthy seeds to fresh, properly moistened medium.
Seeds Drying Out Completely
- Cause: Inadequate sealing, infrequent monitoring, or starting with insufficient moisture leads to desiccation that halts the dormancy-breaking process.
- Prevention: Check moisture levels weekly for paper towel method and biweekly for sand or vermiculite, adding water as needed.
- Solution: Rehydrate medium gradually without oversaturating, and extend stratification period since drying interrupts the hormonal changes needed.
- Recovery: Seeds may still be viable if drying was brief, but expect reduced germination rates and consider starting with fresh seeds if possible.
No Germination After Stratification
- Cause: Insufficient duration, wrong temperature range, non-viable seeds, or missing pre-treatments like scarification can all prevent germination.
- Prevention: Research species-specific requirements before starting, verify seed viability with float test, and use a refrigerator thermometer.
- Solution: Extend stratification period if duration was inadequate, try scarification for hard-coated seeds, or provide light if species requires it.
- Recovery: Some seeds can undergo additional stratification cycles if the first attempt fails, particularly native perennials adapted to variable conditions.
Premature Germination in Fridge
- Cause: Temperature fluctuations or refrigerator running warmer than optimal can trigger germination before you are ready to plant outdoors.
- Prevention: Place thermometer in refrigerator to monitor temperature, avoid door storage areas where temperatures fluctuate most frequently.
- Solution: Plant sprouted seeds immediately in pots indoors under grow lights since emerged radicles are fragile and cannot tolerate continued cold.
- Recovery: Prematurely germinated seeds can grow successfully indoors until outdoor conditions are suitable for transplanting hardened seedlings.
5 Common Myths
All seeds need cold stratification to germinate properly, so you should refrigerate every seed packet before planting.
Most annual vegetables and warm-season crops do not require stratification at all because they evolved in climates without cold winters and germinate readily with warmth and moisture.
Putting seeds in the freezer works better than the refrigerator because colder temperatures break dormancy faster.
Freezing temperatures can actually damage seed cells and reduce viability because optimal stratification occurs at 33-41 degrees Fahrenheit, not below freezing.
Seeds only need a week or two of cold treatment to break dormancy since any exposure to cold should trigger germination.
Most perennial and native seeds require 30-120 days of consistent cold stratification because shorter periods do not allow sufficient hormonal changes to occur.
Dry stratification in the refrigerator works just as well as moist stratification for breaking seed dormancy effectively.
Research shows wet stratification produces 60 percent germination rates compared to only 33 percent for dry conditions because moisture is essential for hormonal activation.
Once seeds have been stratified, they will germinate immediately when planted regardless of growing conditions.
Stratified seeds still require proper soil temperature, moisture, and light conditions to germinate because stratification only breaks dormancy without guaranteeing sprouting.
Conclusion
When I first learned seed stratification, it opened up a whole new world of native plant gardening for my yard. Once you master the basics, you can grow perennial seeds that most gardeners think are too hard. The process takes patience but the results are worth the wait.
The paper towel method, sand method, and winter sowing all work great when you match the method to your needs. I use paper towels for small batches where I want to watch progress closely. Sand works better when I have lots of seeds and less time to check on them. Winter sowing handles itself outdoors with almost no effort from me.
Think about which method fits your gardening style and available space before you start your first batch. Your fridge has room for bags of seeds if you want indoor control. Your yard has space for milk jugs if you prefer the outdoor route. Both paths lead to germination success with the right setup.
Start with one species and a small test batch to build your confidence this season. Once you see those first sprouts push through, you will understand why gardeners get excited about stratify seeds projects. The plants you grow will reward you with strong roots and healthy growth for years to come.
External Sources
Frequently Asked Questions
How do you stratify seeds at home?
Stratify seeds at home using the refrigerator method with moistened paper towels or sand in sealed containers at 33-41 degrees Fahrenheit for 30-120 days depending on species.
Should seeds be stratified in the fridge or freezer?
Use the refrigerator, not the freezer, for most seed stratification because optimal temperatures are 33-41 degrees Fahrenheit while freezing can damage seed cells.
Is soaking seeds necessary before stratification?
Soaking seeds for 12-24 hours before stratification helps soften hard seed coats and jumpstart moisture absorption, improving germination rates significantly.
What happens if you skip cold stratification?
Seeds that require stratification will likely remain dormant, germinate poorly with rates under 10 percent, or produce weak seedlings if you skip the cold treatment period.
Can paper towels be used for cold stratification?
Yes, the paper towel method is one of the most popular home stratification techniques because it maintains consistent moisture and allows easy monitoring of seed condition.
How can you accelerate seed stratification?
Accelerate stratification by combining scarification with cold treatment, maintaining optimal moisture levels, and ensuring consistent temperatures without fluctuations.
Does hydrogen peroxide improve germination?
Hydrogen peroxide can improve germination by softening seed coats and providing oxygen, but it is not a substitute for proper cold stratification requirements.
Why do some stratified seeds still fail to sprout?
Stratified seeds fail to sprout due to:
- Insufficient stratification duration for the species
- Improper moisture levels causing mold or drying
- Temperature fluctuations during the process
- Non-viable or old seeds with poor viability
- Missing scarification for hard-coated seeds
Which seeds should never be soaked?
Avoid soaking very small seeds like petunias and begonias, seeds with mucilaginous coatings, and any seeds prone to fungal issues in wet conditions.
When is the best time to start stratification?
Start stratification 30-120 days before your planned planting date, typically in late fall or early winter for spring planting.