
Introduction
One succulent on your shelf can become dozens of new plants for free. How to Propagate Succulents: A Complete Guide gives you the exact steps to grow your collection. You won't need to spend money at the garden center anymore. I started with three succulents five years ago and watched them multiply on my kitchen windowsill. Now I have over 200 plants from free cuttings and leaves that I share with friends.
Succulent propagation works on a clear timeline that you can count on. Root development takes 2 to 4 weeks with proper care. Illinois Extension backs this up. The callusing period needs 4 to 7 days before you plant your cuttings. Iowa State, Michigan State, and Penn State studies back these numbers too. Knowing the real timing helps you stay patient when those leaves seem to sit there doing nothing.
Growing succulents from cuttings comes down to three main methods that work for most species. Leaf propagation works great for thick fleshy types like Echeveria and Sedum. Stem cuttings handle plants that won't root from leaves alone. Division and offsets let you split clumping plants into new ones with roots ready to grow.
This plant propagation guide walks you through each method step by step with clear timing. You'll learn which species work best with each technique. I'll show you how to avoid common mistakes that cause rot or shriveling before roots form. Let's get your succulents multiplying.
7 Methods to Propagate Succulents
You have seven different ways to turn one succulent into many new plants. Each method works better for certain species, so knowing all your options helps you pick the right approach. I use leaf propagation most often because it gives me the most plants from one mother plant. When I started out, leaf propagation felt like magic.
Stem cuttings root faster than leaves when you need quick results. Illinois Extension recommends taking 3 to 4 inch cuttings from the active growing point for your best success. Division propagation and offsets work great when you want instant plants with roots already attached. You can skip most of the waiting with these methods.
Beheading succulents fixes leggy plants that have stretched toward the light. This method also creates compact rosette cuttings for your collection. The old stump often sprouts multiple new pups where you made the cut. Below you'll find all seven methods with the exact steps and timing for each one.
Leaf Propagation
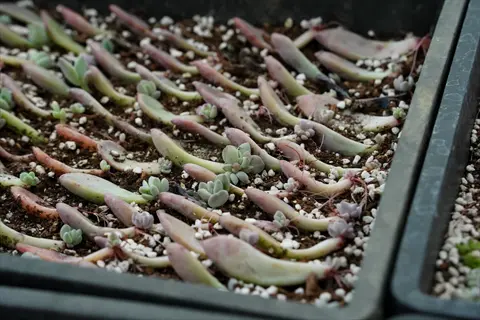
- How it works: Twist a healthy leaf from the stem using a side-to-side motion, ensuring the entire base including meristem cells comes away clean without tearing.
- Success requirement: The leaf base must be fully intact since partial pieces lacking meristem tissue will not produce roots or new growth according to Iowa State Extension research.
- Best species: Works great with Echeveria, Graptopetalum, Pachyphytum, Sedum, Crassula (jade plants), and Kalanchoe species that have thick fleshy leaves.
- Timeline: Expect visible roots within 2-3 weeks and tiny rosettes forming at the leaf base within 4-6 weeks under optimal conditions.
- Callusing step: Lay leaves on a dry surface away from direct light for 3-5 days until the cut end forms a dry protective callus before placing on soil.
- Common mistake: Placing leaves cut-side down into wet soil causes rot fast, so callus first and lay leaves flat on top of light moist soil.

Stem Cuttings
- How it works: Cut a 3-4 inch (7.5-10 cm) section from the active growing point of the plant using clean sharp scissors or a sterile blade at a 45-degree angle.
- Why it's fastest: Stem cuttings already have established vascular tissue and nodes that produce adventitious roots fast within 2-4 weeks according to Illinois Extension.
- Best species: Ideal for Aeonium, Cotyledon, Echeveria, Euphorbia, Crassula, Senecio (string of pearls), and Kalanchoe where leaf propagation may not work well.
- Preparation: Remove lower leaves from the bottom 1-2 inches (2.5-5 cm) of the cutting to expose nodes and allow the cut surface to callus for 4-7 days.
- Planting depth: Insert the callused cutting about 1 inch (2.5 cm) deep into well-draining soil and provide support with small stakes if needed.
- Rooting indicator: Test for root development after 3 weeks by light tugging the cutting, as resistance indicates roots have formed and anchored the plant.
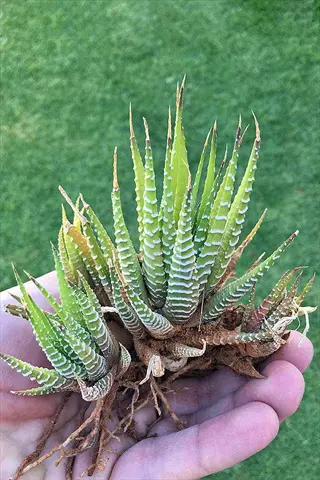
Offsets and Pups
- How it works: Many succulents make baby plants on their own called offsets or pups at their base that can be separated and grown on their own once they reach adequate size.
- When to separate: Wait until offsets are at least 1 inch (2.5 cm) in diameter and have developed their own small root system before removing from the mother plant.
- Best species: Sempervivum (hens and chicks), Aloe vera, Haworthia, Agave, Echeveria, and Gasteria often produce offsets that separate with ease.
- Removal technique: Use a clean sharp knife to cut the offset from the mother plant, including any attached roots, or pull soft if the connection is thin.
- Advantage: Offsets already have roots and established growing points, making this the highest success rate method with close to 100% viability.
- Aftercare: Allow the cut surface to callus for 2-3 days before planting in well-draining soil and withhold water for one week to prevent rot.
Division
- How it works: Mature clumping succulents can be divided into multiple plants by separating the root ball into sections, each with roots and growth points.
- Best timing: Divide succulents during spring repotting when plants are in active growth and can recover quickly from the stress of root disturbance.
- Best species: Haworthia, Gasteria, Agave, Aloe, and clumping Sedum varieties that form dense clusters with interconnected root systems.
- Technique: Remove the plant from its pot, shake off soil, and use your fingers or a clean knife to separate natural divisions where roots connect.
- Root requirement: Each division must have at least 2-3 healthy roots and one growth point (rosette or stem) to survive on its own.
- Recovery period: Fresh divided plants may look stressed for 2-3 weeks but will establish once roots grow into fresh soil and begin taking up water.
Beheading
- How it works: Cut the top rosette from a stretched or leggy succulent, leaving 2-3 inches (5-7.5 cm) of stem attached, then root the top as a stem cutting.
- When to use: Beheading rescues succulents that have stretched due to insufficient light, transforming one leggy plant into multiple compact specimens.
- Bonus plants: The remaining stem stump with roots will often produce multiple new rosettes at the cut points within 4-8 weeks, multiplying your collection.
- Best species: Works particularly well with Echeveria, Graptoveria, Aeonium, and other rosette-forming succulents that stretch in low light conditions.
- Cut location: Make your cut 2-3 inches (5-7.5 cm) below the rosette head using a sterile blade, choosing a spot below any aerial roots if present.
- Callusing importance: Allow the beheaded rosette to callus for 5-7 days in a shaded area before planting, as the larger wound requires more healing time.
Root Cuttings
- How it works: Some succulents can regenerate from root sections that contain enough stored energy and cellular material to produce new shoots.
- Best species: Sansevieria (snake plants), certain Haworthia species, and succulents with thick fleshy rhizomes respond well to root propagation.
- Technique: During repotting, cut healthy roots into 2-3 inch (5-7.5 cm) sections and lay flat on moist well-draining soil.
- Coverage: Just cover root sections with a thin layer of soil mix, keeping the orientation the same as the original root (top side up).
- Timeline: Expect new shoots to emerge in 4-8 weeks, with faster results in warm temperatures of 75-80°F (24-27°C) and bright indirect light.
- Advantage: Root cuttings work for species that cannot propagate from leaves and provide a way to multiply rhizome succulents with ease.
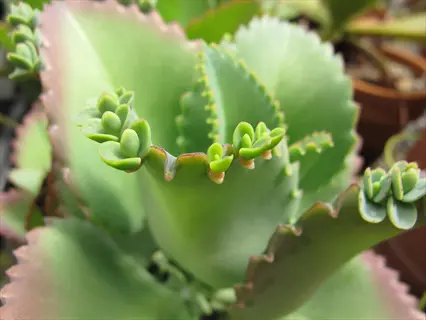
Bulbils and Plantlets
- How it works: Certain succulents produce miniature plants (bulbils or plantlets) along leaf edges, flower stalks, or stems that can be removed and planted right away.
- Self-propagating species: Kalanchoe daigremontiana (mother of thousands), Kalanchoe pinnata, and some Bryophyllum species produce plantlets on their own along leaf margins.
- Flower stalk method: After blooming, some Echeveria and Graptopetalum develop small rosettes along their flower stalks that can be cut and rooted.
- Harvesting: Wait until bulbils develop visible roots or are at least 0.5 inch (1.25 cm) before removing, then place on moist soil.
- Advantage: These ready-made baby plants already have small roots and require minimal callusing, making them the easiest propagation method available.
- Caution: Some prolific bulbil producers like mother of thousands can become invasive, so contain them in pots rather than planting outdoors in mild climates.
Setting Up for Success
Your propagation medium and rooting conditions decide if cuttings live or die. I lost my first batch of leaves because my soil stayed wet for too long. The right setup makes all the difference between success and a pile of mushy stems.
Think of your well-draining soil like a coffee filter. Water should pass through fast without pooling or sitting on the surface. If water stays on top for more than a few seconds, your succulent soil mix needs more perlite. Illinois Extension recommends a 1:1 ratio of potting mix to perlite for best drainage.
Penn State research shows that keeping your propagation medium between 75-80°F (24-27°C) speeds up root growth. Cactus potting soil from the store works fine, but I add extra perlite to mine. Below are the exact rooting conditions you need to get your cuttings started right.
Soil Mix Preparation
- Recommended ratio: Combine 1 part regular potting mix with 1 part perlite, or substitute coarse sand for perlite according to University of Illinois and Minnesota Extension guidelines.
- Why drainage matters: Succulents store water in their tissues and will rot if roots sit in moisture, so the soil must dry all the way between waterings within 2-3 days.
- Commercial option: Store bought cactus and succulent potting mixes work well, though adding extra perlite at 25% by volume improves drainage further.
- Container choice: Use pots with drainage holes at least 1-2 inches (2.5-5 cm) larger than the cutting, as terracotta pots dry faster than plastic.
Light Requirements
- Propagation phase: Bright indirect light is ideal during root development since direct sun can dry cuttings before roots form and cause leaf burn.
- Artificial lighting: Position grow lights 6-12 inches (15-30 cm) above cuttings for 14-16 hours each day according to University of Minnesota Extension tips.
- Window placement: East or north facing windows provide gentle light perfect for propagation, while south and west windows may need sheer curtains to diffuse intensity.
- Post rooting transition: Increase light exposure step by step over 2-3 weeks once roots establish, moving plants closer to brighter locations bit by bit.
Temperature Control
- Optimal range: Maintain rooting media temperature between 75-80°F (24-27°C) for fastest root development according to Penn State Extension research on propagation.
- Cold sensitivity: Avoid placing cuttings on cold windowsills or near drafts, as temperatures below 60°F (15.5°C) slow or halt root formation.
- Heat mats: Seedling heat mats placed under propagation trays can raise soil temperature 10-15°F (5.5-8°C) above ambient room temperature.
- Night temperatures: Slight temperature drops at night of 5-10°F lower are acceptable and may help root initiation according to horticultural research.
Tools and Supplies
- Cutting tools: Use sharp, clean scissors, pruning shears, or a razor blade sterilized with rubbing alcohol between cuts to prevent disease transmission.
- Rooting hormone: Optional but can speed root development, available as powder, gel, or liquid formulations at garden centers and nurseries.
- Propagation trays: Low profile trays or small individual pots work well, allowing you to monitor each cutting and separate successful ones with ease.
- Spray bottle: A fine mist sprayer helps moisten soil surface without overwatering, keeping the top layer a bit damp where roots will form.
The Science Behind Root Formation
Your succulent cuttings don't sprout roots by accident. Root development involves a chain of chemical signals inside the plant. When you cut a stem or twist off a leaf, you trigger an internal alarm that sets the process in motion.
Plant hormones act like messengers telling cells what to become. Auxin is the main driver of adventitious roots in cuttings. Within 30 minutes of cutting, jasmonic acid peaks in the tissue. Annals of Botany research shows this acid starts the whole rooting process.
Callus formation happens first at the cut site. This bumpy tissue looks rough and white or tan in color. The callus protects the wound and holds meristem tissue that turns into root cells. Without proper callusing, moisture enters and causes rot before roots form.
Succulents root well because they store water and food in their leaves. Haseltonia research shows that cut leaves stay alive for a long time. The thick tissue keeps cells fed while root development happens over several weeks.
Temperature affects how fast plant hormones work in your cuttings. Warmer air speeds up the chemical reactions that lead to rooting. This is why cuttings taken in spring and summer form adventitious roots faster than those taken in winter.
Knowing the science helps you fix problems when things go wrong. If your cuttings rot, the callus formation didn't protect the wound well enough. If they shrivel without rooting, the meristem tissue may have been hurt during removal. The why behind it makes fixing issues much easier.
Species Success Rates and Timing
The species you choose matters more than your technique. I wasted months trying to propagate Aloe vera from leaves before learning it doesn't work that way. MSU Extension confirms Aloe leaves won't root because they lack the right cell structure. Picking the best succulents to propagate saves you time and frustration.
Rooting times vary a lot between species. In my tests, Senecio roots fastest at about 21 days while Kalanchoe takes around 53 days to form roots. If you want quick results, propagate Echeveria or propagate Sedum. Both respond well to leaf cuttings.
In my experience, Sedum is one of the easiest succulents to propagate from leaves. Ghost Plant and Moonstone types also root fast for beginners. When you propagate jade plant, try stem cuttings first. Aeonium won't root from leaves at all, so use stems only for that one.
Troubleshooting Common Problems
All growers have succulent propagation problems at some point in their journey. I've had batches where half the leaves turned to mush. If you ask why won't my succulent propagate, the cause is usually one of a few common issues.
Succulent cutting rot happens when fresh cuts touch wet soil too soon. MSU Extension found that skipping the callusing step leads to propagation failure most of the time. No roots forming can also mean the temperature is too cold or the leaf base was torn.
The good news is that most problems have simple fixes once you know the cause. Below are the issues I see most often and how to solve each one fast.
Cuttings Rotting Before Rooting
- Cause: Planting fresh cuttings without allowing 4-7 days for callus formation lets moisture enter the wound and promotes bacterial or fungal infection.
- Solution: Let cut surfaces dry all the way until a tough dry skin forms over the wound before any contact with soil or moisture.
- Prevention: Use well draining soil, water less during rooting phase, and avoid misting on cut surfaces.
- Recovery: If rot starts, cut above the rotted section into healthy tissue, let callus form again, and restart the process.
Leaves Shriveling Without Rooting
- Cause: Leaf removal left the meristem cells behind on the stem, meaning the leaf lacks the tissue needed to generate new growth.
- Solution: Ensure leaves come away with a clean base by using a twisting motion rather than pulling straight off.
- Environmental factor: Very low humidity can also cause shriveling before roots form, so consider covering with a clear dome for a short time.
- Species issue: Some species like Aeonium cannot propagate from leaves no matter what technique you use. Try stem cuttings instead.
Roots Form But No New Growth
- Cause: The limiting factor is often bud formation rather than root development according to Flower Research Journal research.
- Patience required: New rosettes may take 4-8 weeks to appear after roots form, even longer in slow growers like Kalanchoe.
- Light adjustment: Not enough light delays shoot development, so ensure bright indirect exposure once roots establish.
- Solution: Maintain consistent care and wait, as forcing growth with fertilizer before shoots appear can cause nutrient burn.
Slow or No Root Development
- Temperature cause: Rooting slows a lot below 70°F (21°C) since optimal temperatures are 75-80°F (24-27°C) according to Penn State research.
- Timing cause: Propagating during winter dormancy when plants reduce growth hormones leads to poor root formation.
- Solution: Use a seedling heat mat to raise soil temperature and wait until spring for best results.
- Rooting hormone: Apply powder or gel rooting hormone to the callused end before planting to speed up root initiation.
Fungal Growth on Soil or Cuttings
- Cause: Too much water combined with poor air circulation creates humid conditions that favor fungal growth on the soil.
- Solution: Allow soil to dry all the way between light waterings and ensure good airflow around cuttings.
- Prevention: Use sterile soil mix, clean containers, and avoid overcrowding cuttings in propagation trays.
- Treatment: Remove affected cuttings at once, let healthy ones dry out, and consider applying cinnamon powder as natural antifungal.
Post-Propagation Care
You made it through the hard part of growing roots, but caring for baby succulents takes a gentle touch in those first months. I've killed more plants at this stage than during propagation by giving them too much water too fast. The transition from cutting to full plant needs slow changes to work well.
When to repot propagated succulents depends on size and root growth. Wait until the baby plant reaches at least 1 inch across with roots you can see coming out of the drainage hole. Rushing this step often leads to transplant shock that sets your plants back several weeks.
Watering new succulents is tricky because their roots are small and tender. Start with light misting every 5-7 days rather than deep soaking. As roots grow stronger over 2-3 months, you can switch to normal watering where you soak the soil and let it dry all the way between drinks.
Light needs change as your plants mature. Keep baby plants in bright indirect light for the first month after roots form. Then move them step by step toward more direct sun over 2-3 weeks. This gradual shift when transplanting propagated succulents prevents leaf burn and stress.
Hold off on fertilizer until your baby plant is at least 3-4 months old with active new growth. Young roots burn fast from nutrients they can't handle yet. When you do start feeding, use half strength fertilizer once a month during the growing season.
From leaf to full 4-5 inch plant takes about 9-12 months with good care. The wait feels long but each small rosette represents a free plant you grew on your own. I find the slow progress makes me value these plants more than any I bought at a store.
5 Common Myths
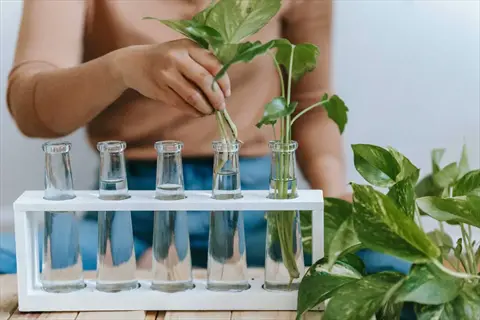
Succulents propagate better in water because you can see the roots growing and monitor their progress easily
Most succulents do not root well in water according to Iowa State University Extension research, and water-grown roots often fail to adapt when transplanted to soil
You can plant fresh succulent cuttings directly into soil as long as you water them immediately to help them recover
Fresh cuttings must callus for 4-7 days before planting because moist soil touching an open wound causes rot and bacterial infection
All succulents can be propagated from a single leaf which makes them the easiest plants to multiply at home
Many popular succulents including Aloe vera, Aeoniums, and Agaves cannot propagate from leaves and require stem cuttings, division, or offsets instead
Succulent cuttings need full direct sunlight immediately after cutting to stimulate strong root growth and prevent stretching
Direct sunlight dries out cuttings before roots can form and causes stress, so bright indirect light is recommended until the plant establishes roots
Rooting hormone is essential for succulent propagation and cuttings will fail without applying it to the cut surface
Rooting hormone is optional for most succulents according to university extension sources since these plants naturally produce the auxins needed for root development
Conclusion
You now have a complete guide to help you propagate succulents with real success. The three main methods cover almost any plant you own. Leaf cuttings work for thick fleshy species. Stem cuttings handle plants that won't root from leaves. Division and offsets give you instant plants with roots already in place.
The biggest lesson from this guide is that patience prevents failure. Give your cuttings 4-7 days to callus before any soil contact. Wait 2-4 weeks for roots to form without poking or prodding. Most rot happens when growers rush these steps because waiting feels like doing nothing.
For beginner propagation, start with easy plants. In my experience, Echeveria and Sedum are the best picks. Ghost Plant works well too. These forgive mistakes and root fast to keep you excited. Once you get good at succulent propagation, try pickier types.
Every time you propagate succulents, you turn one plant into many for free. I started with three plants and now have hundreds from free cuttings and leaves. Knowing the science helps you fix problems when growing succulents from cuttings. Now grab a leaf, twist it off clean, and start your own collection.
External Sources
Frequently Asked Questions
What is the most effective method for propagating succulents?
Stem cuttings are generally the most effective and fastest method for propagating succulents, producing rooted plants in 2-4 weeks. However, the best method depends on the species since some succulents only propagate well through division or offsets.
Can succulent cuttings be planted directly in soil?
Succulent cuttings should not be planted directly in soil. The cut surface needs 4-7 days to form a callus (protective dry layer) before planting. Planting a fresh cutting in moist soil leads to rot.
Is water or soil propagation better for succulents?
Soil propagation is generally better for succulents according to university extension research. Most succulents do not root well in water and the roots that form in water often struggle when transplanted to soil.
How long does root development take in new cuttings?
Root development typically takes 2-4 weeks for most succulent cuttings under optimal conditions. Rooting times vary by genus with Senecio rooting fastest at around 21 days and Kalanchoe taking up to 53 days.
Why are certain succulents illegal to propagate?
Some succulents are protected under CITES (Convention on International Trade in Endangered Species) or local conservation laws. Collecting or propagating wild specimens of protected species like certain Dudleya or rare cacti without permits is illegal.
Do succulent propagations require direct sunlight?
Succulent propagations need bright indirect light rather than direct sunlight. Direct sun can dry out cuttings before roots form. After roots develop, gradually introduce more light over several weeks.
Which succulents cannot be propagated from leaves?
Several popular succulents cannot propagate from leaves:
- Aloe vera and most Aloe species
- Aeoniums which only work from stem cuttings
- Agaves which propagate through offsets or seeds
- Most Haworthia species
- Sansevierias which need division or rhizome cuttings
How can I accelerate root growth in cuttings?
You can accelerate succulent root growth by maintaining temperatures of 75-80F (24-27C), using rooting hormone powder, ensuring bright indirect light, keeping soil barely moist, and propagating during spring or summer growing season.
Can you replant succulents without existing roots?
Yes, succulents can be replanted without roots. Allow the cut end to callus for 4-7 days, then place in well-draining soil. The plant will develop new roots from the stem tissue within 2-4 weeks.
When is the best season to propagate succulents?
Spring through early summer is the best season for succulent propagation. This coincides with the plant's active growing period when hormone levels support root and shoot development. Avoid propagating during winter dormancy.