
Introduction
You push your shovel into the ground after a heavy rain and it stops cold against dense, sticky earth. Water pools on the surface for hours instead of draining down where roots need it. If this sounds like your yard, you need to learn how to improve clay soil: essential steps that turn this heavy soil into a thriving garden where plants grow strong.
Clay works like a bank vault for nutrients rather than a garden curse. Those tiny particles measure less than 0.002 millimeters across. This makes them over 1000 times smaller than sand grains. Their small size creates a negative charge that grabs and holds potassium, calcium, and magnesium. Sandy ground loses these minerals fast when rain washes through, but clay keeps them locked up safe for your plants to use all season.
I spent 3 years fighting my heavy ground instead of working with it. My neighbors with sandy beds hauled in fertilizer bags every spring just to keep their vegetables fed. Meanwhile, my tomatoes and peppers thrived on nutrients the earth held from the year before. The real secret is changing soil structure through organic matter instead of trying to alter what the ground is made of.
More gardeners now want to build up their existing beds rather than trucking in new dirt. Buying replacement earth costs a fortune and often brings new problems with it. The steps ahead show you proven methods from university research. Real gardeners have used these same approaches for years with great results.
Essential Steps to Improve Clay
The path to improve clay soil follows a clear sequence of steps. Each action builds on the one before to create lasting clay soil improvement rather than quick fixes that fade. Missouri Extension research shows you need 1 to 4 inches of organic material. Work that into the top 6 to 10 inches of earth.
Timing matters more than most guides tell you. Iowa State pinpoints April or September as the best months for aeration work. Oregon State confirms that soil amendments need at least annual applications to hold their gains. Skip a year and your ground starts sliding back toward its original dense state.
Test Your Soil First
- Why test: Knowing your soil's current pH, organic matter content, and clay percentage guides your choices. This prevents wasted effort on the wrong treatments.
- Simple ribbon test: Roll moist soil between your palms to form a ribbon. Clay soil ribbons extend 2 inches (5 centimeters) or more before breaking.
- Drainage check: Dig a hole 12 inches (30 centimeters) deep, fill with water, and time how long it takes to drain. Water should drain within 8 hours.
- Lab testing: Contact your local extension office for soil testing services that reveal pH, nutrient levels, and organic matter percentage.
Add Organic Matter
- Application rate: Spread 2 to 3 inches (5 to 7.6 centimeters) of compost, aged manure, or leaf mold over the soil surface before working it in.
- Depth matters: Work amendments into the top 6 to 10 inches (15 to 25 centimeters) of soil to ensure roots can access the improved zone.
- Best materials: Aged compost, rotted manure, leaf mold, and composted bark all improve clay structure.
- Annual commitment: Organic matter breaks down over time. You need yearly applications to maintain the structural gains.
Time Your Soil Work Right
- Moisture test: Squeeze a handful of soil. If it crumbles apart, conditions are right. If it forms a sticky ball, wait for drier conditions.
- Spring timing: Work amendments in spring after soil dries enough to crumble but before planting season begins in your area.
- Fall advantage: Fall applications allow amendments to blend over winter. Freeze and thaw cycles help break up clay clumps on their own.
- Avoid wet clay: Working wet clay destroys structure, smears particles together, and creates hardpan that takes years to correct.
Consider Raised Beds for Problem Areas
- When to choose raised beds: If clay compaction is severe or drainage problems persist despite amendments, raised beds let you bypass the issue.
- Bed depth: Build beds at least 12 inches (30 centimeters) deep and fill with quality garden soil mixed with compost.
- No barrier needed: Skip landscape fabric at the bottom because roots will grow into amended native soil below over time.
- Long term blending: Worms and soil organisms mix raised bed soil with native clay bit by bit, improving the base ground over the years.
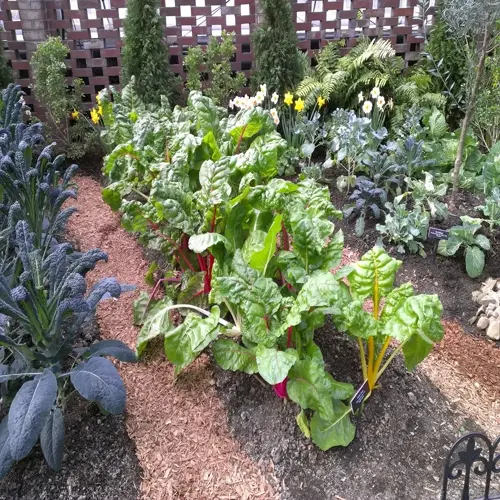
Mulch to Protect Your Progress
- Surface protection: Apply 2 to 4 inches (5 to 10 centimeters) of organic mulch to prevent clay from crusting and compacting after rain.
- Material choices: Shredded leaves, wood chips, straw, and grass clippings all protect soil while adding organic matter as they break down.
- Keep mulch away from stems: Leave a 2 inch (5 centimeter) gap around plant stems to prevent rot and pest problems.
- Continuous addition: Top up mulch each year as it breaks down. This feeds the soil improvement cycle without extra tilling.
I learned these steps through trial and error over 5 years of clay gardening. Test first so you know your starting point. Add organic matter and time your work right. Protect your progress with mulch. Each piece supports the others for results that last.
Understanding Clay Soil
The key to working with clay lies in knowing what you can change and what you cannot. Soil texture refers to the size of particles in your ground. This stays fixed no matter what you add. Soil structure describes how those particles clump together. This is where your work pays off.
Clay particles act like tiny magnets. They carry negative charges on their surfaces that grab nutrients with positive charges. Potassium, calcium, and magnesium stick to clay instead of washing away with rain. Sandy soils lack this nutrient retention power and lose their fertility fast.
Utah State Extension classifies soils with more than 30% clay as unacceptable topsoil. Yet many of us garden in this exact type of ground. The dense nature of heavy clay soil makes digging hard and drainage slow. Rain sits on top instead of soaking down to roots.
I used to curse my clay every spring when my shovel bounced off the ground. Then I learned that those same clay soil characteristics that made digging hard also kept my plants fed. The tight grip clay has on nutrients meant my vegetables got steady meals all season long.
Your goal is to change soil structure without trying to alter soil texture. You cannot turn clay into loam by adding sand or other materials. What you can do is create spaces between those tiny clay particles where air and water can move through. Organic matter does this job better than any other tool.
Think of your clay garden as a long term project rather than a quick fix. Each year of adding compost and other amendments builds on the last. The texture stays clay, but the structure opens up. Your plants get the best of both worlds with steady nutrients and better drainage.
Best Organic Amendments for Clay
Not all clay soil amendments cost the same or work the same way. Oregon State research shows you need 2 to 3 inches of organic matter spread on beds each year for best results. The table below compares your main options from free sources to store bought products.
I have used every type of amendment listed here over my years of clay gardening. Compost gives the best balance of nutrients and structure for most situations. Leaf mold costs nothing if you have trees and works wonders on heavy ground. Aged manure adds nitrogen but needs proper aging to avoid burning plants.
Many cities now offer free or cheap compost through local programs. I got 3 cubic yards free from my town last spring. Check with your waste office before you buy from garden centers. Composted bark works well for paths between beds where you want coverage that lasts.
Cover Crops That Break Up Clay
Cover crops work like biological tillers that break up clay without you lifting a shovel. Their roots push through dense soil and create channels for water and air. When these plants die back, their roots rot and leave hollow tubes that improve drainage for years.
I started using green manure crops 4 years ago after my back gave out from digging. Daikon radish roots punched through clay that my spade could not crack. The next spring, my soil crumbled in my hands for the first time ever.
Daikon Radish (Tillage Radish)
- Root action: Taproots grow 12 to 24 inches (30 to 60 centimeters) deep to break through compacted clay layers.
- Decay benefit: Roots die over winter and rot. This leaves channels that boost water flow and root growth.
- Planting window: Sow in late summer or early fall, 4 to 6 weeks before first frost for best root growth.
- No removal needed: Leave roots in place over winter. Pulling them destroys the drainage channels they created.
Crimson Clover
- Nitrogen fixing: Bacteria on roots turn air nitrogen into plant food. This cuts your need for added fertilizer.
- Organic matter: Dense top growth adds a lot of organic matter when you turn it under or leave it as mulch.
- Pollinator support: Bright red flowers feed bees and helpful insects before you turn the crop under.
- Fall planting: Sow in fall in mild climates or early spring in cold regions for best growth.
Annual Ryegrass
- Fibrous roots: Dense root systems create thousands of tiny channels through the clay soil.
- Fast growth: Seeds sprout in 5 to 7 days and give quick soil coverage to prevent erosion.
- Winter hardy: Survives cold winters in most regions and starts growing again in early spring.
- Easy to kill: Mow before seed heads form and turn under. Or smother with mulch for no dig gardens.
Winter Peas (Austrian Peas)
- Deep roots: Roots reach 3 to 4 feet (0.9 to 1.2 meters) deep to break layers that other crops cannot reach.
- Nitrogen boost: These peas fix 100 to 150 pounds (45 to 68 kilograms) of nitrogen per acre when you add the right bacteria.
- Cold tough: Plants survive temps down to 10 degrees Fahrenheit (minus 12 degrees Celsius) once set.
- Spring turn under: Work plants into soil before planting your main garden crops to release nutrients.
Clover and peas add nitrogen through nitrogen fixation while their roots work the soil. Ryegrass creates dense root networks that loosen clay without the deep tap roots of radishes. Mix different cover crops to get benefits from each type.
How to Test and Fix Drainage
A simple drainage test tells you exactly what your soil needs before you spend money on fixes. Dig a hole about 12 inches deep and wide. Fill it with water and let it drain. Then fill it again and time how long the second fill takes to empty.
Maryland Extension says water should drain within 8 hours for healthy plant roots. Utah State research shows clay soil drainage rates range from 0.01 to 0.5 inches per hour. If your hole still holds water after a full day, you have serious drainage problems to address.
I ran this test across 6 spots in my yard when I first moved in. Two areas drained in 4 hours. Three took over 24 hours. The worst spot held water for 3 days. This told me where to focus my efforts and where to build raised beds instead.
To improve drainage in problem areas, start by adding 3 to 4 inches of compost and working it deep. Test again after a year of amendments. If water infiltration stays slow, try raised beds instead. You can also redirect surface water away from that spot.
Watch how water moves across your yard during heavy rain. Puddles show you where clay sits tightest. Slope your beds away from these areas to keep roots from sitting in soggy ground. Sometimes the fix is changing where you plant rather than fighting the soil.
Repeat your drainage test each spring to track your progress. As organic matter builds up, you should see faster drain times each year. This simple check costs nothing but shows you if your hard work is paying off.
5 Common Myths
Adding sand to clay soil will loosen it and improve drainage, making the soil easier to work with and better for plant roots.
Sand mixed with clay creates a cement-like consistency that worsens drainage and compaction. The tiny clay particles fill gaps between sand grains, creating an even denser material.
Gypsum is a universal solution for all clay soils and will break up heavy clay regardless of where you live or your soil conditions.
Gypsum only benefits sodic soils found mainly in arid western regions. University research confirms gypsum provides little to no benefit for clay soils in humid climates.
Once you improve clay soil with amendments, the improvement is permanent and you never need to add organic matter again.
Organic matter decomposes continuously, requiring annual applications to maintain soil structure improvements. Stop adding amendments and clay reverts to its original condition.
Tilling clay soil deeply and frequently is the best way to break up compaction and create loose, workable garden beds.
Frequent tilling destroys soil structure, kills beneficial organisms, and creates hardpan layers. Minimal disturbance with surface amendments preserves soil improvements longer.
Clay soil is terrible for growing plants because its dense structure prevents roots from spreading and accessing nutrients properly.
Clay soil holds nutrients and moisture better than sandy soil. Many plants thrive in clay, and its high fertility makes it excellent once structure improves through organic amendments.
Conclusion
Missouri Extension puts it simply: there is just one practical way to improve clay soil. Work in plenty of organic matter year after year. No fancy product or quick trick will do what steady compost additions achieve over time.
Your clay will not change into sandy loam no matter how much you add. The texture stays the same. But the soil structure transforms into something you can work with and plants can thrive in. Expect to see real clay soil improvement after 1 to 3 years of annual applications.
I spent 5 years turning my worst clay patch into my best garden bed. Those dense spots that broke shovels now crumble in my hands each spring. The wait was worth it because clay that holds water also holds nutrients better than any other soil type.
Your patience will pay off in a garden that needs less water and fertilizer once you get past the hard early years. Stick with your annual compost routine and watch your clay transform into the rich, workable ground you want.
External Sources
Frequently Asked Questions
Can you turn clay soil into good soil?
Yes, you can transform clay soil into productive garden soil by adding organic matter consistently over multiple years, though the clay particles themselves remain unchanged.
What's the fastest way to improve clay soil?
Adding 2 to 3 inches (5 to 7.6 centimeters) of compost worked into the top 6 to 10 inches (15 to 25 centimeters) provides the quickest improvement, though visible results take at least one growing season.
Does gypsum work for all clay soils?
No, gypsum only benefits sodic soils found mainly in arid western regions. For most gardeners, organic matter provides better results than gypsum applications.
How long does clay soil improvement take?
Noticeable improvement takes 1 to 3 years of consistent annual organic matter additions, with ongoing maintenance required to sustain the benefits.
Can I just add topsoil over clay?
Adding topsoil over clay creates drainage problems at the interface between layers. Mixing amendments into existing clay produces better long-term results.
What plants grow best in clay soil?
Many plants thrive in clay including daylilies, coneflowers, asters, roses, River Birch, Red Maple, and vegetables like brassicas and beans.
Is tilling recommended for clay soil?
Tilling wet clay destroys structure and creates hardpan. Only work clay when it crumbles in your hand, and consider no-till methods for established beds.
How to improve clay soil drainage?
Organic matter improves drainage by creating air pockets and channels. Raised beds, proper grading, and cover crops provide additional drainage solutions.
Are coffee grounds good for clay soil?
Coffee grounds add organic matter to clay soil when composted first. Apply sparingly and mix with other amendments rather than using them alone.
What's the cheapest clay soil amendment?
Fallen leaves, grass clippings, and homemade compost cost nothing and effectively improve clay. Municipal compost programs often provide free or low-cost materials.