
Introduction
Few things beat pulling bright golden rhizomes from your own pot after months of patient waiting. This guide shows you how to grow turmeric indoors successfully. These steps work for any home space or apartment.
I started my indoor turmeric growing journey five years ago in a small apartment. My only space was one sunny window near the kitchen. That was enough to get started with this rewarding plant. University of Vermont Extension data shows plants grow 3 to 4 feet tall. They adapt well to pots when you give them warmth and light.
Most guides miss a key fact about this plant. You can grow it in any climate zone with the right setup at home. Think of it like hosting a tropical guest. Give it warmth, moisture, and patience. It will reward you with culinary gold at harvest time when autumn arrives and the leaves fade back.
This guide walks you through container turmeric from planting to harvest day. You will master turmeric plant care. More people now grow medicinal plants at home for fresh spices and natural remedies. This golden root is a top pick for health focused gardeners who want better food and wellness options at home all year long.
Step-by-Step Indoor Planting
Most gardeners find success when starting turmeric from rhizome. I have planted dozens of batches over the years. The process follows a clear path from picking good stock to getting green shoots. UC Master Gardeners note you should cut rhizomes into 1 to 3 inch pieces with at least 2 buds each.
Good rhizome preparation helps a lot when planting turmeric rhizomes. Wash store bought pieces well to remove growth retardants. The callusing step after cutting seals the wound. This dried surface blocks soil pathogens from entering.
Pre-sprouting turmeric on damp paper towels gives you a head start before planting day. Getting the turmeric planting depth right matters a lot too. Place pieces 2 to 4 inches deep with buds facing up. The steps below walk you through each stage of the indoor planting process.
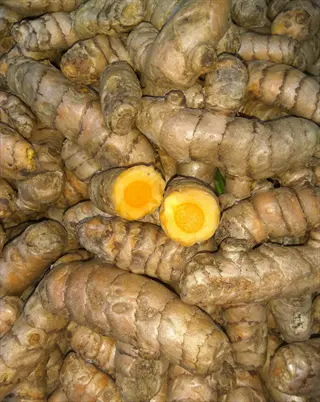
Select Quality Rhizomes
- What to look for: Choose plump, firm turmeric rhizomes with visible growing points called eyes or buds that indicate active growth potential.
- Source options: Purchase organic rhizomes from garden centers, online suppliers, or select healthy specimens from grocery stores.
- Organic advantage: Organic turmeric lacks growth inhibitors commonly applied to commercial rhizomes during shipping and storage.
- Size matters: Select pieces weighing at least 1-2 ounces (28-57 grams) with multiple buds for stronger initial growth.
- Freshness check: Avoid rhizomes with soft spots, mold, or shriveled skin, as these indicate age or disease problems.
- Quantity planning: Start with 3-5 rhizome pieces per 12-inch (30-centimeter) container for a meaningful harvest.

Prepare Rhizomes for Planting
- Wash thoroughly: Rinse grocery store turmeric under warm water with a vegetable brush to remove any growth retardant chemicals.
- Cut strategically: Divide large rhizomes into 1-3 inch (2.5-7.5 centimeter) pieces, ensuring each piece has at least 2-3 healthy buds.
- Callusing process: Allow cut pieces to air dry for 1-2 days in a warm location until cut surfaces form a protective layer.
- Why callusing works: The dried surface prevents soil pathogens from entering through fresh cuts and causing rot.
- Pre-sprouting option: Place rhizomes on damp paper towels in a warm area at 72-80 degrees Fahrenheit (22-27 degrees Celsius) to encourage early sprouting.
- Timing consideration: Begin preparation 2-3 weeks before your planned planting date to allow for proper callusing and potential pre-sprouting.

Choose the Right Container
- Size requirement: Select containers at least 12 inches (30 centimeters) in diameter and 12 inches deep to accommodate spreading rhizomes.
- Drainage essential: Ensure containers have multiple drainage holes to prevent waterlogging that causes rhizome rot.
- Material options: Fabric smart pots, plastic containers, or glazed ceramic pots all work well for indoor turmeric cultivation.
- Width over depth: Turmeric rhizomes spread horizontally rather than deeply, so wider containers yield better harvests.
- Multiple plants: Use containers 18-24 inches (45-60 centimeters) wide when planting 3-5 rhizome pieces together.
- Saucer consideration: Place containers on saucers with pebbles to catch drainage and increase humidity around plants.
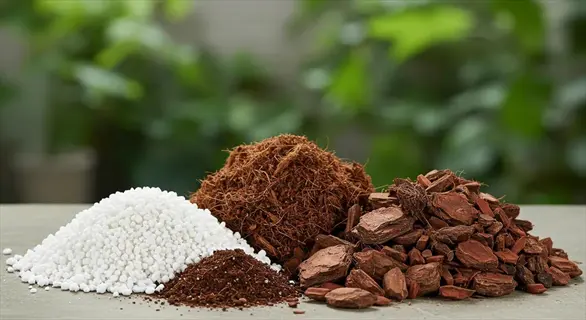
Prepare Ideal Soil Mix
- Soil composition: Mix equal parts quality potting soil, compost, and perlite for excellent drainage and nutrition.
- pH preference: Turmeric prefers neutral to slightly acidic soil with a pH between 6.0 and 7.0 for optimal nutrient uptake.
- Organic matter: High organic content supports the beneficial soil microorganisms that help turmeric rhizomes thrive.
- Avoid compaction: Loose, well-draining soil allows rhizomes to expand freely without resistance during the growing season.
- Fertilizer base: Mix slow-release organic fertilizer into the soil according to package directions before planting.
- Fill level: Add soil mix to within 2 inches (5 centimeters) of the container rim, leaving space for watering.
Plant Rhizomes Correctly
- Planting depth: Position rhizomes 2-4 inches (5-10 centimeters) below the soil surface with buds pointing upward.
- Spacing guidance: Place multiple rhizomes 4-6 inches (10-15 centimeters) apart to allow room for expansion.
- Bud orientation: The growing points must face upward to ensure sprouts reach the surface without obstruction.
- Initial coverage: Cover rhizomes completely with soil and press gently to eliminate air pockets around pieces.
- Marking locations: Note where each rhizome is planted to avoid disturbing them while waiting for sprouts.
- First watering: Water thoroughly after planting until moisture drains from bottom holes, then allow soil to settle.
Create Optimal Growing Conditions
- Warmth priority: Place containers in locations maintaining 68-86 degrees Fahrenheit (20-30 degrees Celsius) consistently.
- Light placement: Position near south-facing windows receiving 6-8 hours of bright light, supplementing with grow lights if needed.
- Humidity boost: Group plants together or use pebble trays with water to increase humidity around developing turmeric.
- Patience required: Expect sprouting in 3-8 weeks, with turmeric often taking longer than ginger to emerge.
- Minimal watering initially: Keep soil lightly moist but not wet until green shoots appear above the soil surface.
- Protection from cold: Keep containers away from drafty windows or doors where temperatures drop below 60 degrees Fahrenheit (15 degrees Celsius).
Containers and Soil Setup
Picking the best pot for turmeric and the right soil mix sets you up for a good harvest later. I have tested many setups over the years. Turmeric soil requirements include loose, well-drained soil with high organic matter. The pH should sit between 6.0 and 7.0 for best results.
Your plants need room to spread out since rhizomes grow sideways rather than down. Wide pots beat deep ones for container turmeric. Chicken manure works great as an organic addition. This suggests the plant loves high nitrogen soil when given the choice.
Good turmeric potting soil should drain fast but still hold some moisture for the roots. Mix equal parts potting soil, compost, and perlite for a blend that works well. The chart below compares common container materials to help you pick the right one for your space and goals.
My top choice is fabric smart pots for well-drained soil turmeric needs. They let air reach the roots and stop plants from getting root bound. You can find them cheap at most garden stores or online.
Light and Temperature Needs
Getting turmeric light requirements and turmeric temperature needs right helps your plant grow well. Think of it like giving your plant a tropical vacation at home. NC A&T University research shows rhizomes grow larger in full sun. But 2 to 5 hours of direct light works fine for most setups.
You can grow turmeric in cold climate areas as long as you keep plants warm inside. Turmeric frost tolerance is zero since any frost kills the foliage. University of Vermont notes the minimum safe temp is 50°F (10°C) for this tropical plant. Keep your plant away from cold drafts at all times.
You need good indoor turmeric lighting. This matters most during winter when daylight hours shrink. A south facing window gives the best natural light in the Northern Hemisphere. Add grow lights when windows alone fall short. The guide below covers each climate factor you need to manage.
Temperature Range Management
- Optimal range: Maintain temperatures between 68-86 degrees Fahrenheit (20-30 degrees Celsius) for active growth throughout the season.
- Minimum threshold: Never allow temperatures to drop below 50 degrees Fahrenheit (10 degrees Celsius) as this causes plant damage and growth stoppage.
- Sprouting warmth: Rhizomes require 72-80 degrees Fahrenheit (22-27 degrees Celsius) for 4-6 weeks to initiate sprouting successfully.
- Winter considerations: Growth slows or stops below 60 degrees Fahrenheit (15 degrees Celsius), though plants survive dormancy.
- Heat sources: Position containers near heat vents during winter while avoiding direct blasts of hot air that dry foliage.
Natural Light Requirements
- Daily minimum: Provide at least 2-5 hours of direct sunlight daily, with 6-8 hours producing larger rhizome yields.
- Window selection: South-facing windows offer the strongest light in the Northern Hemisphere for year-round growing success.
- Shade tolerance: Turmeric tolerates partial shade better than many tropical plants, making it suitable for less bright locations.
- Research backing: NC A&T University studies confirm plants in full sun produce larger rhizomes than those in shade.
- Seasonal shifts: Rotate containers quarterly to ensure even light exposure on all sides of the growing plant.
Grow Light Supplementation
- When needed: Supplement natural light during winter months or in apartments with limited window access for continued growth.
- Light type: Full-spectrum LED grow lights provide the wavelengths turmeric needs without excessive heat generation.
- Duration: Run grow lights for 10-12 hours daily to simulate tropical day length when natural light falls below 6 hours.
- Positioning: Place lights 12-18 inches (30-45 centimeters) above plant canopy, adjusting height as plants grow taller.
- Energy efficiency: Modern LED grow lights use minimal electricity while providing sufficient intensity for tropical plants.
Humidity Management
- Ideal range: Turmeric prefers humidity levels between 50-70%, higher than typical indoor environments in winter.
- Pebble trays: Place containers on trays filled with pebbles and water to increase localized humidity as water evaporates.
- Grouping plants: Cluster turmeric with other tropical plants to create a microclimate with naturally higher humidity.
- Misting caution: Avoid excessive leaf misting which can promote fungal diseases in poorly ventilated indoor spaces.
- Humidifier option: Small humidifiers near plant groupings help maintain consistent moisture levels during dry winter months.
Daily Care and Maintenance
Good turmeric plant care does not require much time once you build a routine. I spend about 5 minutes a day checking on my plants during the active season. You will get better at turmeric maintenance.
Your turmeric water requirements change with the seasons. Keep your soil moist but never soggy to avoid rot. Fertilizing turmeric every 6 to 8 weeks helps a lot. Use a nitrogen rich feed during active growth for bigger roots.
Your turmeric humidity needs matter a lot when you grow indoors. Most homes run dry in winter when heating systems kick on. Group your tropical plants together to raise moisture levels. The seasonal guide below breaks down your care tasks for each growth phase.
Spring Care (Planting Season)
- Planting timing: Begin planting rhizomes in early spring when indoor temperatures naturally warm and daylight hours increase.
- Watering approach: Keep soil lightly moist but not wet until sprouts emerge, typically reducing watering frequency during this period.
- Warmth focus: Maintain consistent warmth between 72-80 degrees Fahrenheit (22-27 degrees Celsius) to encourage sprouting within 3-8 weeks.
- Patience required: Avoid the urge to dig up rhizomes to check progress, as disturbance can damage developing root systems.
- Light optimization: Ensure containers receive maximum available natural light as days lengthen through the spring season.
Summer Care (Active Growth)
- Watering increase: Water more frequently as plants grow actively, checking soil moisture every 2-3 days in warm conditions.
- Fertilizer application: Apply balanced liquid fertilizer or nitrogen-rich amendments every 6-8 weeks during active growth periods.
- Hilling technique: Add additional soil around plant bases as they grow to encourage more rhizome development below the surface.
- Heat awareness: Move containers away from direct afternoon sun if temperatures exceed 90 degrees Fahrenheit (32 degrees Celsius).
- Growth monitoring: Expect plants to reach 2-3 feet (60-90 centimeters) tall with broad, dark green leaves by midsummer.
Fall Care (Pre-Harvest)
- Reduced watering: Gradually decrease watering frequency as plant growth slows and leaves begin yellowing naturally.
- Stop fertilizing: Cease fertilizer applications 6-8 weeks before expected harvest to allow rhizomes to mature properly.
- Temperature monitoring: Ensure plants stay above 60 degrees Fahrenheit (15 degrees Celsius) as outdoor temperatures drop.
- Dormancy signs: Watch for yellowing leaves and drooping stems, which indicate the plant is preparing for dormancy.
- Light reduction: Natural light decrease triggers dormancy cues, helping rhizomes reach full maturity before harvest.
Winter Care (Harvest and Rest)
- Harvest timing: Harvest rhizomes in late fall or early winter once foliage has died back completely and naturally.
- Dormancy management: Plants may go dormant due to reduced light and cooler temperatures, which is normal indoor behavior.
- Storage alternative: Leave some rhizomes in soil for spring regrowth rather than harvesting the entire plant.
- Minimal watering: Water dormant plants sparingly, just enough to prevent complete soil dryness during the rest period.
- Planning ahead: Save healthy rhizome pieces from harvest to plant in early spring for the next growing cycle.
Harvesting and Storing Turmeric
Knowing when to harvest turmeric is key to getting the best flavor and potency from your crop. Watch for yellowing leaves and dying foliage as your main signals. University of Florida notes that harvest time falls in late fall or early winter when plants go dormant. This lines up with natural indoor light cycle changes.
Learning how to harvest turmeric is simple once you know what to look for. Tip the pot over onto a tarp or into a large bin. Gently shake loose the soil and pull out the rhizomes. USDA data shows indoor yields range from 235 to 1700 grams per plant based on growing conditions.
Storing fresh turmeric the right way keeps your harvest usable for months. Fresh rhizomes last up to 3 months in the fridge. Freezing turmeric extends that to 6 months. See the chart below for turmeric preservation. Pick what works best for you.
Save a few healthy rhizome pieces from your harvest to replant in early spring. This gives you a free supply of starter stock for next year. Store these pieces in a cool, dry spot until planting time comes around again.
Troubleshooting Indoor Challenges
Even skilled growers run into turmeric problems now and then. I have dealt with my share of failures over the years. The key is spotting issues early and fixing them fast. Indoor plants face different challenges than outdoor ones do.
Turmeric not sprouting is the most common issue new growers face. Give your rhizomes at least 8 weeks before you worry. Watch out for overwatering turmeric plants. Soggy soil leads to rot and kills roots fast.
Focus on rhizome rot prevention by using well drained soil and pots with holes. UC Master Gardeners note that plants may go dormant inside due to low light and cool temps. This is normal behavior. See below for help with common turmeric problems.
Rhizomes Not Sprouting
- Temperature check: Ensure soil temperature stays consistently between 72-80 degrees Fahrenheit (22-27 degrees Celsius) for sprouting initiation.
- Patience required: Turmeric takes 3-8 weeks to sprout, longer than ginger, so wait at least 8 weeks before troubleshooting.
- Growth retardant: Grocery store turmeric may have growth inhibitors - wash thoroughly and consider soaking in warm water overnight.
- Rhizome viability: Check that planted pieces have visible buds and are firm, not soft or shriveled from age.
- Avoid overwatering: Keep soil moist but not wet during sprouting, as excessive moisture causes rot before emergence.
Yellowing Leaves During Growth
- Natural dormancy: Yellowing in fall is normal as plants prepare for dormancy triggered by shorter days and cooler temperatures.
- Overwatering signs: Yellow leaves during active growth often indicate too much water and potential root problems developing.
- Nutrient deficiency: Pale yellow leaves throughout the plant may signal nitrogen deficiency requiring fertilizer application.
- Light stress: Sudden yellowing after location changes may indicate light shock that resolves with gradual acclimatization.
- Check drainage: Ensure water flows freely from container bottoms, as blocked drainage causes root suffocation and yellowing.
Slow or Stunted Growth
- Temperature too low: Growth stops below 60 degrees Fahrenheit (15 degrees Celsius) - move plants to warmer locations.
- Insufficient light: Plants receiving less than 6 hours of bright light may grow slowly - add grow light supplementation.
- Root bound plants: Check if roots circle container bottoms, indicating need for larger pots to continue healthy growth.
- Nutrient depletion: Container soil loses nutrients faster than garden beds - maintain regular fertilizer schedule every 6-8 weeks.
- Variety differences: Some turmeric varieties naturally grow more compact than others, reaching only 2 feet tall indoors.
Root Rot and Fungal Issues
- Drainage improvement: Immediately improve drainage by adding perlite to soil or repotting into containers with more holes.
- Watering adjustment: Allow top 1-2 inches (2.5-5 centimeters) of soil to dry between waterings to prevent fungal conditions.
- Remove affected parts: Cut away soft, mushy rhizome sections with clean tools, allowing cuts to callus before replanting.
- Air circulation: Improve air movement around plants by spacing containers apart and avoiding crowded corners.
- Prevention focus: Always let cut rhizome pieces dry 1-2 days before planting to prevent initial rot establishment.
Dry Indoor Air Problems
- Humidity monitoring: Use a hygrometer to track humidity levels, aiming for 50-70% around turmeric plants.
- Pebble tray setup: Place containers on trays of pebbles with water to create localized humidity as water evaporates.
- Plant grouping: Cluster turmeric with other tropical houseplants to create a microclimate with naturally higher humidity.
- Brown leaf tips: Crispy brown leaf edges often indicate humidity too low, especially during winter heating season.
- Humidifier use: Small humidifiers placed near plant groupings effectively maintain moisture levels in dry indoor environments.
5 Common Myths
Turmeric needs full tropical sun and cannot possibly grow in apartments or homes with limited window access.
Turmeric tolerates partial shade and needs only 2-5 hours of direct sun daily, making it suitable for indoor growing with grow light supplementation.
You must purchase special turmeric rhizomes from garden centers because grocery store roots will never sprout successfully.
Grocery store turmeric can sprout successfully after washing thoroughly to remove growth retardants, though organic options often perform better.
Turmeric plants require constant daily watering and extremely humid conditions that are impossible to maintain indoors.
Turmeric prefers moist but not wet soil, requiring watering only when the top inch dries out, with normal household humidity being adequate.
Indoor turmeric harvests are so small they are not worth the 8-10 months of effort and container space required.
A single indoor plant can yield 235-1700 grams (8-60 ounces) of fresh rhizomes depending on variety and care, providing substantial harvests.
Turmeric roots must be planted at least 6 inches deep in soil or they will never develop proper rhizomes for harvest.
University extensions recommend planting rhizomes only 2-4 inches (5-10 centimeters) deep with the bud pointing upward for optimal growth.
Conclusion
You now have everything you need to grow turmeric indoors with success. The key factors are warmth between 68 to 86°F (20-30°C), enough light from windows or grow lamps, and soil that drains fast. Patience through the 8 to 10 month cycle pays off at turmeric harvest time.
Anyone can enjoy indoor turmeric growing no matter what climate zone they live in. A good container turmeric setup fits in any apartment or house with a sunny window. The plants look nice too with their large tropical leaves adding green to your space.
You will love home grown turmeric. It tastes far better than dried powder from stores. Fresh rhizomes pack more flavor and may offer stronger health benefits too. I still get excited each fall when I dump out my pots and see those bright golden roots waiting for me.
Spring is the best time to start your first batch. Quality rhizomes are easy to find at garden shops or grocery stores. Give this project a try and enjoy fresh turmeric from your own home for years to come.
External Sources
Frequently Asked Questions
Can turmeric be grown indoors as a houseplant?
Yes, turmeric adapts well to indoor container growing and can thrive as a houseplant when given proper warmth, light, and humidity.
Is grocery store turmeric suitable for planting?
Grocery store turmeric can grow, but you should wash it thoroughly to remove growth retardants applied during shipping.
How long does indoor turmeric take to mature?
Indoor turmeric takes 8-10 months from planting to harvest, with initial sprouting occurring within 3-8 weeks.
Should turmeric rhizomes be soaked before planting?
Soaking is not required, but allowing cut rhizome pieces to dry for 1-2 days before planting prevents rot.
What indicates turmeric is ready for harvest?
Turmeric is ready for harvest when leaves turn yellow and die back naturally in late fall or early winter.
How should fresh turmeric be stored after harvest?
Storage options include:
- Refrigerate wrapped in paper towel for up to 3 months
- Freeze whole or sliced for up to 6 months
- Dry and grind into powder for long-term storage
What are the daily care requirements for indoor turmeric?
Daily care involves checking soil moisture, ensuring adequate warmth, and providing consistent bright light.
Are there health risks from daily turmeric consumption?
This question involves medical topics best discussed with a healthcare provider for personalized guidance.
Can turmeric plants survive winter indoors?
Yes, turmeric survives winter indoors and may enter dormancy due to reduced light and cooler temperatures.
What distinguishes medicinal turmeric varieties?
Medicinal varieties differ primarily in curcumin content, ranging from 0.3 percent to 6.35 percent depending on genetics.