
Introduction
Want to create beautiful new plants from your favorite rose bushes without spending any money at the local nursery? This guide shows you How to Grow Roses from Cuttings (80% Success) with proven methods that work for any gardener. I tested these ways for over ten years in my own yard and know what works best. You can fill your garden with roses for free and share them with friends who love flowers too.
Iowa State University says cuttings are the best way to propagate roses at home. This works for both new and expert gardeners who want more plants in their yards. Rose propagation by this method makes millions of plants around the world each year. Success rates vary from 20% to 100% based on your method and timing. The approach you pick matters more than most other guides admit to their readers.
Taking a cutting captures a genetic snapshot of your favorite rose bush. Every bloom and trait stays the same in the new plant you grow from that stem. Own root roses can live 50 plus years while grafted ones from garden stores last only 8 to 15 years. This makes the skill worth your time to learn and practice well until you get good at it.
Nothing beats the reward of creating new plants through home gardening. You will learn which cutting types root best for your climate and local growing conditions in this guide. I share tips to spot problems early and fix them before they ruin your new rose plants that you worked so hard to grow and nurture in your own yard.
6 Steps to Grow Roses from Cuttings
These six steps will help you propagate roses from cuttings with a high rate of success. I follow this exact process every summer when I take softwood cuttings from my best plants. Each step builds on the one before it to give your rose cuttings the best chance to root.
You will need sharp pruners, rooting hormone powder, and a good growing medium like perlite. You also need containers with clear covers to maintain humidity. Research shows callusing appears about 8 days after planting when you prep cuttings right.
Select Healthy Parent Stems
- Stem Quality: Choose pencil-thickness stems from healthy, disease-free roses that bloomed recently, ensuring the plant has strong genetics worth propagating.
- Growth Stage: Look for semi-hardwood growth from current season, typically found just below faded blooms where wood is starting to firm but not yet woody.
- Leaf Assessment: Select stems with mature five-leaflet leaves indicating sufficient energy storage to support root development during the cutting process.
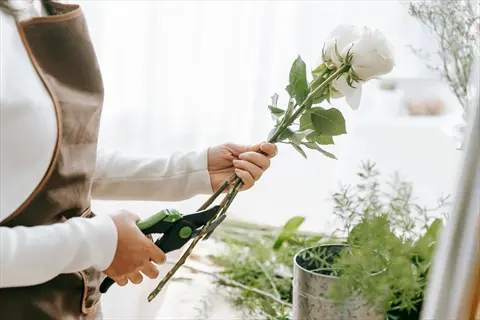
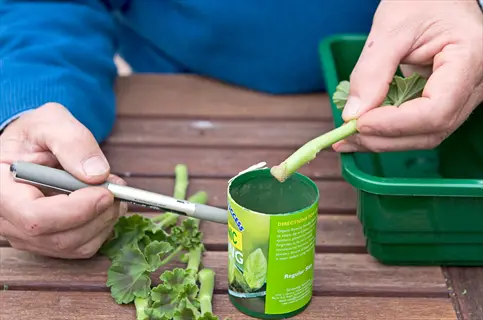
- Morning Timing: Take cuttings early in the morning before sun exposure to prevent desiccation and ensure maximum moisture content in the plant tissue.
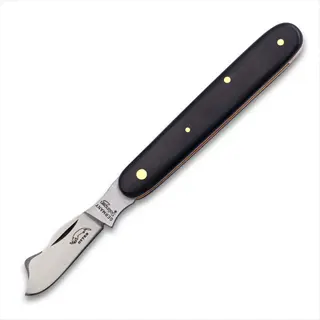
- Tool Preparation: Use sharp, sterilized bypass pruners or a razor blade to make clean cuts that minimize tissue damage and reduce infection risk.
- Patent Check: Verify the rose variety is not patented by checking plant tags or searching online databases before taking any cuttings for propagation.
Prepare the Cutting Properly
- Cutting Length: Cut stems 6 to 8 inches (15 to 20 centimeters) for hybrid tea varieties or 4 to 5 inches (10 to 13 centimeters) for miniature and landscape types.
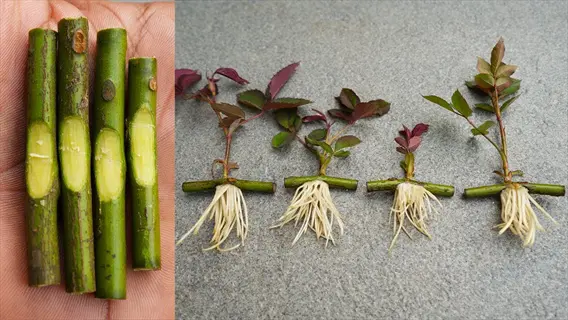
- Bottom Cut: Make the bottom cut at a 45 degree angle just below a leaf node, which increases surface area for water absorption and contains concentrated growth hormones.
- Top Cut: Cut the top straight across about one quarter inch (0.6 centimeters) above a leaf node to help you know which end points up during planting.
- Leaf Removal: Remove all leaves from the bottom two thirds of the cutting, leaving only the top two or three leaves to reduce water loss through transpiration.
- Leaf Trimming: Cut remaining large leaves in half to further reduce moisture loss while maintaining some photosynthesis capability during the rooting period.
- Scarification: Lightly scrape the bottom inch (2.5 centimeters) of bark with a knife to expose the cambium layer, encouraging root emergence from wounded tissue.
Apply Rooting Hormone Treatment
- Hormone Selection: Choose a rooting hormone containing IBA (indole-3-butyric acid) at 0.4% concentration for optimal results across all cutting types.
- Application Method: Dip the bottom 1 to 2 inches (2.5 to 5 centimeters) of the cutting into powder or liquid hormone, coating the scraped area thoroughly.
- Powder Technique: Tap off excess powder after dipping to prevent clumping that can cause stem rot at the planting site and reduce rooting success.
- Liquid Option: For liquid hormone, follow package dilution instructions as concentrations vary from 500 to 2000 parts per million for herbaceous cuttings.
- Fresh Application: Use fresh hormone each time rather than repeatedly dipping into the same container, which prevents contamination from previous cuttings.
- Immediate Planting: Plant the treated cutting within minutes of hormone application to prevent the coating from drying out and losing effectiveness.
Plant in Proper Growing Medium
- Medium Mix: Combine equal parts perlite and peat moss or coco coir to create a well-draining yet moisture-retentive environment ideal for root development.
- Container Choice: Use 4 inch (10 centimeter) pots with drainage holes, cell trays for multiple cuttings, or a deep nursery flat filled with your medium mix.
- Pre-Moistening: Moisten the growing medium thoroughly before planting so water reaches all areas without disturbing the delicate hormone coating on cuttings.
- Planting Depth: Insert cuttings about 2 inches (5 centimeters) deep, ensuring at least two nodes are buried below the surface where roots will emerge.
- Firm Contact: Gently press the medium around each cutting to eliminate air pockets and ensure good contact between the stem and growing medium.
- Spacing Guidelines: Allow 2 to 3 inches (5 to 8 centimeters) between cuttings in shared containers to prevent crowding and allow adequate air circulation.
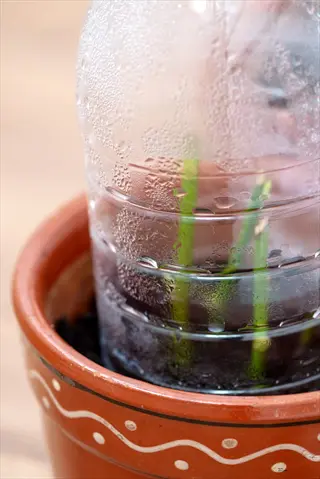
Create High Humidity Environment
- Humidity Level: Maintain humidity above 90% using a clear plastic bag, humidity dome, or upturned glass jar placed over each cutting container.
- Support Structure: Insert small stakes or bent wire into the pot to keep plastic covers from touching leaves, which can cause rot at contact points.
- Ventilation Schedule: Open the cover briefly every few days to exchange air and prevent fungal growth while maintaining overall high humidity conditions.
- Location Selection: Place containers in bright indirect light away from direct sun, which can overheat the enclosed space and cook the delicate cuttings.
- Temperature Range: Maintain temperatures between 70 and 80 degrees Fahrenheit (21 to 27 degrees Celsius) for optimal root development speed and success.
- Moisture Monitoring: Check soil moisture daily and mist lightly if the surface dries, but avoid overwatering which causes stem rot faster than any other factor.
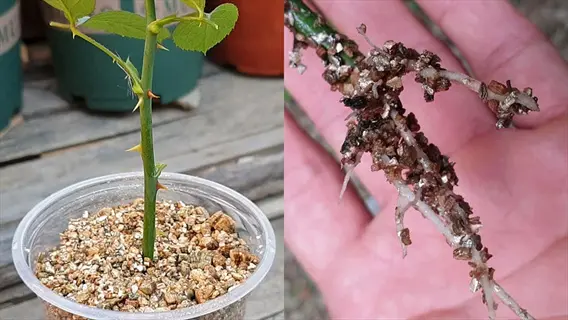
Monitor and Transplant Successfully
- Timeline Expectations: Root primordia typically appear around day 25 with visible roots emerging between days 21 and 28, though full establishment takes 4 to 8 weeks.
- Root Testing: After 4 weeks, gently tug the cutting to feel for resistance indicating root development rather than uprooting to check visually.
- Hardening Off: Once rooted, gradually remove the humidity cover over 7 to 10 days to acclimate the new plant to normal humidity levels before transplanting.
- Transplant Timing: Wait until roots fill the container or reach 2 to 3 inches (5 to 8 centimeters) long before moving to a larger pot or garden location.
- Planting Depth: Set own-root roses with their crown 1 to 2 inches (2.5 to 5 centimeters) below soil level to encourage additional root development from buried stems.
- First Season Care: Provide extra attention during the first growing season with consistent watering and protection from extreme temperatures until fully established.
Three Types of Rose Cuttings
The timing of your cutting matters more than most people think for rose cutting types. I learned this the hard way after losing batches that I took at the wrong stage. Each type roots at a different speed based on how much energy the stem has stored inside.
Iowa State research shows that semi-hardwood cuttings taken in July and August work best for home gardeners. These give you the best balance between fast rooting and sturdy stems that resist wilting. Softwood cuttings root quickest but need more care, while hardwood cuttings take longer but can survive tougher conditions. Try greenwood cuttings.
Softwood Cuttings (Late Spring)
- Timing Window: Take softwood cuttings in late May through early June when new growth is tender, green, and flexible, typically 6 weeks after spring leaf emergence.
- Identification: Stems should bend easily without snapping and leaves appear bright green and fresh rather than dark and leathery from maturity.
- Rooting Speed: These cuttings root fastest of all types, potentially developing roots within 10 to 14 days under optimal humidity and temperature conditions.
- Challenge Factor: Softwood requires extra attention to prevent wilting since tender tissue loses moisture rapidly without a developed waxy cuticle layer.
- Success Rate: When properly maintained with 90% plus humidity, softwood cuttings achieve high success rates despite their delicate nature.
Semi-Hardwood Cuttings (Summer)
- Timing Window: July through August represents the ideal window when current season growth has begun firming but remains flexible with green tissue inside.
- Identification: Stems snap when bent rather than bending flexibly, and bark has started developing but has not turned fully brown and woody yet.
- Best for Beginners: University extensions recommend semi-hardwood as the easiest method for home gardeners due to the balance between vigor and durability.
- Rooting Timeline: Expect roots to develop within 4 to 6 weeks under proper conditions, with visible root emergence typically around day 25 to 28.
- Climate Advantage: Semi-hardwood cuttings tolerate slight variations in humidity better than softwood while still rooting faster than dormant hardwood.
Hardwood Cuttings (Winter)
- Timing Window: November through February during full dormancy, after leaves drop but before spring growth begins, works best in zones 7 through 10.
- Identification: Stems are fully mature, woody, brown, and rigid from the previous growing season with no green tissue visible when scraped lightly.
- Cold Climate Method: Northern gardeners in zones 5 and 6 often struggle with hardwood cuttings due to extended freezing that damages stored stems.
- Rooting Timeline: These cuttings root slowly over winter months and may not show significant growth until spring warming triggers root development.
- Storage Option: Hardwood cuttings can be bundled and stored in moist sand in a cold location over winter, then planted outdoors in early spring.
Greenwood Cuttings (Early Summer)
- Timing Window: Late June through early July when stems have firmed slightly beyond softwood but remain predominantly green and pliable throughout.
- Identification: Stems should bend without snapping but feel firmer than spring softwood, with leaves fully expanded but still relatively light green in color.
- Middle Ground: Greenwood cuttings offer a compromise between the fast rooting of softwood and the resilience of semi-hardwood for gardeners who missed spring timing.
- Rooting Timeline: Expect roots to develop within 3 to 5 weeks under proper conditions, faster than semi-hardwood but with better survival than delicate softwood.
- Best Varieties: Climbing roses, shrub roses, and miniature varieties respond particularly well to greenwood cuttings during this early summer window.
Comparing Propagation Methods
Knowing the best way to propagate roses depends on your skill level and time. I tried all the common rose propagation methods. Some that the internet loves have no science to back them up. The results may shock you.
Soil propagation gives you about 80% success when done right. Water propagation only hits around 20% even though people love it online. Air layering roses reaches nearly 100% success but takes more effort. The potato method? Skip it.
For most home gardeners, soil propagation offers the best balance of success and ease. Air layering works great when you want to guarantee a specific rose survives the process.
Understanding Rooting Hormones
Rooting hormone for roses works like a concentrated signal that tells stem cells to transform into root cells. IBA rooting hormone amplifies the natural process that plants use to grow roots from wounded tissue. I use rooting powder on every batch of cuttings I take from my roses.
The active ingredient in most rooting compound products is IBA or auxin at different strengths. Research from peer reviewed studies shows that 0.4% IBA works best for rose cuttings across all stem positions. Higher amounts like 0.6% can actually hurt your results with bottom cuttings.
Without rooting powder, cuttings from the top of a stem root better than those from the bottom. This happens because auxin builds up more in the upper parts of growing stems. A good rooting hormone evens out this difference so all your cuttings have the same chance to succeed.
Some gardeners prefer a natural rooting hormone. Willow water is one option that does contain some natural auxins to help roots form. Honey may protect against rot but does not stimulate root growth the way true rooting compounds do.
When you apply rooting hormone, dip the cut end 1 to 2 inches deep into the powder. Tap off any excess to prevent clumping that can cause rot at the base. Plant your treated cutting right away before the hormone dries out and loses its power.
Creating Ideal Rooting Conditions
Getting your rooting conditions right makes the difference between success and failure with rose cuttings. I lost my first three batches because I did not keep the humidity for rose cuttings high enough. Once I fixed this, my success rate jumped to over 80% on almost every try.
You need to create the right growing environment. Keep temps at 70°F to 80°F (21°C to 27°C) during the day for best results. Temperature for rooting roses matters more than most guides admit. Research shows even warmer temps work well during daylight hours.
Humidity needs to stay above 90% around your cuttings at all times. Use a clear plastic bag, humidity dome, or glass jar over your containers to trap moisture. Crack the cover every few days to let fresh air in and prevent mold from forming on your stems.
Place your cuttings in bright indirect light but never in direct sun. The enclosed space under your cover will heat up fast in direct sunlight and cook your tender cuttings. A north or east facing window works well for most indoor setups.
Check soil moisture daily but avoid overwatering your cuttings. The medium should feel damp but not soggy to the touch. Too much water causes stem rot faster than any other factor in my years of taking cuttings.
Under these ideal conditions, you should see first callusing around day 8 after planting. Root primordia form by day 25 in most cases. Keep watching and waiting because visible roots may not appear until week 4 to 8.
Diagnosing Cutting Problems
Diagnosing rose cuttings early saves you from losing entire batches of plants. I spent years learning to spot rose cutting problems before they killed my plants. Most issues come down to moisture levels being too high or too low in your setup.
Stem rot rose cuttings show black mushy bases and usually die within days if you do not act fast. Wilting rose cuttings have droopy leaves and crispy edges from low humidity. Be aware of fungal problems cuttings. These occur when air flow gets too poor around your containers.
Stem Rot (Black Mushy Base)
- Cause: Overwatering, poor drainage, or contaminated growing medium creates waterlogged conditions where fungal pathogens attack the cutting base.
- Prevention: Use well-draining medium with 50% perlite, water only when surface dries slightly, and ensure containers have adequate drainage holes.
- Solution: Remove affected cuttings at once to prevent spread, re-cut healthy sections above the rot, and replant in fresh sterile medium.
- Tool Hygiene: Sterilize cutting tools between uses with rubbing alcohol or 10% bleach solution to prevent introducing rot causing pathogens.
Wilting and Drying Out
- Cause: Humidity below 90%, direct sunlight exposure, or taking cuttings during hot afternoon hours when plant tissue is already stressed.
- Prevention: Maintain consistent high humidity with plastic covering, place in bright indirect light only, and take cuttings in early morning.
- Solution: Increase humidity at once by misting and ensuring plastic cover creates a sealed space with visible condensation on interior surfaces.
- Leaf Adjustment: Trim remaining leaves by half if wilting continues despite humidity adjustments to reduce moisture demands on rootless cuttings.
Fungal Growth on Soil or Stems
- Cause: Stagnant air, excessive moisture on leaf surfaces, or contaminated materials create ideal conditions for fungal spores to colonize.
- Prevention: Ventilate humidity covers briefly every few days, avoid wetting leaves when watering, and use sterile growing medium from sealed bags.
- Solution: Remove any cutting showing fuzzy growth, apply cinnamon powder as natural antifungal to remaining cuttings, and improve air circulation.
- Environmental Fix: Reduce watering frequency and ensure covers allow minimal air exchange to prevent the stagnant conditions fungi prefer.
No Root Development After 8 Weeks
- Cause: Temperatures below 65°F (18°C), expired rooting hormone, difficult to root variety, or improper cutting selection.
- Temperature Check: Verify rooting area maintains 70°F to 80°F (21°C to 27°C) consistently using a thermometer near containers.
- Variety Factor: Some hybrid tea roses resist rooting from cuttings regardless of technique, while miniatures, old roses, and shrub types root readily.
- Fresh Start: If cuttings show no rot but also no roots after 10 weeks, they likely will not root. Take new cuttings with fresh hormone application.
5 Common Myths
Rooting rose cuttings in potatoes provides nutrients and moisture that dramatically improve success rates compared to standard methods.
Potatoes offer no rooting benefit and often cause stem rot. Research shows soil or perlite propagation achieves 80 percent success while the potato method has no scientific support.
Rose cuttings must be taken only during the dormant winter season when plants have stored maximum energy reserves.
Semi-hardwood cuttings from current season growth in July and August actually root more easily than dormant hardwood cuttings for most home gardeners.
Water propagation produces healthier rose plants with stronger root systems than soil-based methods.
Water rooting achieves only 20 percent success and produces fragile roots that struggle transitioning to soil. Soil propagation reaches 80 percent success with sturdier roots.
All rose varieties propagate equally well from cuttings, so any rose you like can be easily cloned.
Rooting success varies dramatically by variety. Miniatures, old roses, and shrub roses root easily while some hybrid teas prove extremely difficult even for experienced propagators.
Rooting hormone is just a marketing gimmick and provides no real benefit for growing roses from cuttings.
Research demonstrates rooting hormone with IBA at 0.4 percent allows cuttings from all stem positions to achieve comparable root numbers and lengths, improving overall success rates.
Conclusion
You now know how to grow roses from cuttings with confidence. In my experience, semi-hardwood cuttings in July or August give the best rooting success. Use soil instead of water and apply rooting hormone for the best results.
When I first started, I lost most of my cuttings to simple mistakes. Now my rose propagation method works every season. Own root roses can live 50 years or longer compared to just 8 to 15 years for grafted roses. This makes home gardening.
Before you propagate any rose, check the patent status to stay within the law. Plant patents last 20 years and many popular roses still have protection. Stick to older varieties or roses with expired patents to avoid legal issues.
Start with easy varieties like miniatures or old roses. These root well for beginners and help you build skills. I failed many times before I figured out what works. Your first batch of rooted roses will make all the learning worth it.
External Sources
Frequently Asked Questions
What's the fastest method to root rose cuttings?
Softwood cuttings taken in late spring root fastest, typically within 10 to 14 days under optimal conditions with rooting hormone and 90 percent humidity.
Should I root rose cuttings in water or soil?
Soil or growing medium propagation achieves approximately 80 percent success while water rooting only reaches about 20 percent success rate.
Can I grow roses from store-bought flower stems?
Yes, but success depends on freshness and whether stems received preservative treatments that inhibit rooting.
How long until rose cuttings develop roots?
Root primordia appear around day 25 with visible roots emerging between 21 and 28 days, though full establishment takes 4 to 8 weeks.
What naturally helps rose cuttings root faster?
Willow water contains natural rooting compounds, while cinnamon provides antifungal protection though not true rooting stimulation.
Is propagating patented rose varieties illegal?
Yes, plant patents last 20 years and asexually propagating patented roses during this period violates federal law.
What's the best season for taking rose cuttings?
Mid to late summer (July and August) for semi-hardwood cuttings offers the highest success rates for home gardeners.
Why do my rose cuttings keep dying?
Common causes include:
- Insufficient humidity below 90 percent
- Overwatering causing stem rot
- Direct sunlight drying cuttings
- Fungal infection from unsterilized tools
Can cinnamon be used as rooting hormone?
Cinnamon works as an antifungal to prevent rot but does not contain auxins that stimulate root growth like true rooting hormones.
What is the five-leaf rule for rose cuttings?
Take cuttings from stems with at least five leaflets per leaf set, indicating mature growth with enough stored energy to produce roots.