
Introduction
Learning how to grow mushrooms at home: beginner guide topics need no backyard and no direct sunlight to get started with this fun hobby. A spare closet, bathroom shelf, or basement corner works just fine for growing your first batch. Fungi follow different rules than plants in many ways. They suit apartment dwellers and anyone who has failed at keeping herbs alive on a windowsill in the past.
I tried mushroom cultivation about 4 years ago after many failed tomato plants. The learning curve felt steep at first glance to me back then. But beginner mushroom growing follows simple steps once you know the basics. Think of it like brewing beer or making sourdough bread at home. Both seem complex from the outside but become routine after a few batches succeed in your own kitchen.
Mushrooms share about 50% of their DNA with humans according to mycologist Paul Stamets in his research. This genetic link might explain why we find them so fun to grow and watch develop over time. The colonization phase takes just 10 to 20 days in most cases. Once pins form, your fruiting bodies mature in 2 to 3 days after that point. That speed beats almost any veggie you could plant in an outdoor garden plot near your home.
The specialty mushroom market reached 67.4 million dollars in sales last year at stores around the country. About 89% of shiitake growers say demand exceeds supply right now. Indoor mushroom growing gives you fresh food for the kitchen or a side business selling at local farmers markets. The next sections cover how to pick your first variety and harvest your crop at peak flavor.
Best Mushroom Varieties for Beginners
Picking the right mushroom varieties makes a huge difference for new growers trying to get started with this hobby. Some species tolerate mistakes better than others. Others produce results faster with less fuss. I grew 6 different types over the past 3 years and learned which ones work best for you as a beginner. The easiest mushrooms to grow share certain traits that make them forgiving.
Oyster mushrooms top the list of gourmet mushrooms for beginners. They fruit in just 7 to 10 days and grow on almost any material you have around your house. Shiitake mushrooms take longer but reward your patience with rich flavor. Lion's mane offers something special for cooks who want seafood texture from fungi.
Oyster Mushrooms
- Growth Speed: Oyster mushrooms produce harvestable fruiting bodies within 7 to 10 days after kit activation, making them the fastest variety for impatient beginners seeking quick results.
- Temperature Tolerance: These adaptable fungi thrive across a wide range from 55 to 75 degrees Fahrenheit (13 to 24 degrees Celsius), forgiving minor environmental fluctuations that would stress other species.
- Substrate Versatility: Oyster mushrooms colonize straw, coffee grounds, cardboard, hardwood sawdust, and even paper waste, allowing beginners to experiment with readily available materials.
- Biological Efficiency: Research demonstrates 66% to 74% biological efficiency on optimal substrates like cotton seed and corncob, meaning more mushrooms per pound of growing medium.
- Nutritional Value: With 19% to 29% protein by dry weight, oyster mushrooms offer substantial nutritional benefits beyond their delicate seafood-like flavor profile.
- Flush Production: A single growing block produces 3 to 4 flushes over several weeks, extending your harvest window and maximizing return on your initial investment.
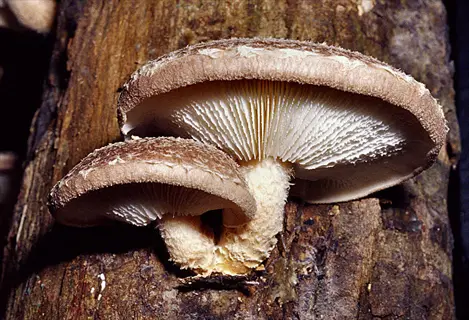
Shiitake Mushrooms
- Flavor Profile: Shiitake mushrooms deliver rich umami depth that intensifies when dried, making them prized in Asian cuisine and worth the longer cultivation timeline for serious home cooks.
- Log Cultivation: Traditional shiitake growing on hardwood logs like oak or sugar maple produces mushrooms for 3 to 5 years from a single inoculation investment.
- Temperature Range: Shiitake requires cooler conditions between 50 to 70 degrees Fahrenheit (10 to 21 degrees Celsius) for incubation, making basements and garages ideal growing locations.
- Spawn Run Duration: Expect 6 to 12 months for the mycelium to colonize a log before first fruiting, requiring patience but rewarding with years of production.
- Market Value: Shiitake ranks second only to button mushrooms in global cultivation and commands premium prices at farmers markets where 89% of growers report demand exceeds supply.
- Block Alternative: Shiitake block kits offer faster results than logs, producing within 2 to 3 weeks while still delivering authentic flavor and texture.
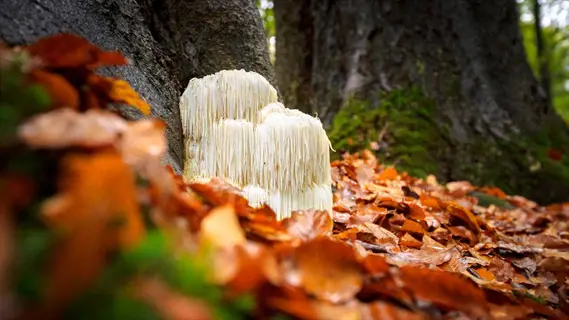
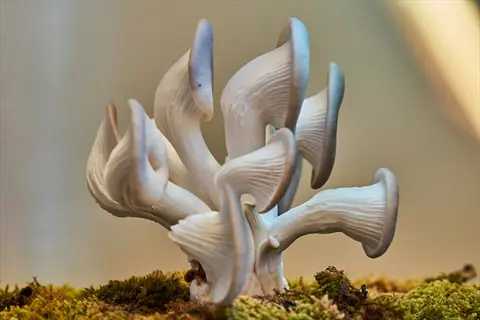
Lion's Mane Mushrooms
- Unique Appearance: Lion's mane grows in cascading white spines rather than traditional caps and stems, creating a stunning visual display during the fruiting process.
- Culinary Uses: When cooked, lion's mane develops a texture similar to crab or lobster meat, making it popular for seafood substitutes and gourmet vegetarian dishes.
- Growing Conditions: This variety prefers temperatures between 65 to 75 degrees Fahrenheit (18 to 24 degrees Celsius) and higher humidity around 85% to 90% during fruiting.
- Substrate Preferences: Lion's mane thrives on supplemented hardwood sawdust or masters mix, though beginner kits eliminate the need to prepare these substrates yourself.
- Harvest Timing: Pick lion's mane when spines reach 0.25 to 0.5 inches (0.6 to 1.3 centimeters) before yellowing begins, as older specimens become bitter and less tender.
- Health Interest: Growing interest in lion's mane stems from research into its potential cognitive benefits, driving increased demand at specialty markets and health food stores.
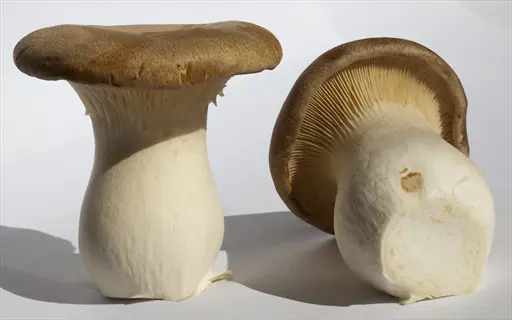
King Trumpet Mushrooms
- Meaty Texture: King trumpet mushrooms feature thick, dense stems that slice into rounds, providing substantial texture that holds up to cooking methods using high heat.
- Shelf Stability: These mushrooms last longer in refrigeration than most varieties, maintaining quality for 10 to 14 days when stored in paper bags.
- Growing Requirements: King trumpets need cooler fruiting temperatures between 50 to 65 degrees Fahrenheit (10 to 18 degrees Celsius) with humidity around 80% to 85%.
- Substrate Needs: This variety performs best on supplemented hardwood sawdust with wheat bran or soy hull additions, though kits simplify preparation for beginners.
- Yield Potential: While slower to colonize than oyster mushrooms, king trumpets produce substantial individual specimens weighing 2 to 4 ounces (57 to 113 grams) each.
- Cooking Versatility: The mild flavor and firm texture make king trumpets excellent for grilling, searing, or slicing thin for vegan bacon alternatives.
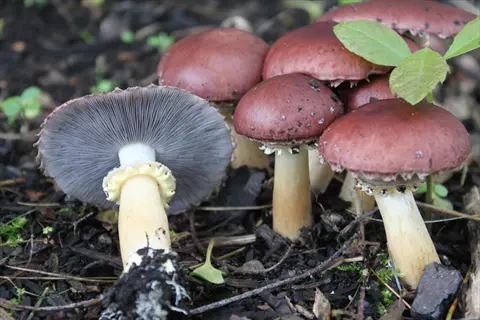
Wine Cap Mushrooms
- Outdoor Growing: Wine caps excel in outdoor garden beds and wood chip paths, making them ideal for growers with yard space who want mushrooms without indoor equipment.
- Climate Adaptability: These hardy mushrooms tolerate a wide temperature range and continue producing through light frosts, extending the harvest season into fall months.
- Substrate Simplicity: Wine caps colonize fresh hardwood chips, straw, or even corn stalks spread in garden beds, requiring no sterilization or special preparation.
- Production Timeline: Expect first harvests 3 to 6 months after inoculation, with established beds producing for multiple years when you add fresh substrate each year.
- Flavor Notes: Wine caps offer a mild, somewhat nutty taste with a texture similar to portobello mushrooms, making them versatile for various cooking applications.
- Garden Benefits: The mycelium network improves soil structure and nutrient availability while breaking down organic matter, providing benefits beyond just mushroom production.
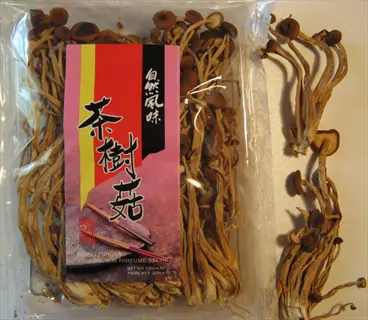
Pioppino Mushrooms
- Growth Habit: Pioppino mushrooms emerge in attractive clusters with long stems and small caps, creating abundant harvests from compact growing containers.
- Temperature Preferences: This variety fruits between 55 to 65 degrees Fahrenheit (13 to 18 degrees Celsius), performing well in cooler basement or garage environments.
- Culinary Character: Italian cuisine features pioppino for their firm, crunchy texture that remains intact through cooking, making them excellent for pasta dishes.
- Growing Medium: Pioppino colonizes hardwood sawdust supplemented with wheat bran, though fruiting blocks eliminate substrate preparation for new growers.
- Harvest Method: Cut entire clusters at the base when caps reach 1 to 2 inches (2.5 to 5 centimeters) in diameter, before edges begin curling upward.
- Multiple Flushes: A maintained pioppino block produces 3 to 5 flushes over several months, with later harvests sometimes exceeding the initial yield.
Growing Methods Compared
Choosing your mushroom growing methods works a lot like picking your first car to drive. Mushroom grow kits function like automatic transmission. They handle the hard parts for you while you learn the basics. Substrate preparation and log cultivation are more like manual driving. They give you more control but require extra skill and practice to master.
I started with kits and moved up to DIY mushroom growing over about 2 years of steady practice at home. The kit method took me from zero to harvest in just 10 days on my first try. Commercial growers need about 14 weeks for the full cycle using composting methods. Kits skip most of that wait time for you as a beginner.
Scaling up from kits to making your own substrate can cut your cost per harvest by 60% to 80% once you learn the process. The table below shows how each method stacks up for your budget, time, and skill level right now.
Setting Up Your Growing Space
Getting the mushroom growing conditions right determines your success or failure with this hobby. Many new growers treat fungi like plants and end up with nothing to show for it. Mushrooms have opposite needs in many ways. They want humidity for mushrooms instead of direct watering. They care more about fresh air exchange than they do about light.
Your indoor growing environment can be a bathroom, basement, closet, or spare corner of any room you have free. Bathrooms offer natural humidity for mushrooms that fungi love to grow in. Basements give you stable mushroom growing temperature year round. Closets let you control darkness and air flow with ease.
I set up my first grow space in a bathroom closet and got 3 harvests from one kit without any special equipment at all. The key is matching your chosen room to the needs below.
Temperature Control
- Colonization Phase: Maintain temperatures between 72 to 75 degrees Fahrenheit (22 to 24 degrees Celsius) during initial mycelium growth when the fungus spreads through your substrate.
- Fruiting Phase: Lower temperatures to 68 to 71 degrees Fahrenheit (20 to 22 degrees Celsius) once colonization completes, signaling the mycelium to produce mushrooms.
- Species Variations: Shiitake prefers cooler 50 to 70 degrees Fahrenheit (10 to 21 degrees Celsius) while oysters tolerate wider ranges, so match your space to your chosen variety.
Humidity Management
- Target Range: Keep humidity below 80% during fruiting to prevent bacterial contamination while providing enough moisture for healthy mushroom development.
- Misting Technique: Spray the growing area and walls rather than the pins and young mushrooms, which can cause water damage and bacterial spots.
- Monitoring Tools: Use a digital hygrometer to track humidity levels, adjusting misting frequency based on readings rather than fixed schedules.
Air Exchange and Circulation
- Carbon Dioxide Limits: Mushrooms require carbon dioxide levels below 1000 parts per million for proper pin formation and development, unlike plants that use carbon dioxide for growth.
- Fresh Air Exchange: Open growing containers or fan the area 2 to 3 times each day, or use small holes in fruiting chambers to allow passive air exchange.
- Avoid Drafts: While fresh air is essential, direct drafts dry out developing pins and cause aborted mushrooms, so position growing areas away from vents and fans.
Lighting Requirements
- Indirect Light: Mushrooms benefit from ambient indirect light during fruiting, which helps orient pin development and signals the transition from colonization to reproduction.
- Duration Needs: About 10 to 12 hours of indirect light per day mimics natural conditions, though mushrooms are far less demanding than plants that need photosynthesis.
- Artificial Options: Standard room lighting or a nearby window with filtered sunlight provides sufficient illumination without special grow lights or timers.
From Spawn to Harvest
Watching your mycelium growth from spawn run to mushroom harvesting feels like magic the first time you see it happen. Each stage looks different and has its own signs that tell you things are going well. I check my grows every morning to spot any changes early on.
The full cycle from spawn to harvest takes about 27 to 40 days depending on which substrate you use at home. Cotton seed gets you there faster while wheat straw takes longer to work through. Knowing what to watch for at each stage helps you catch problems before they ruin your batch.
Mushroom colonization comes first, then the pinning stage kicks off your mushroom fruiting phase right after that. Below you can see what each stage should look like and how long each one takes.
Inoculation and Early Colonization
- Starting Point: This phase begins when spawn contacts substrate, whether you are opening a kit, mixing grain spawn into bulk substrate, or drilling plugs into logs.
- Visual Signs: Within 3 to 5 days, you should notice white threadlike growth spreading outward from spawn points into the surrounding material.
- Timeline Range: Early colonization takes 10 to 14 days for fast colonizers like oyster mushrooms on optimal substrates like cotton seed or straw.
Full Colonization
- Completion Signs: The substrate appears covered in white mycelium with no visible uncolonized material, indicating readiness to transition to fruiting conditions.
- Duration Factors: Full colonization takes 10 to 20 days for most species on prepared substrates, extending to 6 to 18 months for log cultivation methods.
- Patience Required: Rushing this phase by introducing fruiting conditions too early weakens the mycelium network and reduces eventual yield.
Pinning and Primordia Formation
- Trigger Conditions: Lowering temperature, increasing fresh air exchange, and introducing light signals the mycelium to form pins.
- Visual Appearance: Pins look like small bumps or knots on the mycelium surface, often appearing in clusters where fresh air reaches the colonized substrate.
- Critical Phase: This stage requires consistent conditions, as fluctuations in temperature or humidity cause pins to abort and turn brown rather than developing.
Fruiting Body Development
- Rapid Growth: Once pins form, mushrooms grow fast, often doubling in size each day and reaching harvest maturity in just 2 to 3 days.
- Maintenance Needs: Continue misting to maintain humidity while ensuring adequate air exchange to prevent carbon dioxide buildup that causes malformed mushrooms.
- Variety Differences: Oyster mushrooms develop fan shaped caps with gills, while lion's mane produces cascading spines and shiitake forms classic umbrella shapes.
Harvesting and Flush Cycles
- Harvest Timing: Pick mushrooms just before or as the cap edges begin to flatten or curl upward, when flavor and texture are optimal and before spore release.
- Cutting Technique: Twist and pull at the base or cut with a clean knife, avoiding damage to surrounding pins that will become your next harvest.
- Subsequent Flushes: After harvesting, rest the block for 7 to 10 days while maintaining humidity, as most substrates produce 3 to 4 additional flushes.
Troubleshooting Problems
Most new growers give up after their first failed batch without knowing what went wrong in the first place. Troubleshooting mushroom growing problems saves you time and money on future attempts. I lost 3 batches before I learned to spot the warning signs early enough to act.
Mushroom contamination shows up as colors that stand out from the normal white mycelium. Black, green, pink, and orange patches mean you have mold on mushrooms or bacteria. These need immediate attention from you. Proper sterilization and clean handling prevent most problems before they start.
A mushroom not fruiting usually comes down to wrong temperature, poor air flow, or missing light. These signals trigger pinning in your grow. The list below covers the main issues you might run into and how to fix them fast.
Contamination Issues
- Green Mold: Bright green patches indicate aggressive mold contamination that spreads fast and cannot be saved, requiring immediate disposal away from your growing area.
- Black or Pink Spots: These colors signal bacterial contamination often caused by excessive moisture, poor air circulation, or working with hands that were not clean.
- Prevention Methods: Work with clean hands, sterilized tools, and pasteurized or sterilized substrates to minimize contamination risk before it starts.
Failure to Fruit
- Temperature Issues: Mycelium stuck in colonization mode often needs a temperature drop of 5 to 10 degrees Fahrenheit (3 to 6 degrees Celsius) to trigger fruiting initiation.
- Fresh Air Shortage: High carbon dioxide levels above 1000 parts per million prevent pinning, so increase ventilation or open containers more often.
- Light Deficiency: While mushrooms need less light than plants, complete darkness during fruiting phase can prevent proper pin formation and development.
Aborted Pins and Deformed Mushrooms
- Humidity Fluctuations: Pins that turn brown and shrivel usually experienced humidity drops below 70% during critical early development stages.
- Carbon Dioxide Buildup: Long stems with tiny caps indicate insufficient fresh air exchange, as mushrooms stretch toward oxygen when carbon dioxide accumulates.
- Direct Water Damage: Spraying water on young pins rather than misting the surrounding area causes spots, bacterial infection, and developmental failure.
Slow or Stalled Colonization
- Temperature Problems: Colonization below 65 degrees Fahrenheit (18 degrees Celsius) proceeds very slowly, while temperatures above 80 degrees Fahrenheit (27 degrees Celsius) stress the mycelium.
- Substrate Issues: Overly wet substrate drowns mycelium while dry substrate cannot support growth, aim for moisture content where squeezing produces a few drops.
- Spawn Quality: Old or improperly stored spawn loses viability, so purchase from reputable suppliers and use within recommended timeframes.
5 Common Myths
Mushrooms require complete darkness to grow properly, so you need a totally blacked-out room for cultivation.
Mushrooms actually benefit from indirect light during fruiting, which helps orient pin development and signals the transition from colonization to reproduction stage.
Growing mushrooms at home is extremely difficult and requires expensive laboratory equipment and sterile conditions.
Beginner grow kits eliminate sterilization requirements entirely, and many substrate methods use simple pasteurization with hot water rather than pressure sterilizers.
You can only grow mushrooms in fall and winter because they need cold temperatures to produce fruiting bodies.
Most culinary mushrooms fruit between 60 and 75 degrees Fahrenheit (16 to 24 degrees Celsius), making year-round indoor cultivation achievable in any climate-controlled home.
Sawdust is the best and most economical substrate for growing all types of edible mushrooms at home.
Research shows sawdust alone has only 10 percent biological efficiency, while cotton seed achieves 74 percent and corncob reaches 66 percent for oyster mushrooms.
Home-grown mushrooms are less safe to eat than store-bought ones because of contamination risks and toxicity concerns.
Properly cultivated home mushrooms are equally safe as commercial products, and you control the entire process without unknown pesticides or preservatives.
Conclusion
You now have everything you need to grow mushrooms at home with confidence in your own space. Beginner mushroom growing works in any living situation from small apartments to houses with yards. A spare closet or bathroom corner gives you enough room to start producing your own home-grown mushrooms within 2 weeks.
Start growing mushrooms with a kit first to learn the basics without any complex setup on your part. Oyster mushrooms fruit in 7 to 10 days and forgive the small mistakes that new growers make along the way. Once you get comfortable with kits, you can move up to bucket methods that cost less per harvest over time.
Your mushroom cultivation success depends on getting the environment right in your growing space. Keep temperatures stable while your mycelium grows. Maintain humidity without soaking your pins. Give your grows fresh air to keep carbon dioxide levels low.
Pick one variety that matches your space and timeline, order a kit this week, and apply what you learned here. Mushrooms share 50% of their DNA with us according to Paul Stamets. Growing them connects you to one of the oldest organisms on earth right in your own home.
External Sources
Frequently Asked Questions
How can beginners start growing mushrooms at home?
Beginners should start with a ready-to-grow mushroom kit featuring oyster mushrooms, which requires only misting and proper placement in indirect light.
Is it possible to grow mushrooms from store-bought ones?
Yes, you can propagate mushrooms from store-bought specimens by cloning stem butts onto cardboard or pasteurized substrate, though success rates are lower than using commercial spawn.
What is the easiest mushroom variety for home cultivation?
Oyster mushrooms are unanimously recommended as the easiest variety due to their rapid colonization, tolerance of temperature fluctuations, and ability to grow on diverse substrates.
Where should I set up my mushroom growing area at home?
The ideal location offers indirect light, temperatures between 65 and 75 degrees Fahrenheit (18 to 24 degrees Celsius), humidity control, and minimal air contaminants like a spare bathroom, basement, or closet.
Is home mushroom cultivation legally permitted?
Growing culinary mushrooms like oyster, shiitake, and lion's mane at home is legal everywhere. Only psilocybin-containing species face restrictions in most jurisdictions.
What essential conditions do mushrooms need to thrive?
Mushrooms require specific temperature ranges, humidity below 80 percent, adequate fresh air exchange to keep carbon dioxide below 1000 parts per million, and indirect light for fruiting.
What are common challenges in mushroom cultivation?
The most common challenges are:
- Contamination from mold or bacteria appearing as green, black, or pink spots
- Failure to fruit due to incorrect temperature or humidity levels
- Substrate drying out from insufficient misting
- Poor air circulation causing carbon dioxide buildup
How long does the mushroom growing process take?
Grow kit mushrooms can be ready in 7 to 10 days, while substrate cultivation takes 4 to 6 weeks and log cultivation requires 6 to 18 months for first harvest.
Are mushroom spores hazardous to breathe?
Inhaling large quantities of mushroom spores can cause respiratory irritation in sensitive individuals, but normal home cultivation with proper ventilation poses minimal health risk.
Is home cultivation more economical than store purchases?
Yes, home cultivation typically costs 50 to 75 percent less per pound than store purchases after initial setup, with a single inoculated log producing mushrooms for 3 to 5 years.