
Introduction
Learning how to grow microgreens indoors at home puts some of the most nutrient-dense foods right at your fingertips. USDA research shows these tiny plants pack up to five times more vitamins than their mature counterparts. Their vitamin C content alone ranges from 20 to 147 mg per 100 grams based on which variety you choose to grow. These small but mighty greens give you a real health boost with very little effort at all.
I started my indoor microgreen garden three years ago. I lived in a small apartment with zero outdoor space for traditional gardening back then. My trays fit on a single windowsill and gave me fresh greens faster than any outdoor plot ever could. Within 10 days of my first planting, I had enough nutrient-dense microgreens to top salads and sandwiches every single week.
This guide shows you how to grow microgreens at home with total confidence from your very first tray. You will learn which varieties work best for people just getting started. The guide also covers the right growing conditions to use for the best results. Each step comes backed by real research so you know the advice works.
Below you will find everything you need to start your own indoor microgreen garden soon. The basic setup costs less than a meal at a restaurant. Your first harvest arrives in days instead of the months you wait for outdoor vegetables. Anyone with a windowsill or basic grow light can make this work at home.
How to Grow Microgreens Indoors
Growing microgreens at home takes less time than you might think. The whole process from seed starting microgreens to harvest runs just 7 to 21 days based on what variety you pick. Penn State Extension shows that microgreen germination works best with 2 to 4 days of darkness before light exposure.
I follow this microgreens step by step method with every single tray I plant now. Different varieties need different timelines, so keep that in mind as you plan. Arugula is ready in just 6 to 8 days while broccoli and radish take about 8 to 12 days to reach harvest size. The steps below show you exactly how to grow microgreens indoors from start to finish.
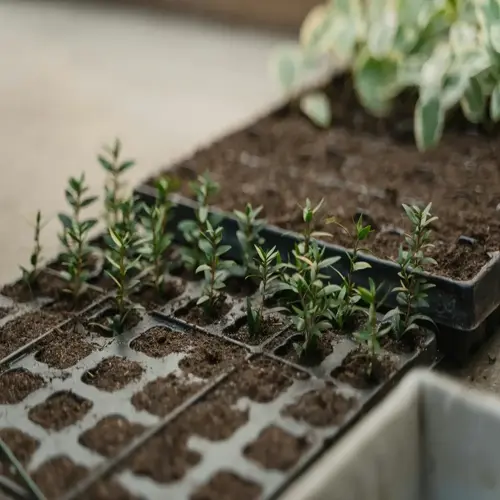
Prepare Your Growing Containers
- Container Selection: Choose low profile trays with drainage holes that are 1 to 2 inches deep, as microgreens have short root systems that do not require deep soil.
- DIY Options: Repurpose clean takeout containers, pie tins, or plastic produce boxes by poking drainage holes in the bottom if commercial trays are not on hand.
- Sanitization Step: Wash containers with warm soapy water and rinse well before each use to prevent bacterial contamination and mold growth.
Select and Add Growing Medium
- Soil Based Option: Use a seed starting mix or fine potting soil without large chunks, filling containers to about 1 inch depth and moistening until damp but not waterlogged.
- Soilless Alternative: Coconut coir, hemp mats, or natural fiber growing pads work well and reduce mess while providing adequate moisture retention for root development.
- Pre-Moistening Method: Dampen your growing medium before adding seeds rather than watering hard afterward, which helps prevent seed displacement and uneven coverage.
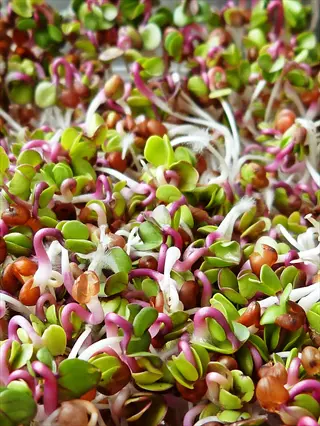
Sow Seeds Dense and Even
- Broadcast Seeding: Scatter seeds across the entire surface at a density much higher than you would for mature plants, aiming for seeds close together without stacking.
- Pressing Technique: Press seeds into the growing medium with your palm or a flat object to ensure good contact for consistent germination.
- Coverage Decision: Most small seeds like broccoli and radish do not need covering, while larger seeds like sunflower and pea benefit from a thin layer of medium on top.
Create Darkness for Germination
- Blackout Period: Cover trays with another tray, damp newspaper, or dark cloth for 2 to 4 days at 74°F (23°C) to encourage strong root development before stem elongation.
- Weight Application: Place a light weight on covered larger seeds like peas and sunflowers to help shed seed hulls and encourage straight vertical growth.
- Moisture Check: Mist once or twice each day during blackout to maintain humidity without creating standing water that promotes mold growth.
Expose to Light After Sprouting
- Timing Indicator: Remove covers when you see pale yellow shoots reaching about 1 inch tall, which is often 2 to 4 days after sowing based on variety.
- Light Requirements: Provide 4 to 6 hours of direct sunlight near a south window or 12 to 18 hours under artificial grow lights positioned 2 to 4 inches above plants.
- Greening Process: Seedlings transform from yellow to vibrant green within 24 to 48 hours of light exposure as chlorophyll production begins.
Maintain Proper Watering
- Bottom Watering Method: Place trays in a larger container with about an inch of water for 10 to 15 minutes to allow roots to absorb moisture from below, keeping leaves dry.
- Top Watering Alternative: If misting from above, water at the base of plants in the morning so foliage dries before evening to reduce disease risk.
- Frequency Guideline: Check moisture each day by touching the growing medium surface, watering when the top feels dry but before plants show wilting signs.
Best Microgreens for Beginners
The best microgreens to grow are ones that forgive your mistakes. Easy microgreens like radish microgreens keep going even when you mess up. Broccoli microgreens handle your errors well too. USDA research shows red cabbage and cilantro rank highest for vitamin C.
When I started out, I found beginner microgreen seeds that sprout fast gave me the best results. The microgreen varieties below range from mild to bold and peppery. You can match them to your own flavor preferences with ease. Each one rewards you with a harvest in under two weeks.
Radish Microgreens
- Growth Speed: Radish microgreens are among the fastest to harvest, ready in just 6 to 10 days from seeding, making them ideal for impatient first time growers who want quick results.
- Flavor Profile: These microgreens deliver a pleasant peppery kick similar to mature radishes, adding zest to sandwiches, salads, and Asian inspired dishes without overwhelming other ingredients.
- Growing Difficulty: Radish seeds germinate well even in imperfect conditions and tolerate minor watering mistakes, earning them a beginner friendly reputation among indoor gardeners.
- Nutritional Highlight: Radish microgreens contain notable levels of vitamin C and provide a concentrated source of glucosinolates, compounds studied for their potential health benefits.
- Visual Appeal: The stems display attractive pink to red coloring near the base with bright green cotyledons, adding visual interest to plated dishes and garnishes.
- Seed Availability: Radish seeds for microgreens are cheap and found at most garden centers, making them an economical choice for beginners learning the process.
Broccoli Microgreens
- Growth Timeline: Broccoli microgreens reach harvest size in 8 to 12 days, providing a quick turnaround while developing their characteristic mild brassica flavor.
- Health Benefits: Research shows broccoli microgreens contain high levels of sulforaphane, a compound studied a lot for its antioxidant properties and potential protective effects.
- Flavor Description: These microgreens taste milder than mature broccoli with subtle earthy notes, making them palatable even for people who dislike the stronger flavor of the full sized vegetable.
- Germination Success: Broccoli seeds sprout well at room temperature and produce uniform stands even when seed distribution is a bit uneven during sowing.
- Culinary Versatility: The mild taste blends into smoothies for added nutrition without affecting flavor, and they work well as salad base or sandwich topping.
- Storage Quality: Broccoli microgreens maintain their texture and flavor for 7 to 10 days when stored right in the refrigerator, allowing time to use the entire harvest.
Sunflower Microgreens
- Harvest Window: Sunflower microgreens are ready in 9 to 12 days and produce big yields with thick crunchy stems and large cotyledons that provide satisfying texture.
- Taste Profile: These microgreens offer a nutty sunflower seed flavor with mild sweetness, appealing to adults and children alike as a nutritious snack or salad ingredient.
- Seed Preparation: Unlike smaller seeds, sunflower seeds benefit from 8 to 12 hours of soaking before planting to soften the hull and speed germination.
- Weight Requirement: Placing a weighted tray on top during germination helps sunflower seedlings push off their seed hulls, resulting in cleaner harvests with fewer stuck shells.
- Protein Content: Sunflower microgreens contain more protein than many other varieties, making them popular among those seeking plant based protein sources from homegrown foods.
- Growing Tip: Use hulled sunflower seeds sold for microgreens rather than birdseed varieties to ensure food safe quality and higher germination rates.
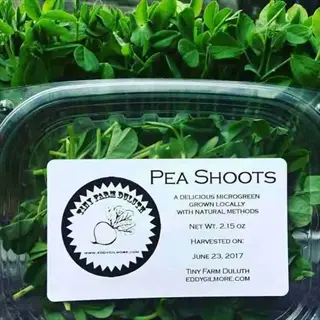
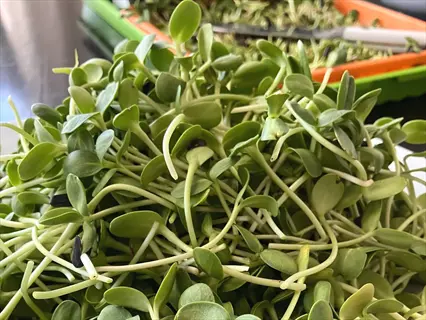
Pea Shoots
- Days to Harvest: Pea shoots reach optimal size in 8 to 14 days depending on desired height, with tendrils adding decorative appeal as they grow taller.
- Flavor Character: These microgreens taste like fresh spring peas with natural sweetness that makes them a favorite for eating raw or sauteed light as a side dish.
- Seed Treatment: Soak pea seeds for 8 to 24 hours before planting and apply weight during germination to help stems grow straight and shed their seed coats.
- Yield Volume: Pea shoots produce abundant harvests with tall growth reaching 3 to 6 inches, providing more volume per tray than smaller microgreen varieties.
- Regrowth Potential: Unlike most microgreens, pea shoots may produce a second smaller harvest if cut above the lowest leaf node, though quality decreases with subsequent cuts.
- Culinary Uses: Their substantial texture holds up well in stir fries and warm dishes where other delicate microgreens would wilt right away upon contact with heat.
Red Cabbage Microgreens
- Growing Period: Red cabbage microgreens mature in 10 to 14 days, developing their signature purple red coloring that intensifies with adequate light exposure during growth.
- Nutritional Champion: USDA research identified red cabbage as having the highest vitamin C content among 25 microgreen varieties tested, along with significant carotenoid levels.
- Flavor Notes: These microgreens have a mild cabbage taste with slight peppery undertones, less intense than mature red cabbage while providing similar nutritional compounds.
- Color Impact: The vibrant purple stems create striking visual contrast on plates and in salads, making them a favorite choice for food presentation and garnishing.
- Health Research: Studies using red cabbage microgreens showed they reduced LDL cholesterol levels more than mature red cabbage in laboratory mouse studies.
- Growing Ease: Red cabbage seeds germinate well and the seedlings tolerate beginner mistakes well, making them suitable for new growers despite their impressive nutritional profile.
Arugula Microgreens
- Quick Harvest: Arugula microgreens are ready in just 5 to 10 days, ranking among the fastest varieties and providing almost instant gratification for eager new growers.
- Distinctive Taste: These microgreens deliver the same peppery, bitter flavor as mature arugula leaves, concentrated in tender young cotyledons perfect for salads.
- Germination Rate: Arugula seeds sprout fast and uniform at room temperature without requiring soaking or special treatment, simplifying the growing process a lot.
- Heat Sensitivity: This variety prefers cooler conditions around 65°F to 70°F (18°C to 21°C) and may bolt or become bitter tasting in temperatures above 75°F (24°C).
- Culinary Pairing: The bold peppery flavor pairs great with mild ingredients like mozzarella, tomatoes, and olive oil in Italian inspired dishes and pizzas.
- Successive Planting: The rapid growth cycle makes arugula ideal for succession planting, where you start new trays each week to maintain continuous fresh supply.
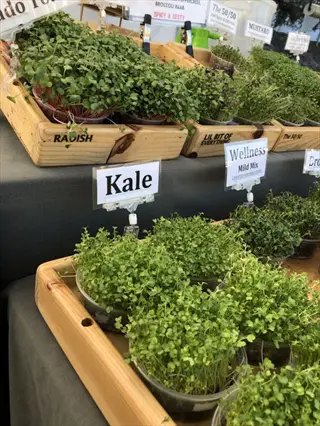
Kale Microgreens
- Maturation Time: Kale microgreens develop over 8 to 12 days, emerging with delicate leaves that taste milder and more tender than their sometimes tough mature counterparts.
- Nutritional Value: These microgreens concentrate vitamins A, C, and K along with antioxidants, delivering kale nutrition in a more palatable form for those who dislike mature kale.
- Flavor Improvement: Many people who avoid mature kale enjoy the microgreen version because it lacks the bitter compounds that develop as the plant ages.
- Growing Reliability: Kale seeds germinate well and the seedlings grow at a steady predictable rate, making them easy to time for planned meals or events.
- Variety Options: Both curly and lacinato kale varieties work well as microgreens, with slight differences in leaf texture but similar growing requirements.
- Smoothie Favorite: The mild flavor makes kale microgreens popular for blending into smoothies where they add nutrition without the strong taste of mature leaves.
Cilantro Microgreens
- Longer Growth Period: Cilantro microgreens require 14 to 21 days to reach harvest size, making them one of the slower varieties but worth the wait for cilantro lovers.
- Vitamin C Leader: USDA research ranked cilantro microgreens among the highest in vitamin C content, tied with red cabbage for top position among varieties tested.
- Authentic Flavor: These microgreens deliver genuine cilantro taste from day one, providing that distinctive flavor popular in Mexican, Asian, and Middle Eastern cuisines.
- Germination Challenge: Cilantro seeds have harder seed coats that benefit from gentle crushing or overnight soaking to improve germination rates and timing uniformity.
- Continuous Supply: The longer growth cycle means planning ahead, but staggering plantings every two weeks ensures steady availability once your rotation is established.
- Temperature Preference: Cilantro microgreens prefer cooler growing conditions and may bolt too early in warm environments, so position them away from heat sources.
Optimal Growing Conditions
Getting your growing conditions microgreens right makes a big difference in how your trays turn out. Utah State Extension research shows seeds sprout best at 74°F (23°C). Once your greens start to grow, you can drop the microgreen temperature to 68°F to 72°F for best results.
I learned early on that microgreen light requirements vary based on what source you use. If you grow near a window, you need 4 to 6 hours of direct sun each day. Under grow lights, your plants do best with 12 to 18 hours of light placed 2 to 4 inches above the trays. The table below shows you how much light microgreens need at each stage.
Microgreen watering takes some practice to get right. Bottom watering works best once your seeds sprout because it keeps the leaves dry and prevents mold. During germination, light misting once or twice a day keeps things moist without overdoing it.
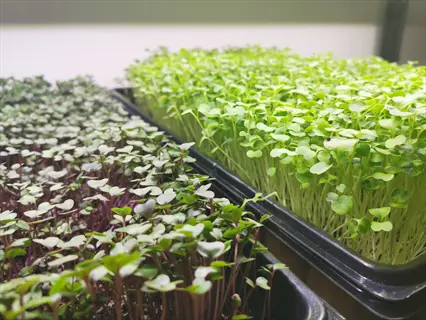
Harvesting and Storing Greens
Knowing when to harvest microgreens is half the battle for new growers. Most varieties hit the sweet spot 7 to 21 days after planting based on what you grow. South Dakota State Extension research shows your greens are ready once the first true leaves appear above the rounded seed leaves.
I harvest my trays in the morning after watering the night before. The stems are crisp and full of water at that time. When cutting microgreens, snip about half an inch above the soil with sharp scissors. This gives you the cleanest cut and keeps dirt out of your harvest.
Your microgreen storage method affects how long they last. Microgreen shelf life runs about 7 to 14 days when you store them right in the fridge. The tips below show you how to harvest microgreens and keep them fresh for as long as possible.
Recognizing Harvest Readiness
- Cotyledon Development: Most microgreens are ready when the first pair of seed leaves are open and the stems reach 1 to 3 inches tall.
- True Leaf Indicator: Some varieties like pea shoots and sunflower are best harvested after the first true leaves appear, which look different from the rounded cotyledons.
- Timing Range: Different varieties mature at different rates, with fast growers like radish ready in 6 to 8 days while slower varieties like cilantro need 14 to 21 days.
Proper Cutting Technique
- Tool Selection: Use clean sharp scissors or a knife to cut stems about half an inch above the soil surface, avoiding soil contact with your harvesting tool.
- Batch Harvesting: Grasp small bunches and cut with one clean motion rather than sawing, which damages stems and reduces storage quality.
- Timing Matters: Harvest in the morning after watering the night before, when plants are hydrated and leaves are crisp rather than wilted from afternoon heat.
Washing and Drying
- Gentle Rinse: Swirl harvested microgreens in cold water to remove any soil particles or seed hulls, then lift out with care to avoid bruising delicate leaves.
- Drying Method: Spread microgreens on clean paper towels or use a salad spinner on the gentlest setting to remove excess moisture before storage.
- Moisture Balance: Microgreens should be dry to touch but not dried out, as both excess moisture and over drying reduce shelf life quite a bit.
Refrigerator Storage
- Container Choice: Store microgreens in airtight containers lined with dry paper towels to absorb excess moisture while maintaining humidity around the greens.
- Temperature Setting: Keep stored microgreens at 38°F to 40°F (3°C to 4°C) in the main refrigerator section rather than colder areas where they may freeze.
- Expected Duration: Stored right, microgreens last 7 to 14 days, with heartier varieties like pea shoots lasting longer than delicate ones like basil.
Signs of Spoilage
- Visual Changes: Discard microgreens showing yellowing leaves, slimy texture, dark spots, or visible mold growth as these indicate spoilage has begun.
- Odor Check: Fresh microgreens should smell green and pleasant, so any sour or off odors indicate bacterial growth and the batch should not be eaten.
- Texture Test: Microgreens past their prime become limp and lose their crunch, though wilted greens can sometimes be revived in ice water for a bit.
Food Safety for Home Growers
Microgreen food safety matters more than many new growers realize. These greens have a strong safety record overall. You still need to follow basic microgreen hygiene practices to keep that record going. Proper handling prevents issues with bacteria like Salmonella and E. coli.
Growing microgreens safely comes down to a few simple habits. When I first started, I lost two trays to mold before I figured out what I was doing wrong. Safe microgreens are easy to produce once you learn what to watch for. The key to microgreen contamination prevention is doing things right from step one.
South Dakota State Extension says to sanitize your equipment and wash hands before touching seeds. The checklist below covers everything you need to keep your greens safe.
Seed Selection and Storage
- Untreated Seeds Only: Purchase seeds labeled for sprouting or microgreens that have not been treated with chemicals not meant for eating at seedling stage.
- Certified Organic Option: USDA certified organic seeds provide added assurance that no banned chemicals were used during production, though clean untreated seeds also work.
- Proper Storage: Keep seeds in cool dry conditions below 70°F (21°C) in airtight containers to maintain viability and prevent mold growth on the seeds.
Equipment Sanitation
- Pre Use Cleaning: Wash all trays, containers, and tools with hot soapy water before each use, then rinse well to remove soap residue that could affect seed germination.
- Sanitizing Solution: For added protection, sanitize equipment with a diluted bleach solution of 1 tablespoon per gallon of water, then rinse and air dry.
- Dedicated Tools: Consider keeping separate scissors or knives just for microgreen harvesting to avoid cross contact from other kitchen tasks.
Growing Environment Hygiene
- Clean Growing Area: Set up your microgreen station away from potential contamination sources like pet areas, garbage, and raw meat prep surfaces.
- Hand Washing Protocol: Wash hands well with soap before handling seeds, watering plants, or harvesting, and after touching phones, doorknobs, or pets.
- Fresh Water Supply: Use clean potable water for all watering needs and never reuse water that has drained from trays as it may contain bacteria or mold spores.
Monitoring for Contamination
- Daily Inspection: Check trays each day for signs of mold, unusual colors, or off odors, and discard entire batches showing contamination rather than trying to salvage portions.
- Mold Identification: Learn to tell the difference between fuzzy white or colored mold growth which is harmful and fine white root hairs which are normal and safe.
- Temperature Awareness: Avoid growing in areas where temperatures rise above 80°F (27°C) for long periods, as warmth speeds up pathogen growth.
Safe Consumption Practices
- Wash Before Eating: Rinse harvested microgreens under clean running water before eating even when grown at home in controlled conditions.
- Prompt Refrigeration: Refrigerate harvested microgreens within two hours of cutting and consume within one to two weeks for best safety and quality.
- Vulnerable Populations: Young children, elderly individuals, pregnant women, and those with weak immune systems should consider cooking microgreens rather than eating raw.
Troubleshooting Growing Issues
Every grower runs into microgreen problems at some point. The good news is that most common microgreen mistakes come down to just two things: too much water or not enough light. Microgreen troubleshooting gets easier once you know what signs to look for.
When I first started, I saw leggy microgreens in almost every tray because my windowsill did not get enough sun. Yellow microgreens showed up when I watered too often and the roots sat in soggy soil. Both issues went away once I fixed the basics.
Microgreen mold is another issue that scares new growers but it is easy to prevent with good air flow. The table below shows you the most common problems, what causes them, and how to fix each one fast.
5 Common Myths
Microgreens and sprouts are exactly the same thing, just harvested at different times and grown in identical conditions.
Microgreens grow in soil or growing medium with leaves exposed to light, while sprouts germinate entirely in water without light, making them fundamentally different in growing method and food safety profile.
You need expensive specialized equipment and grow lights to successfully cultivate microgreens indoors at home.
Basic household items like shallow containers and a sunny windowsill providing 4 to 6 hours of natural light are sufficient for growing most microgreen varieties without any specialized equipment.
Microgreens have the same nutritional value as their fully grown vegetable counterparts and offer no additional health benefits.
USDA research demonstrates that microgreens contain approximately five times higher concentrations of vitamins and carotenoids compared to mature vegetables of the same plant varieties.
Microgreens can be harvested multiple times from the same planting since they will regrow after cutting like herbs or lettuce.
Most microgreens are single-harvest crops that do not regrow after cutting because you remove the growing point when harvesting above the soil line.
Any seed packet from the garden center works perfectly fine for growing safe and healthy microgreens at home.
Seeds specifically sold for microgreen or sprouting use are preferable because regular garden seeds may be treated with fungicides or chemicals not intended for consumption at the seedling stage.
Conclusion
Growing microgreens gives you five times the nutrition of big vegetables in just days. When I started home microgreen growing three years ago, my whole setup fit on one windowsill. A basic grow light works great for starting microgreens any time of year.
The whole process from seed to plate takes just 7 to 21 days based on the variety you pick. Your indoor microgreen garden needs only trays, growing medium, seeds, water, and light. Follow the food safety basics in this guide and you will produce safe greens every single time.
Microgreens for beginners work best when you start with forgiving types. I tell every new grower to try radish or broccoli first because they handle mistakes well. Once you master them, move on to sunflower, pea shoots, and others that need a bit more care.
After a few successful batches, you can set up a rotation to grow microgreens at home week after week. Plant new trays every few days and you will have fresh greens ready to harvest all the time. Anyone with a small space can make this work with the steps covered in this guide.
External Sources
Frequently Asked Questions
Can microgreens be grown indoors year-round?
Yes, microgreens can be grown indoors year-round because they do not depend on outdoor weather conditions or seasonal changes.
Do microgreens need direct sunlight to grow?
No, microgreens do not require direct sunlight and can thrive under artificial grow lights or in bright indirect light near windows.
Is it cost-effective to grow microgreens at home?
Yes, growing microgreens at home is cost-effective because seeds are inexpensive and a small investment in supplies yields multiple harvests.
How do I prevent mold in microgreens?
Prevent mold by ensuring good air circulation, avoiding overwatering, using clean containers, and not overcrowding seeds.
Can you reuse microgreen soil?
Reusing microgreen soil is not recommended because depleted nutrients and potential pathogen buildup can affect new crops.
What are common mistakes beginners make?
Common beginner mistakes include overwatering, insufficient light, overcrowding seeds, harvesting too late, and poor air circulation.
Are homegrown microgreens safer than store-bought?
Homegrown microgreens can be safer when you follow proper food safety practices because you control the entire growing environment.
How soon can you harvest microgreens?
Most microgreens can be harvested within 7 to 14 days after planting, though some varieties may take up to 21 days.
Do microgreens attract indoor pests?
Microgreens can attract fungus gnats and other small pests if conditions are overly moist, but proper care minimizes this risk.
What supplies are essential for starting?
Essential supplies include shallow trays, quality seeds, growing medium like potting mix or coconut coir, and a light source.