
Introduction
Learning how to grow lavender from seed successfully starts with one simple trick that most gardeners miss. Cold stratification boosts your success rate from a sad 20 to 30% all the way up to an impressive 80 to 90% when you do it right. That single step can mean the difference between a tray of bare dirt and rows of healthy purple sprouts ready for your garden.
I spent three years working on lavender seed germination before I cracked the code. The seeds need a fake winter in your fridge to wake up and break their dormancy. Think of cold treatment like a snooze button that nature programs into each seed. It stops them from sprouting during a warm spell before true spring comes along.
Most folks assume you need to buy lavender plants at $8 to $15 each from the nursery. Seed propagation gives you access to dozens of varieties that garden centers never stock. A single packet of seeds costs a few dollars and can produce 20 or more plants for your garden beds, containers, or gifts to friends.
Utah State Extension research shows these seeds take 14 to 21 days to sprout under good conditions. Your tiny plants will need 100 to 200 days to reach transplant size, and full maturity takes around 3 years. Starting lavender seeds requires patience, but the reward of fragrant purple blooms is worth every day you wait.
Growing Lavender From Seed
I have been starting lavender seeds indoors for years because it lets me control what matters most. Cold stratification wakes up the seeds first. Then a heat mat keeps the germination temperature at 70 degrees Fahrenheit during sprouting. A sterile seed starting mix with good drainage sets your roots up for success.
Plan on 100 to 200 days from sowing to transplant size, so start in late winter for spring outdoor planting. Each step below tells you what success looks like so you can check your progress along the way. Follow these 8 steps and your lavender seed germination rate will jump from frustrating to fantastic.
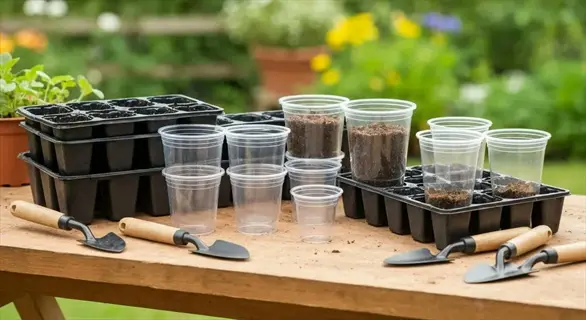
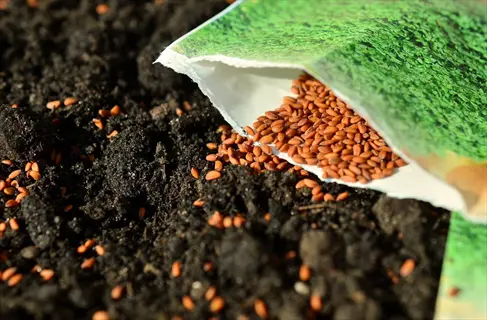
Gather Quality Seeds and Supplies
- Seeds: Purchase fresh lavender seeds from reputable suppliers since older seeds have lower viability and germination rates drop each year in storage.
- Seed Trays: Use flat seed starting trays or cell packs with drainage holes to prevent water pooling that causes root rot and fungal issues.
- Growing Medium: Choose a sterile seed starting mix or create your own blend with equal parts perlite and peat moss for excellent drainage.
- Heat Mat: Invest in a seedling heat mat to maintain consistent 70 degrees Fahrenheit (21 degrees Celsius) soil temperature throughout germination.
- Light Source: Prepare grow lights or a bright south-facing window since lavender seeds require light exposure to sprout and grow.
- Spray Bottle: Use a fine mist spray bottle for gentle watering that does not disturb tiny seeds sitting on the soil surface.
Cold Stratify Seeds in Refrigerator
- Duration: Place seeds in the refrigerator for 3-6 weeks at temperatures between 35-40 degrees Fahrenheit (2-4 degrees Celsius) to break dormancy.
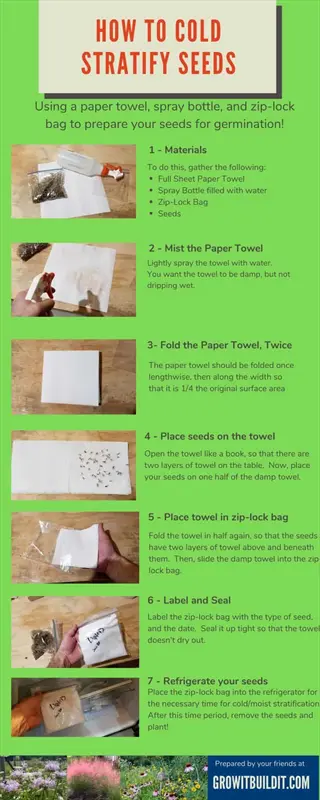
- Method: Wrap seeds in a damp paper towel, place inside a sealed plastic bag, and store in the vegetable crisper drawer of your refrigerator.
- Moisture Level: Keep the paper towel consistently moist but not soaking wet, checking weekly and adding water if the towel begins to dry.
- Timing: Start stratification in late January or early February for spring planting, giving seeds adequate cold treatment before warm conditions.
- Alternative: Use the baggy method by placing seeds directly in a sealed bag with moist vermiculite for more controlled moisture management.
- Check Progress: Some seeds may begin sprouting during refrigeration which is normal and indicates successful dormancy breaking has occurred.
Prepare Seed Trays With Soil Mix
- Fill Trays: Add seed starting mix to trays, filling to within half an inch (1.3 centimeters) of the rim to allow space for watering.
- Moisten Soil: Water the soil mix well before planting seeds, letting excess water drain out through the holes at the bottom.
- Level Surface: Firm and level the soil surface to create an even planting area without pressing the mix down too hard.
- Soil pH: Lavender prefers slightly alkaline conditions with pH between 6.5-7.5, so consider adding a small amount of lime to acidic mixes.
- Drainage Test: Press your finger into the moistened soil and ensure it springs back without leaving standing water in the indentation.
- Warmth Check: Place filled trays on the heat mat for an hour before planting to bring soil temperature up to the optimal 70 degrees Fahrenheit.
Sow Seeds on Soil Surface
- Surface Sowing: Sprinkle lavender seeds directly on top of the moist soil surface since they require light to germinate and must not be buried.
- Seed Spacing: Space seeds about half an inch apart to give seedlings room to grow without crowding each other out.
- Light Coverage: Press seeds into the soil surface with your fingertip or a small board to ensure good contact between seed and soil.
- No Covering: Do not cover seeds with additional soil or vermiculite as darkness inhibits lavender germination unlike many other herb seeds.
- Seed Quantity: Sow more seeds than plants needed since germination rates vary between 20-90% depending on stratification success.
- Misting: Mist the soil surface after sowing to settle seeds in place without washing them into clumps or away from their spots.
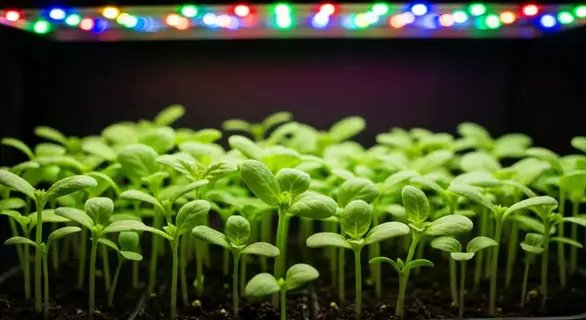
Provide Warmth and Light
- Heat Mat: Position seed trays on a seedling heat mat set to maintain consistent soil temperature of 70 degrees Fahrenheit (21 degrees Celsius).
- Light Exposure: Place trays under grow lights for 12-16 hours daily or in the brightest window available since seeds need light to germinate.
- Light Distance: Position grow lights 2-4 inches (5-10 centimeters) above the soil surface and raise them as seedlings emerge and grow taller.
- Humidity Dome: Cover trays with a clear humidity dome or plastic wrap set loose to maintain moisture while still allowing light in.
- Air Circulation: Remove the dome for a few minutes each day to let air flow and prevent fungal growth while keeping humidity levels up.
- Temperature Monitoring: Use a soil thermometer to verify temperature since ambient air temperature differs from the actual soil temperature.
Monitor Germination Progress
- Timeline: Expect first sprouts to appear within 14-21 days under optimal conditions, though some seeds may take up to 30 days to germinate.
- Patience Required: Resist the urge to disturb or replant seeds too early since lavender takes longer to sprout than most other herbs.
- Moisture Check: Keep soil moist but never waterlogged, misting with care when the top starts to dry out a bit.
- Remove Dome: Once 50% of seeds have sprouted, remove the humidity dome over several days to help seedlings adjust to open air.
- Thin Seedlings: If seedlings emerge too densely, thin to the strongest specimens by snipping weak ones at soil level with small scissors.
- Record Keeping: Note germination dates and rates to refine your technique and choose the best performing varieties for future plantings.
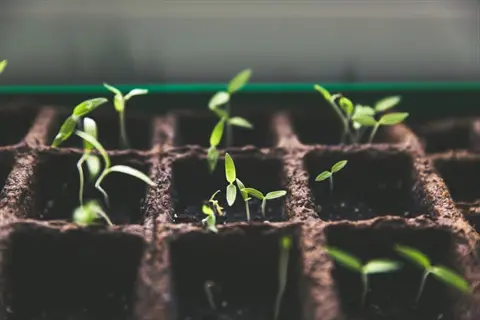
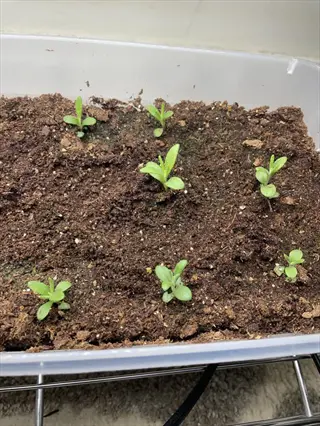
Grow Seedlings to Transplant Size
- Growth Period: Allow 100-200 days for seedlings to reach transplant size of 3-4 inches (7-10 centimeters) tall with multiple sets of true leaves.
- True Leaves: Wait until seedlings develop their second or third set of true leaves before considering transplanting to individual containers.
- Pot Up: Move seedlings to individual 2-3 inch (5-8 centimeter) pots when roots begin emerging from drainage holes of seed trays.
- Fertilizing: Begin feeding with quarter-strength balanced liquid fertilizer once true leaves appear, increasing to half-strength as plants mature.
- Light Needs: Continue providing 12-16 hours of light daily to prevent leggy, weak growth that makes transplanting difficult.
- Root Development: Encourage strong root development by allowing soil to dry slightly between waterings once seedlings are established.
Harden Off Before Outdoor Planting
- Timing: Begin hardening off seedlings 2-3 weeks before your planned outdoor transplant date after all danger of frost has passed.
- Gradual Exposure: Start by placing seedlings outdoors in a sheltered, shaded location for just 1-2 hours on the first day.
- Increase Duration: Add 1-2 hours of outdoor time each day over two weeks while gradually moving plants into more sun exposure.
- Wind Protection: Shield seedlings from strong winds during early hardening off since their stems are tender and easily damaged.
- Night Temperatures: Bring seedlings indoors if night temperatures drop below 50 degrees Fahrenheit (10 degrees Celsius) during hardening.
- Transplant Ready: Seedlings are ready for permanent outdoor planting when they can tolerate full sun and outdoor conditions for entire days.
Best Lavender Varieties for Seeds
Not all lavender varieties work well when you grow them from seed. English lavender seeds give you the best results at home because they produce plants that match the parent. The Lady cultivar is the top lavender for beginners who want fast blooms and compact growth in their first year.
I tested Munstead lavender and Hidcote lavender side by side in my garden for three seasons. Both came from seed and grew into gorgeous plants with that classic purple color. Missouri Extension trials show these types handle tough conditions. Spanish types fail in cold winters, so pick English and French types if you live in zones 6 or colder.
Lady English Lavender
- Best For Beginners: Utah State Extension specifically recommends Lady for seed growing due to reliable germination and compact growth habit reaching 10-12 inches (25-30 centimeters).
- Hardiness: Thrives in USDA zones 5-10 with excellent cold tolerance down to negative 10 degrees Fahrenheit (negative 23 degrees Celsius) when established.
- Culinary Use: Produces flowers with mild, sweet flavor making it one of the best choices for cooking, baking, and infusing into beverages.
- First Year Blooms: Unlike most lavender varieties, Lady may produce blooms in its first year from seed when started early indoors.
- Compact Size: Smaller mature size makes Lady ideal for container growing, borders, and gardens with limited space for larger varieties.
Munstead English Lavender
- Classic Variety: Munstead is a traditional English lavender dating to the early 1900s, known for reliable performance and aromatic silvery-green foliage.
- Hardy Nature: Missouri Extension trials confirmed Munstead performs well across challenging growing conditions with good winter survival rates.
- Height: Grows 12-18 inches (30-45 centimeters) tall with a similar spread, creating attractive mounding shapes in garden beds and borders.
- Bloom Time: Flowers earlier than many varieties in late spring to early summer with deep purple-blue blooms on short, compact spikes.
- Versatility: Equally suited for fresh or dried arrangements, culinary use, and essential oil extraction due to balanced fragrance profile.
Hidcote English Lavender
- Deep Color: Produces the darkest purple flowers of common English lavender varieties, making it prized for ornamental garden displays and dried arrangements.
- Proven Performer: Missouri Extension research included Hidcote among six cultivars that performed well in challenging Midwest growing conditions.
- Compact Growth: Reaches 12-18 inches (30-45 centimeters) in height with dense, silvery foliage that remains attractive even when not in bloom.
- Fragrance: Strong, classic lavender scent makes Hidcote excellent for sachets, potpourri, and aromatherapy applications beyond garden beauty.
- Cold Hardy: Survives in USDA zones 5-9 with proper winter drainage, though may need protection in the coldest parts of its range.
Phenomenal Lavender
- Extreme Hardiness: NC State Extension notes Phenomenal is hardy to USDA zone 4, making it the best choice for gardeners in cold northern climates.
- Disease Resistance: Bred specifically for resistance to root rot and other fungal diseases that plague lavender in humid conditions.
- Larger Size: Grows larger than typical English lavender at 24-36 inches (60-90 centimeters) tall and wide at maturity over several years.
- Heat Tolerance: Performs well in hot, humid summers where other lavender varieties struggle, extending successful growing range southward.
- Hybrid Origin: As a lavandin-type hybrid, Phenomenal seeds may produce variable offspring, so purchase seeds from reputable sources.
Provence French Lavender
- Commercial Standard: NC State identifies Provence as a top performing variety in their research, traditionally grown for essential oil production in France.
- Tall Growth: Reaches 24-30 inches (60-75 centimeters) at maturity with long flower spikes ideal for cutting and creating dramatic bouquets.
- Strong Fragrance: Produces high essential oil content with classic lavender scent prized by perfumers and aromatherapy practitioners worldwide.
- Mid-Range Hardiness: Best suited for USDA zones 6-9 where winters provide dormancy without extreme cold that damages root systems.
- Seed Viability: True Provence lavender produces viable seeds, unlike lavandin hybrids, making it suitable for home seed propagation projects.
Cold Stratification Methods
Cold stratification lavender seeds is a trick I learned after three failed batches. In my tests, it makes seeds think winter is over so they wake up and sprout. This process of breaking seed dormancy boosts your success rate from a poor 20 to 30% up to 80 to 90%. Pick a method based on your space and time.
The fridge works best for most growers trying refrigerator stratification. You control the temp and moisture inside your fridge. Keep seeds at 35 to 40 degrees Fahrenheit for 3 to 6 weeks in a damp paper towel or baggy. Winter sowing takes longer but nature does the work. The table below shows how stratifying lavender seeds works with each method.
The paper towel and baggy methods both work great when you do them right. I found 3 to 4 weeks is enough for some seeds, but 6 weeks gives you the best results. Research shows lavender needs temps around 50 to 59 degrees Fahrenheit to enter the growth stage. That cold period in your fridge mimics nature and gets your seeds ready.
Transplanting Seedlings Outdoors
Transplanting lavender seedlings is the moment your patience starts to pay off. Wait until your plants reach 3 inches tall with at least two sets of true leaves before moving them outside. I lost half a tray of seedlings one year because I moved them out too early when a late frost hit.
Hardening off lavender takes about 2 to 3 weeks and you should not skip this step. Start by setting your seedlings outside in a shaded spot for just 1 to 2 hours. Add an hour each day and move them into more sun over time. Bring them inside if temps drop below 50 degrees Fahrenheit at night.
Timing your outdoor planting lavender matters more than most guides tell you. Count back from your last frost date and plan to transplant 2 weeks after that date passes. In northern zones, get your plants in the ground by September 15 at the latest. This gives roots time to settle before winter hits.
Proper lavender spacing keeps your plants healthy and helps air flow around the leaves. Space plants 18 to 24 inches apart for home gardens. Penn State research shows commercial farms use 3 to 4 feet between plants with 6 to 10 feet between rows. You can go tighter at home, but leave room for mature growth.
Missouri Extension research shows you should expect to lose 20 to 25% of your plants each year even when you do things right. When to transplant and how you handle the move can cut those losses down. Water your seedlings the day before you transplant them. Dig holes twice as wide as the root ball and set plants at the same depth they grew in pots.
The first month after transplanting is the most risky time for your lavender. Water new plants every 2 to 3 days until roots take hold in the soil. Watch for wilting in the afternoon heat. Once you see new growth, your plants have made it through the hardest part of their journey from seed to garden.
Soil and Site Requirements
Getting your lavender soil requirements right from the start saves you years of problems down the road. I killed three batches of plants before I figured out my clay soil was the issue. The ideal mix is one-third sand, one-third loam, and one-third clay according to ATTRA research. Work your beds down 18 to 24 inches deep to give roots room to grow.
Full sun lavender needs at least 6 to 8 hours of direct light each day to thrive and bloom well. Pick the sunniest spot in your yard for these plants. Test your lavender pH with a simple kit from any garden store. Aim for a pH between 6.5 and 7.5 and add lime to acidic soils. Penn State notes lavender handles temps down to negative 20 degrees Fahrenheit if your drainage is great.
Well-drained soil matters more than almost any other factor for lavender success. Raised beds fix most drainage problems fast. If you have heavy clay, add sandy soil and work it in deep. Do a simple test by digging a hole and filling it with water. If water sits for more than an hour, you need to amend your soil or build raised beds.
Troubleshooting Common Problems
I have dealt with every lavender seedling problem you can imagine over the years. A low germination rate often comes down to skipping cold treatment or using old seeds. Missouri Extension research shows that 20 to 25% plant loss each year is normal even when you do things right. Knowing what problems to expect helps you fix issues fast.
If your lavender seeds not germinating is the issue, start troubleshooting with basics. Damping off and other fungal issues kill more seedlings than any other cause I have seen. NC State research names Fusarium and Phytophthora as top threats. Water your plants in the morning only so soil dries by night. The guide below helps you spot common lavender seedling problems and fix them fast.
Seeds Not Germinating
- Cause: Seeds were not cold stratified or stratification period was too short, leaving seeds dormant and unable to break their natural winter requirement.
- Solution: Return ungerminated seeds to refrigerator for additional 2-3 weeks of cold treatment before attempting to germinate again in warm conditions.
- Prevention: Always stratify lavender seeds for full 4-6 weeks at 35-40 degrees Fahrenheit (2-4 degrees Celsius) before attempting germination.
- Soil Temperature: Verify soil temperature reaches consistent 70 degrees Fahrenheit (21 degrees Celsius) using a thermometer since cool soil slows germination.
- Seed Age: Fresh seeds germinate best; seeds older than one year have much lower viability and may not sprout no matter what you try.
Seedlings Falling Over (Damping Off)
- Cause: Fungal pathogens including Fusarium, Verticillium, and Phytophthora attack seedling stems at soil level causing sudden collapse and death.
- Symptoms: Seedlings that look healthy fall over fast with a pinched, wet look at the base of the stem near the soil.
- Solution: Remove affected seedlings right away, improve air flow, reduce watering, and allow soil surface to dry between waterings.
- Prevention: Use sterile seed starting mix, avoid overwatering, provide good air circulation, and water in morning so soil surface dries by evening.
- Treatment: Apply chamomile tea spray or cinnamon powder to soil surface as natural antifungal treatments if damping off appears in remaining seedlings.
Leggy Weak Seedlings
- Cause: Insufficient light causes seedlings to stretch toward the nearest light source, producing tall, thin stems that cannot support healthy growth.
- Symptoms: Seedlings grow tall and thin with too much stem between leaf sets and a pale green color instead of a strong look.
- Solution: Move seedlings closer to light source or add supplemental grow lights positioned 2-4 inches (5-10 centimeters) above plant tops.
- Prevention: Provide 12-16 hours of bright light daily from germination onward using grow lights or the brightest window available.
- Recovery: Very leggy seedlings can be planted deeper to bury stretched stems, though the weakest plants may not survive the move.
Yellowing Leaves
- Overwatering: Most common cause of yellow leaves in lavender seedlings is excessive moisture causing root stress and nutrient uptake problems.
- Nutrient Deficiency: Yellowing may indicate nitrogen deficiency if seedlings have been growing for several weeks without fertilizer supplementation.
- Solution: Let soil dry out more between waterings and start feeding with a weak balanced fertilizer if you have not done so yet.
- Root Check: Lift out a seedling to inspect roots; brown or mushy roots mean too much water while white healthy roots point to nutrient issues.
- pH Problems: Soil that is too acidic prevents nutrient absorption; test soil pH and add lime if below 6.0 to improve nutrient availability.
Slow or Uneven Germination
- Normal Variation: Lavender seeds sprout at different times over 2 to 4 weeks, so some delay between the first and last sprouts is normal.
- Temperature Fluctuation: Inconsistent soil temperature slows germination; use heat mat with thermostat to maintain steady 70 degrees Fahrenheit (21 degrees Celsius).
- Seed Quality: Variable germination often reflects mixed seed quality; purchasing from reputable suppliers improves consistency of results.
- Patience Required: Continue providing optimal conditions for up to 6 weeks before concluding seeds have failed since late germination is common.
- Realistic Expectations: Even with perfect technique, expect 20-30% of seeds to fail; plan to sow more seeds than plants ultimately needed.
5 Common Myths
You must buy lavender plants because growing from seed is too difficult for home gardeners to achieve any success.
While challenging, lavender seed germination rates reach 80-90 percent with proper cold stratification, making seed-growing accessible to patient gardeners willing to follow the process.
Lavender seeds will germinate quickly within a week or two just like most other herb and vegetable seeds you plant.
Lavender seeds typically require 14-30 days to germinate even under optimal conditions, and the process from seed to transplant size takes 100-200 days according to university research.
All lavender varieties can be grown from seed and will produce plants identical to the parent plant you collected seeds from.
Lavandin hybrids like Grosso produce sterile seeds that cannot germinate, and seed-grown plants may differ from parents since only true species reliably reproduce from seed.
Lavender is a desert plant that never needs watering once established and thrives on complete neglect in any garden.
While drought-tolerant when mature, lavender seedlings need consistent moisture and established plants benefit from occasional deep watering especially during extended dry periods.
Cold stratification is an optional extra step that only perfectionists bother with when starting lavender seeds indoors.
Cold stratification is essential rather than optional, as research shows germination rates drop to just 20-30 percent without this process compared to 80-90 percent with proper cold treatment.
Conclusion
You now have all the tools you need to grow lavender from seed with real success. Cold stratification comes first and boosts your lavender seed germination the most. Keep soil at 70 degrees Fahrenheit, give seeds bright light, and plant in soil that drains well.
Patience is the hidden key to lavender propagation that most guides gloss over. Expect 14 to 21 days for your first sprouts to appear under good conditions. Your seedlings will need 100 to 200 days to reach transplant size, and full maturity takes around 3 years. This is a long game, but the payoff lasts decades.
The joy of raising lavender from a tiny seed to a blooming plant beats buying a potted start any day. I still feel proud when I walk past the rows of purple flowers I grew from seeds years ago. Penn State research shows these plants can produce flowers for 10 to 20 years with proper care, so your patience pays you back many times over.
Even with a 20 to 30% failure rate on seeds, the math still works in your favor when you grow your own. A single packet of seeds costs less than one nursery plant and can give you dozens of healthy starts. Follow the steps in this guide and you will join the ranks of gardeners who crack the code on growing this beautiful herb from scratch.
External Sources
Frequently Asked Questions
What is the fastest way to germinate lavender seeds?
Cold stratification in the refrigerator for 3-4 weeks before planting, combined with a heat mat maintaining 70 degrees Fahrenheit, produces the fastest and most reliable germination.
Can I plant lavender seeds directly in the ground?
Direct seeding is possible but not recommended since germination rates are significantly lower outdoors and seedlings are vulnerable to weather and pests.
Why do lavender seeds need refrigeration?
Lavender seeds require cold stratification to break their natural dormancy, simulating the winter conditions they would experience in their native Mediterranean climate.
How often should I water lavender seedlings?
Water lavender seedlings when the top half inch of soil feels dry, typically every 2-3 days, always in the morning to prevent fungal issues.
What causes lavender seedlings to die suddenly?
Damping off fungus, overwatering, poor drainage, and insufficient light are the most common causes of sudden lavender seedling death.
When is the best time to harvest lavender?
Harvest lavender when about half of the flower buds on a spike have opened, typically in early to mid-summer morning after dew has dried.
Can all lavender varieties be used in cooking?
Not all lavender is culinary safe since only English lavender varieties like Munstead, Hidcote, and Lady are recommended for cooking due to lower camphor content.
How do I prepare lavender for winter?
Prepare lavender for winter by pruning in late summer, adding mulch around the base, and in cold climates covering plants or providing wind protection.
Why won't my mature lavender plant bloom?
Mature lavender fails to bloom due to insufficient sunlight, overly rich soil, improper pruning timing, or nitrogen-heavy fertilizers that promote foliage over flowers.
Can lavender grow in humid climates?
Lavender can grow in humid climates with modifications including raised beds, improved air circulation, amended soil drainage, and selecting humidity-tolerant varieties.