
Introduction
Welcome to How to Care for Air Plants: Expert Guide where you will learn everything about these amazing soil free plants. Tillandsia plants are epiphytes that cling to trees and rocks in the wild instead of growing in dirt. With over 660 species in the bromeliad family, you have countless options to add to your home or office space today.
I started growing air plants about 8 years ago after killing my first 3 within months. The problem was simple: I didn't understand how these plants actually absorb water and nutrients. Think of trichomes as tiny drinking straws covering the leaves that pull moisture and nutrients right from the air around them. Once I learned this, my air plant care improved overnight.
The science behind air plants also explains why they need different care than your typical houseplant. These plants use a special process called CAM photosynthesis where they open their pores at night and close them during the day. This water saving trick helped them survive in trees and cliffs where roots can't reach soil. Once you grasp this concept, the rest of their care starts to make a lot more sense.
This guide will show you the exact methods I use to keep my Tillandsia collection healthy year after year. You will learn the right watering schedule, ideal light conditions, and how to spot problems before they kill your plants. Let's turn you into an air plant expert who can help these amazing epiphytes thrive in any space you put them in. By the end of this article, you will have the confidence to grow a full collection of these beautiful plants.
Essential Air Plant Care Tips
These air plant care tips will help you keep your Tillandsia healthy for years to come. I use a simple memory trick called WLAT to keep track of the four key elements: Water, Light, Air, and Temperature. I learned this system after losing too many plants and it has helped me grow over 50 thriving air plants in my home.
Most people fail with Tillandsia care because they don't understand how these plants work on the inside. Air plants open their stomata at night to absorb carbon dioxide and close them during the day to save water. This means your plants need good air circulation around them at all times so they can breathe and dry out after watering.
Your home's humidity requirements also play a big role in caring for air plants and how often you need to water them. Most American homes sit between 30 to 50% humidity while air plants prefer 50 to 70%. If your home runs dry, you may need to mist between soaks or move your plants to a more humid room like the bathroom.
Watering Schedule
- Frequency: Soak air plants in room-temperature water for 20-30 minutes once per week for most species and environments.
- Method: Submerge the whole plant, shake off excess water with care, and place upside down on a towel to dry all the way.
- Critical Rule: Plants must dry all the way within 4 hours after watering to prevent crown rot and fungal issues.
- Seasonal Adjustment: Increase frequency during hot, dry summer months and reduce during cool, humid winters.
Light Requirements
- Ideal Exposure: Bright, indirect light near east or west-facing windows provides the perfect balance for most air plants.
- Minimum Needs: Air plants require at least 4-6 hours of filtered sunlight daily to maintain healthy growth.
- Artificial Option: Fluorescent or LED grow lights positioned within 24 inches (61 centimeters) work well for 12 hours daily.
- Warning Signs: Pale, stretched growth indicates insufficient light while brown patches suggest too much direct sun.
Air Circulation
- Importance: Good airflow prevents moisture from sitting in leaf crevices where rot-causing bacteria and fungi thrive.
- Terrarium Caution: Never place air plants in sealed containers; open displays allow proper ventilation after watering.
- Indoor Tips: Position near a ceiling fan or in areas with natural breezes, and avoid direct air conditioning vents.
- Why It Matters: In nature, air plants grow on tree branches where constant breezes help them dry fast after rain.
Temperature Range
- Optimal Range: Air plants thrive between 50-90 degrees Fahrenheit (10-32 degrees Celsius) with most preferring the middle range.
- Night Preference: A 10-degree drop at night mimics natural conditions and can encourage blooming in mature plants.
- Frost Warning: Temperatures below 40 degrees Fahrenheit (4 degrees Celsius) cause cellular damage and should be avoided.
- Indoor Benefit: Normal household temperatures suit air plants well, making them ideal indoor companions all year long.
Watering Your Air Plants
Watering air plants is the one task that trips up most new owners. I killed my first few Tillandsia because I followed bad advice about misting alone being enough. The truth is that how to water air plants depends on three things: your home's humidity, the species you own, and your tap water quality.
Water quality matters more than most guides will tell you. Air plants prefer water with a pH between 5.5 and 6.0 for the best nutrient uptake through their leaves. If you use tap water, let it sit out for 24 hours so the chlorine can evaporate before you give your plants an air plant soak.
You may have heard that distilled water is best, but this advice comes with a catch. In my experience, pure distilled water lacks the minerals your plants need to stay healthy. If you only use distilled water for misting air plants, you will need to add a weak fertilizer to replace those missing nutrients.
Light and Temperature Needs
Air plant light requirements are simpler than most people think once you learn a few basics. I tested my plants in every room of my house over 2 years to find what works best. Most air plants want bright indirect light for 4 to 6 hours each day to stay healthy and grow new leaves.
Window placement changes with the seasons in ways that catch many plant owners off guard. A south facing window that works great in winter can burn your plants in summer when the sun sits higher in the sky. Pay attention to how the light shifts through the year and be ready to move your plants as needed.
If your home lacks good natural light, your fluorescent light air plants setup can work just as well. LED or fluorescent bulbs work great when placed about 24 inches away for 12 hours each day. Air plant temperature also matters for growth. Most types prefer daytime temps between 65 to 85 degrees Fahrenheit to stay happy.
Propagation and Life Cycle
Air plant propagation works best through division rather than seeds. I tried growing from seed once and waited 3 years with little to show for my effort. The air plant life cycle makes division the smarter choice since healthy plants produce 2 to 5 pups after they bloom.
Many new owners panic when their plant starts to decline after air plant blooming happens. This is normal and not your fault at all. Air plants bloom just once in their lifetime and then pass their energy to the next batch of babies. Think of it as the mother plant passing the torch to a new crew of plants.
When you start separating air plant pups, wait until they reach about one third the size of the parent. You can also leave them attached to form clumps that bloom in waves over the years. I have a clump that started as one plant 6 years ago and now has over 20 connected plants that flower at different times.
Young Plant Growth
- Duration: Air plants spend 2-5 years growing and maturing before they become capable of blooming for the first time.
- Care Focus: Provide consistent watering and bright light to encourage strong leaf development and overall plant health.
- Signs of Progress: Healthy young plants add new leaves from the center and increase in size each growing season.
- Patience Required: Unlike flowering houseplants, air plants cannot be forced to bloom before reaching natural maturity.
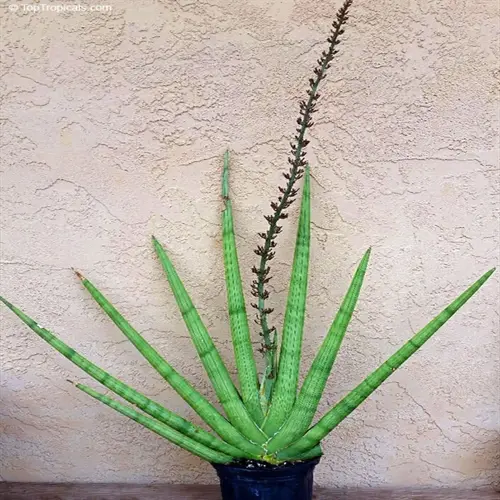
Blooming Phase
- Trigger Factors: Maturity, seasonal light changes, and proper care combine to trigger the blooming process in air plants.
- Visual Changes: Many species display dramatic color changes in their leaves before producing a central flower spike.
- Bloom Duration: Depending on species, blooms can last from several weeks to several months before fading.
- One-Time Event: Air plants are monocarpic, meaning each plant blooms only once in its lifetime before starting to decline.
Pup Production
- Timing: Pups appear at the base of the mother plant during or right after the blooming period ends.
- Number Expected: Most air plants produce 2-5 air plant pups that grow your collection without extra purchases.
- Separation Size: Wait until pups reach one third to one half the size of the mother plant before separating them.
- Clump Option: Leaving pups attached creates impressive clumps that can bloom in waves over the coming years.
Mother Plant Decline
- Natural Process: After blooming and producing pups, the mother plant declines over months as energy transfers to offspring.
- Continued Care: Keep watering the mother plant as it continues to nourish attached pups during this phase.
- When to Remove: Only remove the mother plant once it has dried up and pups can survive on their own.
- Legacy View: One healthy air plant can produce a large family over years through many generations of pups.
Troubleshooting Common Problems
Most air plant problems show up in the leaves first if you know what to look for. Is your plant's base soft and mushy? That points to air plant rot from overwatering air plants or poor drying. Do you see air plant brown tips on the outer leaves? That often means air plant dehydration needs your attention.
I learned to check my plants every week during watering time to catch issues early. An air plant dying from rot can spread bacteria to nearby plants in your display. Pests like mealybugs also jump from plant to plant fast. When I spot white fuzzy spots, I isolate that plant right away before treating it.
The table below helps you match what you see on your plant to the most likely cause. Most issues come down to water and light balance that you can fix with small changes to your care routine.
Mesic vs Xeric Air Plants
Not all types of air plants need the same care. Mesic air plants come from humid rainforests while xeric air plants evolved in dry deserts. This split in origins means they need very different watering schedules to stay healthy in your home.
You can tell the types apart by looking at their leaves. Smooth air plants with deep green coloring are mesic Tillandsia species that want more water. Fuzzy air plants with silver or gray leaves are xeric types that hold moisture better and need less frequent soaks to prevent rot.
I made the mistake of treating all my plants the same when I first started. My fuzzy xeric plants started to rot while my smooth mesic ones dried out. Once I learned to spot the differences, I could give each plant the exact care it needed to thrive.
5 Common Myths
Air plants do not need any water because they get all their moisture from the air around them.
While air plants absorb moisture through trichomes on their leaves, they still need regular watering through soaking or misting to stay healthy and hydrated.
Air plants can thrive in completely dark rooms or windowless bathrooms without any light source.
Air plants require at least 4-6 hours of filtered or indirect light daily to photosynthesize; they will slowly decline without adequate light exposure.
Putting air plants in sealed glass terrariums creates the perfect humid environment for them.
Sealed terrariums trap moisture and prevent air circulation, causing air plants to rot; they need good airflow and must dry within 4 hours after watering.
All air plants have the same care requirements regardless of their appearance or species type.
Mesic (green, smooth) air plants need more water and humidity, while xeric (silver, fuzzy) varieties are adapted to drier conditions with less frequent watering.
Air plants do not need any nutrients or fertilizer because they absorb everything from the air.
Air plants benefit from monthly fertilizing with diluted bromeliad fertilizer during the growing season to support healthy growth and blooming.
Conclusion
Good air plant care comes down to a few simple habits you can master with practice. In my experience, soaking your plants once a week and making sure they dry within 4 hours works for most types. Give them bright indirect light and keep air moving around them at all times.
Once you understand how trichomes absorb water and why these plants breathe at night, caring for air plants makes a lot more sense. Your healthy air plants will reward you with beautiful blooms and baby pups that grow your collection for free. I think of pup production as the best part of the whole journey with these plants.
Air plant success depends on paying attention to what your plants tell you through their leaves. Curled leaves mean they need more water while soft bases warn you to cut back. With over 650 Tillandsia species to explore, you have plenty of room to grow your collection once you nail down the basics.
These plants forgive small mistakes better than most houseplants I have grown over the years. Start with the care tips in this guide and watch your plants thrive. You now have everything you need to keep your air plants happy and healthy for many years to come.
External Sources
Frequently Asked Questions
What is the proper watering technique for air plants?
Soak air plants in room-temperature water for 20-30 minutes weekly, then shake off excess water and let them dry upside down within 4 hours.
Where should I place my air plants indoors?
Place air plants near east or west-facing windows for bright, indirect light with good air circulation.
Can air plants survive in low-light environments?
Air plants can survive in low light temporarily but will not thrive; they need at least 4-6 hours of filtered light daily.
How do I know if my air plant is healthy?
Healthy air plants have firm, vibrant leaves with natural color; signs of trouble include brown tips, soft bases, or curling leaves.
What type of fertilizer is safe for air plants?
Use bromeliad or Tillandsia-specific fertilizer diluted to quarter strength monthly; avoid fertilizers containing boron, copper, or zinc.
Should I remove dead leaves from my air plant?
Yes, gently pull off brown or dried outer leaves to improve appearance and prevent moisture from getting trapped.
How do air plants reproduce?
Air plants reproduce by producing offsets called pups at their base after blooming; these can be separated when one-third the parent size.
What are common mistakes that kill air plants?
The most common mistakes include overwatering without proper drying, placing in direct sunlight, using distilled water exclusively, and neglecting air circulation.
Can I keep air plants outdoors?
Yes, air plants thrive outdoors in temperatures between 50-90 degrees Fahrenheit (10-32 degrees Celsius) with protection from direct sun and frost.
How long does an air plant live?
Air plants typically live 3-15 years depending on species and care, with the mother plant declining after blooming but producing multiple pups.