
Hydrogen peroxide germination can help with hard-coated seeds but does not replace the cold treatment they need. The peroxide works as a chemical seed scarification agent that softens tough outer shells. It also adds extra oxygen that may wake up sleepy seed cells. But you still must stratify after the soak if your species requires cold to break dormancy.
I tested this on a batch of honey locust seeds that have some of the hardest coats around. After a two-hour soak in 3% hydrogen peroxide, the seeds had small bubbles forming on their surface. The peroxide was breaking down the waxy coating on each seed. These seeds took up water faster during the follow-up soak and plumped up more than seeds I skipped the peroxide step with.
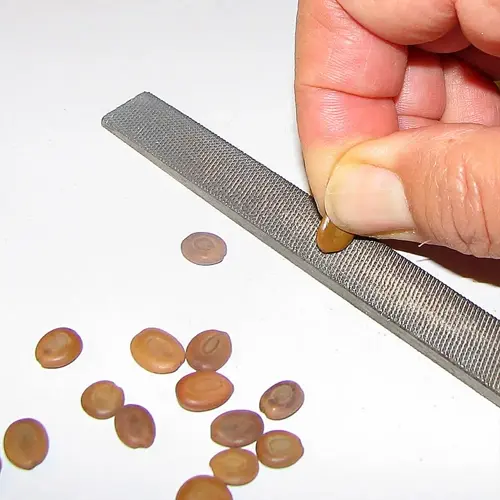
Hydrogen peroxide seed treatment works by eating away at the seed coat from outside. The bubbles you see are oxygen being released as the peroxide reacts with organic matter on the seed. This chemical action thins the coat and creates tiny pathways for water to enter later on. Think of it as micro-sanding without the physical work of filing or nicking each seed by hand yourself.
The peroxide seed soaking process is simple but your timing matters a lot here. Use regular 3% peroxide from the drugstore and soak your seeds for 30 minutes to 2 hours at most. Longer soaks can damage the embryo inside your seeds. Rinse seeds well in plain water before moving them to your paper towels for cold treatment.
Best Seeds For This Method
- Honey locust and redbud: These have very hard coats that resist water. Peroxide softens them enough to let moisture in during the pre-soak step.
- Morning glories: Shiny hard seeds that benefit from chemical help. You will see faster plumping after peroxide treatment before stratification.
- Native legumes: Bean family seeds with tough outer layers respond well to this gentle chemical scarification approach for you.
Seeds To Skip Peroxide With
- Chia and basil: Mucilaginous seeds that form gel coats when wet. Peroxide can react oddly with the gel and cause clumping problems.
- Tiny seeds: Poppies and foxgloves are too small and thin-coated for this method. Peroxide can damage them instead of helping.
- Already damaged seeds: Old or cracked seeds should skip this step. Peroxide can enter and harm the embryo through existing openings.
I once made the mistake of soaking seeds too long in peroxide by accident. A batch of baptisia sat in the solution for four hours while I got distracted with other tasks in my garden. When I checked them, the seed coats looked bleached and mushy. None of those seeds sprouted after stratification at all. Now I set a timer every single time I use this method so I never forget.
You can add peroxide to your normal seed prep routine. Soak seeds in peroxide first, then rinse them well. Follow up with plain water overnight. After that, move seeds to damp paper towels and into your fridge. The peroxide gives seeds a head start on soaking up water before cold treatment starts.
Do not expect peroxide to cut your cold treatment time down at all. Your seeds still need their full days in the fridge to break dormancy. You get faster water uptake and more even sprouting when you plant them. It is a prep step that helps but never replaces cold stratification for species that need it.
Read the full article: How to Stratify Seeds: Ultimate Methods Guide