
Introduction
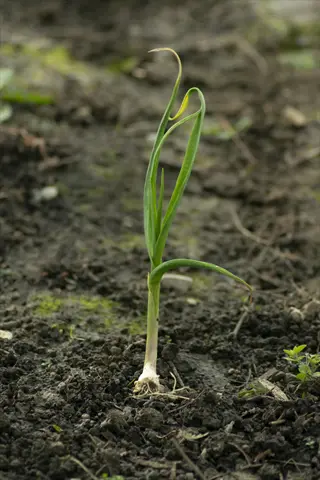
You stare at your onion patch and wonder if those bulbs are ready to pull from the soil beneath your feet today. Most gardeners face this exact moment of doubt every growing season when summer turns to fall. These 7 essential signs for when to harvest onions give you the tools to pick the perfect time for pulling your crop. No more guessing games about bulb readiness or pulling too early and losing size in your garden harvest this year.
I grew onions for years before I learned to read plant signals in my own garden beds. Onion harvest signs work like body language your crops use to talk to you about their growth stage. Each sign tells part of the maturity story as the bulbs finish growing in the soil. I now watch for multiple onion maturity indicators at once and my harvest results are much better each year.
Six state universities back up these core indicators with solid research. Nebraska Extension data shows yields jump by 30% to 40% with the right harvest timing. Most other guides only cover 3 or 4 signs. This one gives you all 7 methods to spot ready bulbs in your home garden beds before you start pulling them up from the soil.
Below you will learn when to harvest onions based on visual cues and touch tests that work every time in any climate zone. Each sign builds on the others to show you a clear picture of bulb readiness. Together they give you the confidence to pull your onion crop at the right moment and start the curing process.
7 Essential Signs of Harvest Readiness
Your onions send clear signals when harvest readiness approaches. You just need to know what to look for. Each sign connects to what happens inside the bulb as it moves from growth mode into storage mode.
The science behind these signs involves carbohydrate transfer from leaves to bulb. As this process completes, you see tops falling over, yellowing onion leaves, and foliage die back. The neck changes from stiff to soft. Soft neck onions have finished moving nutrients into the bulb and stand ready for harvest.
I learned through years of growing that necks of immature onions feel stiff while necks of mature onions feel soft and limber. A papery skin forms as the outer layers dry out. These signs work together to give you multiple ways to confirm that your bulbs are ready. Use both visual and touch based checks for the best results in your garden.
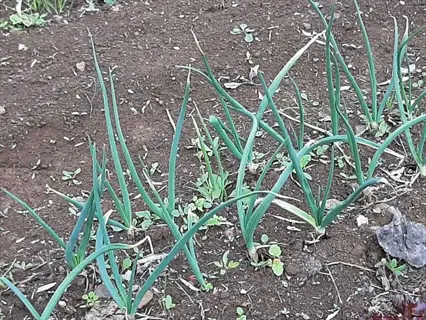
Tops Falling Over Naturally
- What to Look For: Watch for 50% to 67% of your onion tops to bend at the neck and fall over onto the soil surface without any intervention from you.
- Why It Happens: When the bulb completes its carbohydrate storage, the neck tissue weakens because the plant no longer needs to transport nutrients upward to the leaves.
- Timing Matters: University research shows that harvesting when only 20% to 30% of tops have fallen results in smaller bulbs, while waiting until 80% maximizes flavor development.
- Regional Variation: In northern climates this occurs in late summer, while southern gardeners may see this sign as early as late spring for short day varieties.
- Hands Off Approach: Never bend green tops over by hand thinking it will speed up bulb growth because this kills the leaves needed for continued bulb development.
- Variety Difference: Early varieties should reach 100% tops down before harvest while later storage varieties perform best at only 20% to 50% fallen.
Soft and Pliable Neck
- The Pinch Test: Squeeze the neck area just above the bulb between your thumb and forefinger and a mature onion neck feels soft and gives under light pressure.
- Immature vs Mature: Stiff, rigid necks indicate the onion is still growing and transferring nutrients from leaves to bulb, while soft necks signal completion of this process.
- Scientific Reason: The neck softens when cell division in the bulb has completed and the tissue connecting leaves to bulb begins its natural drying process.
- Harvest Window: Once necks soften, plan to harvest within 1 to 2 weeks to prevent rot or the bulb attempting to regrow or flower.
- Consistency Check: Test multiple onions across your planting area since individual plants may mature at different rates based on growing conditions.
- Storage Prediction: Onions with soft and dried necks at harvest store much longer than those harvested with firm necks.
Yellowing and Browning Foliage
- Color Progression: Healthy mature onion foliage transitions from deep green to yellow green, then to pale yellow, and then to brown as the plant completes its lifecycle.
- Natural Process: This yellowing occurs because the plant redirects chlorophyll and nutrients from the leaves back into the bulb for storage through senescence.
- Percentage Guideline: University extensions recommend harvesting when at least half of the foliage shows significant yellowing or browning combined with tops falling over.
- Disease vs Maturity: Yellowing from maturity progresses from leaf tips downward, while disease related yellowing often appears in sudden or irregular patterns.
- Timing Connection: Foliage color change often coincides with neck softening, providing dual confirmation that the bulb has reached harvestable maturity.
- Weather Impact: Extended wet periods during this stage can delay natural yellowing and increase disease risk, so monitor your patch during rainy spells.
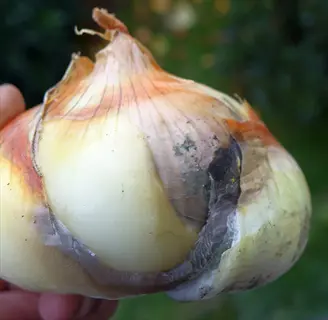
Papery Outer Skin Formation
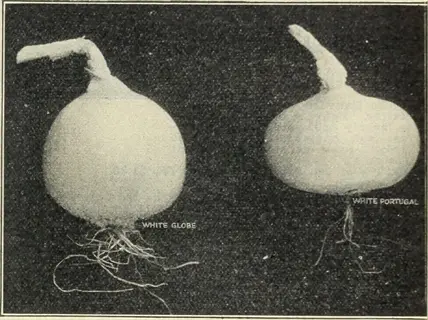
- Visual Indicator: Mature onions develop a dry, papery outer layer that feels like thin parchment and may show the characteristic color of the variety whether yellow, red, or white.
- Protection Development: This outer skin forms as the bulb's protective barrier against moisture, pests, and disease during storage, showing the onion is preparing for dormancy.
- Partial Visibility: You may need to brush away soil near the shoulder of the onion to check skin development without disturbing the bulb or damaging the forming layers.
- Thickness Matters: Good outer skins consist of multiple papery layers, while immature bulbs may have only one thin layer that tears when handled.
- Variety Colors: White onions develop white papery skins, yellow varieties show golden brown outer layers, and red onions display their characteristic purple red coloring.
- Storage Correlation: Onions with intact papery skins at harvest store much longer than those with thin or damaged outer layers.
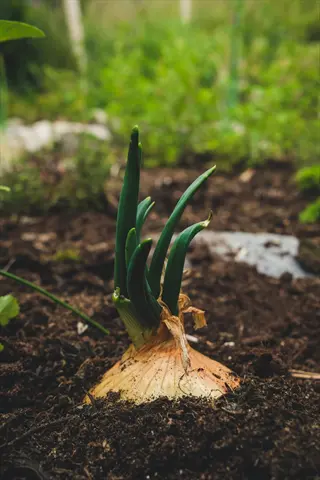
Bulb Shoulders Above Soil
- Natural Emergence: As onions mature and reach full size, the top portion of the bulb called the shoulders pushes up above the soil surface on its own.
- Size Assessment: Visible shoulders allow you to gauge final bulb size without digging and most home garden onions reach 2 to 4 inches in diameter at maturity.
- Sunscald Risk: While some shoulder exposure is normal and good, too much exposure in hot climates can cause green discoloration or sunscald if left too long.
- Soil Coverage: If shoulders are exposed for extended periods, you may cover them with light mulch to prevent sun damage while still allowing proper maturation.
- Harvest Timing Clue: When shoulders become visible and other signs align, the bulb has stopped expanding and is ready for harvest within 1 to 2 weeks.
- Water Management: Stop watering once shoulders are visible and other maturity signs appear to help the curing process begin in the ground.
Leaf Count Reaches Minimum
- The Leaf Rule: Commercial onion farmers use leaf count as a maturity indicator because each green leaf corresponds to one ring inside the bulb for protection during storage.
- Optimal Number: A mature storage onion has 13 leaves at peak growth, with a minimum of 7 green leaves remaining at harvest to ensure enough protective rings.
- Ring Formation: As outer leaves yellow and die back, those matching rings become the papery protective layers while inner green leaves become the edible flesh rings.
- Counting Method: Count all leaves including partial yellow ones, starting from the outermost and working inward to the center growth point.
- Variety Variation: Smaller varieties and green onions harvested early may have fewer leaves, while large storage varieties benefit from keeping more green leaves at harvest.
- Storage Connection: Onions harvested with fewer than 7 green leaves often have not enough protective layers and store for shorter periods.
Days to Maturity Timeline
- Seed Packet Guidance: Most bulb onions mature in 85 to 120 days from transplanting, though this varies by variety, with green onions ready in as few as 50 days.
- Tracking Method: Record your planting date and count forward to estimate the harvest window, then use physical signs to confirm actual readiness.
- Environmental Factors: Hot, dry conditions may speed up maturity by 1 to 2 weeks while cool, wet weather can delay harvest timing a good deal.
- Day Length Impact: Long day varieties require 14 or more hours of daylight to form bulbs, meaning northern gardeners see later maturity than the calendar might suggest.
- Variety Examples: Short day onions like Texas Super Sweet mature in 85 to 95 days while long day storage varieties like Copra need 100 to 115 days.
- Calendar Planning: Use the days to maturity timeline as a starting point for when to begin checking physical harvest signs rather than an absolute harvest date.
Harvest Timing by Onion Variety
Not all onion varieties signal harvest readiness the same way. I learned this the hard way after losing a batch of sweet onions by waiting too long for tops to fall. The harvest threshold changes based on what type you grow in your garden beds.
Short-day onions grow best in southern regions while long-day onions thrive up north. UGA research shows that early varieties need 100% tops down before you pull them. Late storage varieties perform best when you harvest at only 20% to 50% tops fallen. This gap surprises most gardeners.
Utah State data confirms that yields increase 30% to 40% with the right sweet onion harvest timing. The table below shows the exact harvest threshold for each onion type. Use it to know when to pull based on what you planted.
How to Harvest Onions Properly
Knowing how to harvest onions the right way protects your bulbs from damage that leads to rot. In my early years of gardening, I yanked a whole row of onions by their tops and lost half to bruising within weeks. The technique you use at harvest time makes or breaks your storage success.
Utah State recommends undercutting bulbs with a garden fork rather than pulling onions straight up by the tops. Lifting onions this way keeps the neck intact and prevents the bruising that causes early spoilage. Harvest in the morning when temperatures stay cool to reduce heat stress on your crop.
Stop Watering One Week Before
- Timing: Cease all irrigation 7 to 10 days before your planned harvest date once most tops have begun falling over.
- Purpose: Allowing the soil to dry helps the outer bulb skins begin curing in place and reduces the moisture content that can lead to storage rot.
- Soil Check: The top 2 to 3 inches of soil should feel dry to the touch before you begin harvesting.
Loosen Soil Around Bulbs
- Tool Selection: Use a garden fork or spade inserted 4 to 6 inches away from the bulb to avoid piercing or damaging the onion during garden fork harvesting.
- Technique: Push the tool straight down, then lever the soil upward to break the root connections without pulling on the tops.
- Benefit: Loosening soil first reduces the force needed to lift bulbs and prevents tearing the neck where it connects to the bulb.
Lift Bulbs Gently by Hand
- Method: Grasp the onion at the base of the neck where it meets the bulb and lift straight up with steady pressure rather than yanking or twisting when lifting onions.
- Handling: Support the bulb from underneath with your other hand for larger onions to prevent the weight from straining the neck.
- Inspection: Check each bulb as you lift for signs of damage, disease, or soft spots that indicate the onion should be used right away rather than stored.
Brush Off Loose Soil
- Gentle Cleaning: Use your hands or a soft brush to remove loose soil from the bulb surface without scrubbing or removing the papery outer layers.
- Never Wash: Avoid using water to clean onions as moisture promotes bacterial growth and cuts storage potential way down.
- Root Handling: Leave the roots attached during initial drying as they continue to draw moisture from the bulb during the early curing phase.
Field Dry for Initial Curing
- Placement: Lay harvested onions in a single layer on the soil surface or on a raised screen in a shaded area of the garden for undercutting bulbs to dry.
- Duration: Allow onions to field dry for 2 to 3 days in warm, dry weather or up to 5 days if conditions are humid or cool.
- Protection: Cover bulbs with their own tops or a light cloth if rain threatens, as wet bulbs during this stage tend to rot fast.
Curing Onions for Long-Term Storage
Onion curing makes the difference between bulbs that last weeks and bulbs that last months. When I first started growing onions, I skipped this step and watched my entire harvest rot within a month. Now I treat curing as the most important part of the storage process.
Nebraska Extension data shows that proper curing requires 2 to 4 weeks for best results. Keep onions at 75°F to 90°F (24°C to 32°C) in a well ventilated area for drying onions. Field curing works great in dry climates. The curing duration depends on bulb size and humidity levels.
You know curing is complete when the necks feel papery and dry all the way through. Squeeze the neck and you should feel no soft spots. The outer skins rustle when touched. These cues tell you the onion is ready for storage at the right curing temperature.
Choose the Right Location
- Indoor Option: A covered porch, garage, shed, or barn with good air flow and protection from direct sun and rain works well for ventilated drying.
- Outdoor Option: A shaded area under a tree or covered structure where air flows around the bulbs during dry weather conditions.
- Avoid These: Never cure onions in direct sunlight which causes sunscald, or in enclosed spaces without airflow which promotes mold growth.
Maintain Optimal Temperature
- Ideal Range: Cure onions at temperatures between 75°F and 90°F (24°C to 32°C) for fastest and most thorough drying.
- Cooler Temps: If temperatures fall below 70°F (21°C), extend the curing time by an extra 1 to 2 weeks.
- Hot Weather Caution: Temperatures above 95°F (35°C) can cook the outer layers so provide shade during heat waves.
Ensure Proper Air Circulation
- Spacing: Arrange onions in a single layer on screens, racks, or mesh surfaces with space between each bulb for air to move around.
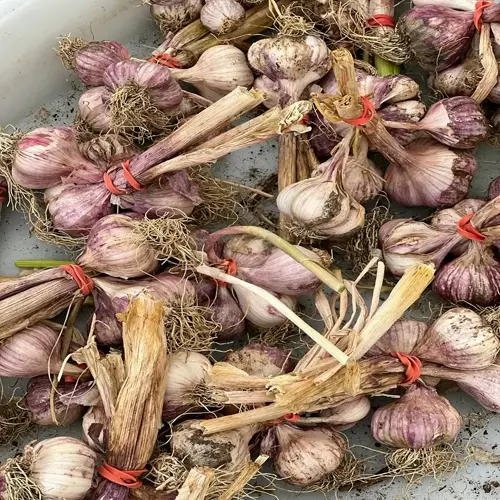
- Hanging Method: You can also braid the dried tops together and hang in bunches of 6 to 10 onions from rafters or hooks.
- Turn Them: Flip onions every few days if laying flat to ensure all sides dry out and no moisture gets trapped below.
Monitor the Curing Timeline
- Standard Duration: Most onions require 2 to 4 weeks of curing time based on bulb size, humidity levels, and temperature conditions.
- Large Bulbs: Onions over 3 inches in diameter may need an extra week for the thick neck to dry all the way through.
- Weather Impact: High humidity extends curing time a good bit while hot dry conditions can finish the process in as little as 10 days.
Recognize When Curing Is Complete
- Neck Test: The neck should feel dry and papery with no soft or moist spots when squeezed between your fingers.
- Skin Sound: Cured onions make a rustling, papery sound when the outer skins are touched or when bulbs are rolled together.
- Foliage State: The tops should be brown and dry enough to break away or be trimmed to 1 inch above the bulb.
Optimal Storage Conditions
Good onion storage needs the right temperature and humidity. I tested different storage spots around my house and found that small changes make huge differences in onion shelf life. The right setup keeps bulbs dormant for months while the wrong one leads to sprouting.
Nebraska Extension recommends storing onions long term at 32°F to 36°F (0°C to 2°C) with humidity at 60% or less. This storage temperature range keeps bulbs in dormancy. A root cellar hits these targets well. Your refrigerator crisper works too for mesh bags storage.
Michigan State data shows storage duration ranges from 1 to 8 months based on your setup. Sweet onions only last 2 to 3 weeks no matter what you do. Storage at 40°F to 50°F (4°C to 10°C) causes rapid sprouting and decay, so avoid that range.
5 Common Myths
Bending onion tops over while they are still green forces the plant to put more energy into bulb development and increases bulb size.
Bending green tops actually kills the leaves needed for carbohydrate manufacturing, reducing bulb size and overall yield according to university research.
All onion varieties should be harvested at the same stage when all tops have completely fallen over and dried.
Early onion varieties should be harvested at 100 percent tops down, while later storage varieties perform best when harvested at only 20 to 50 percent tops down.
Onions should be washed immediately after harvest to remove soil and prevent disease from spreading to the bulbs.
Washing onions after harvest introduces moisture that promotes bacterial rot, so soil should only be gently brushed off while keeping bulbs completely dry.
Onions can be stored at room temperature just as effectively as in cold storage if they are properly cured first.
Storage at 40 to 50 degrees Fahrenheit (4 to 10 degrees Celsius) causes rapid sprouting and decay, while temperatures between 32 and 36 degrees Fahrenheit (0 to 2 degrees Celsius) maintain dormancy for months.
Sweet onions last just as long in storage as regular storage varieties when kept in the same conditions.
Sweet onions contain less pyruvic acid and only store for 2 to 3 weeks, while pungent storage varieties can last 1 to 8 months under proper conditions.
Conclusion
You now know the 7 essential signs for when to harvest onions from your home garden. These onion harvest signs work together to give you a complete picture of bulb readiness. Using multiple indicators instead of just one takes the guesswork out of proper harvest timing.
The research backs up what I learned through years of trial and error in my own garden. Wait for 50% to 67% of tops to fall before you pull your bulbs. Cure them for 2 to 4 weeks at 75°F to 90°F (24°C to 32°C) in a well ventilated area. These steps increase your yields by 30% to 40% compared to poor timing.
Proper harvest timing connects your garden work to months of home cooking with onions you grew yourself. Store your cured bulbs at 32°F to 36°F (0°C to 2°C) and enjoy fresh home garden onions well into winter. Each harvest builds your confidence for the next growing season.
Start watching for these signs as your onions approach maturity this year. The storage success you achieve will prove that science backed methods beat guesswork every time in the garden.
External Sources
Frequently Asked Questions
How do I know when onions are ready to harvest?
Onions are ready to harvest when 50 to 67 percent of the tops have naturally fallen over, the necks feel soft and pliable when gently squeezed, and the outer skin has developed a papery texture.
Can onions be left in the ground too long?
Yes, leaving onions in the ground too long increases the risk of:
- Bacterial rot from soil moisture
- Sunscald damage on exposed shoulders
- Premature sprouting in warm conditions
- Disease infections spreading through the bulb
What happens if I harvest onions too early?
Harvesting onions too early before proper maturity results in reduced bulb size, poor storage quality, and yields up to 45 percent lower than properly timed harvests.
Should onions be washed after harvesting?
No, onions should never be washed after harvesting because moisture promotes bacterial growth and rot during storage. Instead, gently brush off loose soil and allow the outer layers to dry naturally during curing.
How long does onion curing take?
Onion curing typically takes 2 to 4 weeks at temperatures between 75 and 90 degrees Fahrenheit (24 to 32 degrees Celsius) in a well-ventilated area until the necks are completely dry and papery.
What temperature is best for storing onions?
The best storage temperature for onions is 32 to 36 degrees Fahrenheit (0 to 2 degrees Celsius) with humidity between 60 and 70 percent, which maintains dormancy and prevents sprouting.
Why do onion tops fall over?
Onion tops fall over naturally when the bulb reaches maturity because carbohydrate transfer from the leaves to the bulb rings has completed, causing the neck tissue to soften and no longer support the upright foliage.
Can different onion varieties be stored together?
While different onion varieties can be stored in the same area, they should be kept separate because:
- Sweet onions only last 2 to 3 weeks while storage varieties last months
- Different maturity rates affect when each type deteriorates
- Strong pungent varieties may transfer flavors to milder ones
How do I prevent rot during storage?
Prevent rot during onion storage by:
- Curing completely until necks are fully dry
- Storing at temperatures between 32 and 40 degrees Fahrenheit (0 to 4 degrees Celsius)
- Maintaining humidity at 60 to 70 percent
- Providing good air circulation using mesh bags or braids
- Regularly checking and removing any soft or damaged bulbs
Do onions need sunlight during curing?
Onions should be cured in indirect sunlight or shade, not direct sun, because excessive heat and light can cause sunscald on the bulb shoulders and lead to green discoloration or premature deterioration.