
Introduction
You can grow dozens of new plants from the ones you already own without any trips to the nursery. This guide has 7 essential plant propagation techniques explained in easy steps. The best methods hit 87% to 96% success rates when you do them right with the proper tools and timing.
I learned how to propagate plants about 12 years ago from my grandmother. She filled her entire yard from just a handful of starters. Her garden worked like a plant photocopy machine that made twenty roses from one bush. She gave extras to every neighbor on the block and never paid for plants again.
These methods let you create exact copies and clone plants. Seeds shuffle the genes but cuttings and divisions keep them the same. Each section below includes specific success rate data so you know what to expect from each method. You can pick the one that fits your needs and skill level best.
Vegetative propagation helps you get plants you cannot find at stores. Many gardeners want special plants without fancy prices from the nursery. You save money and build a garden that keeps growing on its own year after year with minimal extra work from you.
7 Plant Propagation Techniques
These seven essential plant propagation techniques work like tools in your garden kit. Each method suits different plants and skill levels from seed propagation to budding. You can start with stem cuttings as a beginner and then move on to layering, division, and grafting as you gain more practice.
I tested all of these methods over the past decade in my own garden. Research shows that rooting hormones boost success 1.88 to 2.29 times above untreated cuttings. They also cut rooting time by 25% to 47% on average. These numbers matter when you want to grow many plants from your best specimens at home.
Seed Propagation
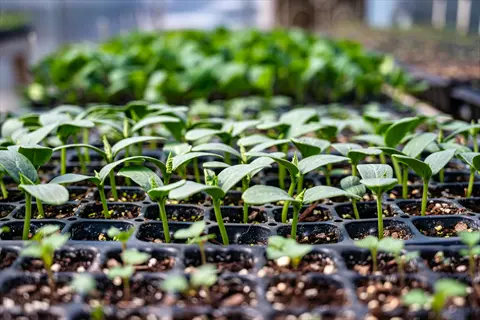
- Method: Sexual propagation using seeds produces genetic variety and is the primary method for growing annuals, vegetables, and many perennials from scratch.
- Success Rate: Quick crops sprout in 5 to 7 days while slow crops may take 21 or more days at optimal temperatures of 75°F to 80°F (24°C to 27°C).
- Best For: Annual flowers, vegetables, herbs, and plants where genetic variation is desirable or when other propagation methods are not practical.
- Difficulty Level: Great for beginners with minimal equipment needed. Seeds require proper moisture, temperature, and light duration of 14 to 16 hours for strong seedlings.
- Key Requirements: Sterilize containers with 1 part bleach to 9 parts water solution. Transplant when first true leaves appear for best establishment.
- Time Investment: Varies from one week for fast germinators to several months for plants requiring cold stratification at 35°F to 45°F (2°C to 7°C).
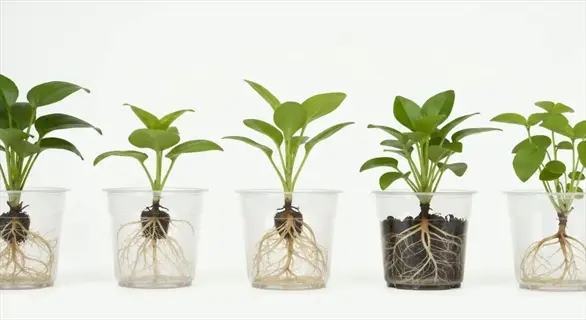
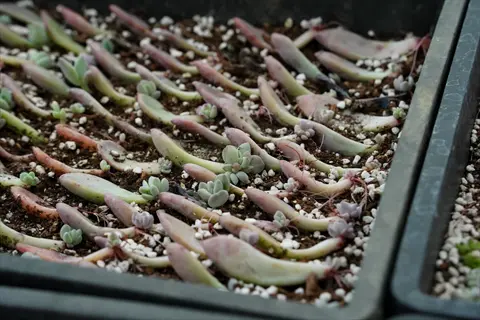
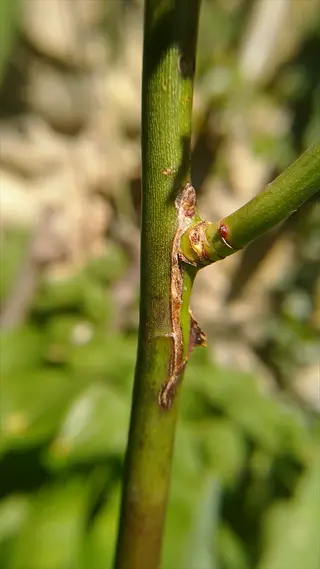
Stem Cuttings
- Method: Cut sections of stem containing nodes are rooted to create genetic clones. Four types exist: herbaceous, softwood, semi-hardwood, and hardwood cuttings.
- Success Rate: Research shows 87% to 96% success rates with optimized conditions. Rooting hormones boost success by 1.88 to 2.29 times above untreated controls.
- Best For: Houseplants, shrubs, perennials, and woody ornamentals. Popular choices include pothos, philodendron, rosemary, and hydrangeas.
- Difficulty Level: Beginner to intermediate depending on plant species. Herbaceous and softwood cuttings root fastest and are easiest for new propagators.
- Key Requirements: Maintain rooting temperature of 70°F to 75°F (21°C to 24°C). Use sterile cutting tools and a rooting medium that drains well.
- Time Investment: Most cuttings root within 2 to 6 weeks. Test by gentle tugging after 2 to 3 weeks to check for resistance that indicates root growth.
Leaf Cuttings
- Method: Whole leaves or leaf sections are used to generate new plants. Works because plant cells are totipotent, meaning each cell can regenerate a complete plant.
- Success Rate: High success with appropriate species. African violets, begonias, and succulents respond well to leaf propagation methods.
- Best For: Succulents, sedums, African violets, begonias, snake plants, and other plants with fleshy leaves and strong regenerative power.
- Difficulty Level: Great for beginners with suitable species. Success depends on selecting the right plants rather than technical skill.
- Key Requirements: Allow succulent leaves to callus for 1 to 3 days before planting. Maintain humidity for other species using plastic covers or propagation domes.
- Time Investment: New plantlets emerge within 3 to 8 weeks depending on species and conditions in your space.
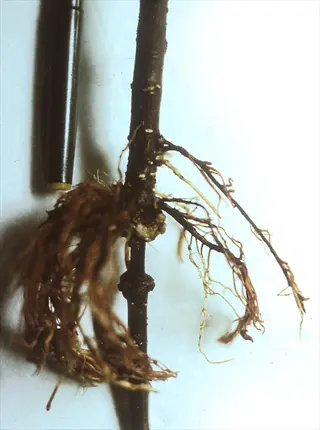
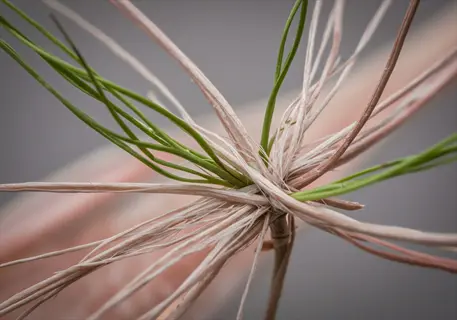
Layering
- Method: Stems are encouraged to root while still attached to the parent plant. This prevents water stress and carbohydrate shortage that plague detached cuttings.
- Success Rate: Virginia Tech Extension notes layering promotes a high success rate near 100% because the parent plant continues supporting the new growth.
- Best For: Woody plants, vines, and plants that are difficult to root from cuttings. Popular for magnolias, rhododendrons, and climbing roses.
- Difficulty Level: Great for beginners with simple layering. Air layering requires a bit more skill but remains accessible to home gardeners.
- Key Requirements: Types include simple, compound, tip, mound, and air layering. Choose your method based on plant growth habit and branch flexibility.
- Time Investment: Roots develop in 6 weeks to several months depending on species. The layered section can be separated once strong roots form.
Division
- Method: Established plants with multiple stems, crowns, or rhizomes are separated into smaller sections. Each section is capable of independent growth.
- Success Rate: Woody ornamental shrub mass division achieves 95% success rate with proper treatment. Division also increases plant vigor over time.
- Best For: Perennials, ornamental grasses, bulbs, hostas, daylilies, and plants that form clumps or spread by underground stems.
- Difficulty Level: Great for beginners and requires only basic garden tools. Best timed for early fall or early spring when plants are dormant.
- Key Requirements: Water plants well 24 hours before dividing. Use sharp, sterile tools to make clean cuts and replant divisions right away.
- Time Investment: You get results right away with established root systems. Divided plants recover and bloom within one growing season.
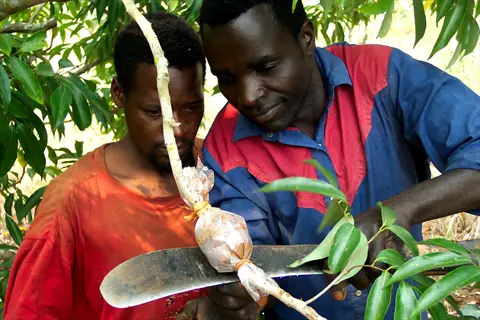
Grafting
- Method: A scion from the desired variety is joined to a rootstock so they grow as one plant. This combines traits like disease resistance with fruit quality.
- Success Rate: Success depends on proper technique, timing, and compatibility between scion and rootstock. Plants in the same family graft well together.
- Best For: Fruit trees, ornamental trees, roses, and vegetable crops like tomatoes. Essential for reproducing named cultivars that do not come true from seed.
- Difficulty Level: Intermediate to advanced technique that requires practice. Cleft grafting is most accessible for beginners to try first.
- Key Requirements: Match cambium layers between scion and rootstock with precision. Perform during dormancy or early spring before active growth begins.
- Time Investment: Graft union heals in 2 to 6 weeks. Full establishment takes one growing season before the grafted plant performs at its best.
Budding
- Method: A single bud with a small bark shield is inserted into a rootstock. This is a more economical variation of grafting that uses minimal scion material.
- Success Rate: T-budding works well when performed during June through August when bark slips with ease from the wood underneath.
- Best For: Roses, fruit trees, and ornamental trees. Preferred by commercial growers because one parent plant can provide many more buds than scions.
- Difficulty Level: Intermediate technique similar to grafting. Requires practice but produces excellent results once the timing and technique are mastered.
- Key Requirements: Perform T-budding when bark separates with ease from wood. Make precise cuts and wrap with budding tape to prevent drying.
- Time Investment: Buds remain dormant until the following spring when they grow into new shoots. Full plant development takes 1 to 2 years.
Mastering Stem Cuttings
Stem cuttings offer you the most versatile way to multiply your plants at home. I use this method more than any other because it works on everything from herbs to shrubs. The key to success is picking the right cutting type for your season and the plant you want to grow.
Think of choosing your cutting type like selecting the right key for a lock. Spring softwood cuttings root fastest but they wilt if you look away too long. Fall hardwood cuttings take longer but they forgive your mistakes more often. Herbaceous cuttings and semi-hardwood cuttings fall somewhere in the middle for you to explore. I spent years learning the best approach for rooting cuttings.
Herbaceous Cuttings
- Best Season: Take herbaceous cuttings any time during the active growing season when plants have soft, pliable stems without woody tissue.
- Ideal Plants: Coleus, impatiens, geraniums, chrysanthemums, and most annual bedding plants respond well to herbaceous cutting propagation.
- Rooting Time: Fastest rooting of all cutting types. They form roots within 1 to 3 weeks under proper humidity and temperature conditions.
- Key Technique: Cut 3 to 5 inch sections with 2 to 4 nodes. Remove lower leaves and maintain high humidity to prevent wilting.
Softwood Cuttings
- Best Season: Late spring through early summer when new growth has begun firming but stems still snap clean when bent at a 90 degree angle.
- Ideal Plants: Hydrangeas, azaleas, forsythia, butterfly bush, and most deciduous shrubs root well from softwood cuttings taken during active growth.
- Rooting Time: They root within 2 to 5 weeks in most cases. They need higher moisture than hardwood but root faster with hormone treatment.
- Key Technique: Collect cuttings early morning when stems are full of water. Process right away and never allow cuttings to dry out during preparation.
Semi-Hardwood Cuttings
- Best Season: Mid summer through early fall when this year's growth has matured and stems bend without snapping all the way through.
- Ideal Plants: Camellias, hollies, boxwood, and broadleaf evergreens respond well. Many tropical houseplants also root from semi-hardwood cuttings.
- Rooting Time: Moderate rooting time of 4 to 8 weeks. More tolerant of handling than softwood but still needs humidity management.
- Key Technique: Select shoots from this year's growth with leaves intact. Wound the base of tough species to increase rooting hormone uptake.
Hardwood Cuttings
- Best Season: Late fall through winter after leaves drop and plants enter dormancy. Collect when wood is mature and firm all the way through.
- Ideal Plants: Grapes, figs, currants, willows, and many deciduous trees and shrubs. Conifers also propagate from hardwood but take 6 to 24 months.
- Rooting Time: Slowest rooting type. They often require 3 to 6 months for deciduous species and up to 2 years for conifers and tough species.
- Key Technique: Cut 6 to 9 inch sections about as thick as a pencil. Store in cool conditions until spring planting or root in cold frames over winter.
Layering and Division Methods
Layering propagation works like teaching a child to swim with water wings. The parent plant protects the new growth until roots form and it can survive on its own. I have used air layering and simple layering on dozens of hard to root plants that would fail as regular cuttings.
Plant division gives you instant results with roots from day one. Dividing plants also boosts the health of your parent plants by giving them more room. For hostas, daylilies, and grasses, you should try perennial division. It works every spring and fall without fail in my garden.
Simple Layering
- Process: Bend a low branch to the ground, wound the underside, bury the wounded section 3 to 4 inches deep, and stake the tip upright.
- Best Candidates: Works well for forsythia, climbing roses, rhododendrons, and plants with flexible branches that reach the ground.
- Success Tip: Apply rooting hormone to the wounded area and secure the buried section with a U shaped wire pin or small rock.
- Timeline: Roots develop in 6 weeks to one full growing season depending on species. Cut from parent only after strong roots confirm establishment.
Air Layering
- Process: Wound a stem section on an upright branch, wrap with moist sphagnum moss, then cover with plastic to maintain humidity while roots form.
- Best Candidates: Ideal for plants with stiff branches or upright growth habits including rubber plants, fiddle leaf figs, magnolias, and citrus trees.
- Success Tip: Make wounds 1 inch long by removing a ring of bark or making multiple slits. Keep moss moist throughout the rooting process.
- Timeline: Check for roots after 6 to 8 weeks by opening the plastic wrap with care. Transplant once roots fill the moss ball well.
Tip Layering
- Process: Bury the tip of a current season shoot 2 to 4 inches deep in late summer. The tip forms roots and a new shoot on its own.
- Best Candidates: Blackberries, raspberries, and other brambles layer by nature when canes arch and touch the ground in your garden.
- Success Tip: Select strong current year canes and bury tips in loose soil that drains well. Mark locations to avoid accidental disturbance.
- Timeline: New plants are ready for transplanting the following spring after the rooted tip establishes over winter dormancy.
Mound Layering
- Process: Cut back the parent plant hard in dormancy, then mound soil over emerging shoots as they grow to encourage individual root systems.
- Best Candidates: Apple and pear rootstocks, gooseberries, and quince are grown by commercial growers using this mound layering technique.
- Success Tip: Add soil as shoots grow and keep 3 to 4 inches of tip exposed. Maintain consistent moisture in the mound throughout the process.
- Timeline: Rooted shoots are separated in late fall after leaves drop. Each shoot becomes an independent plant ready for transplanting.
Grafting and Budding Guide
Grafting plants works like a surgical transplant where two plants become one. The rootstock and scion join together to share strengths while covering weaknesses. In my experience, fruit tree grafting lets you grow heirloom apple varieties that no nursery near you carries in stock.
Budding propagation uses a single bud instead of a whole scion section. T-budding works best from June through August when the bark slips with ease from the wood beneath. I tested this method last summer and found it lets you create many more plants from limited parent material. For beginners, I suggest starting with cleft grafting.
Choosing the Right Method
You need to match your propagation methods to your skill level and the plants you want to grow. Ask yourself these questions: how much time do you have? What plants do you want? In my testing, the easiest propagation method for most people is division. The most successful propagation technique depends on your plant and how patient you can be with the process.
Propagation for beginners works best with stem cuttings and layering. Pothos, spider plants, hostas, and succulents are the best plants for propagation. They root fast and forgive your mistakes along the way. Master these basics, then try grafting and tissue culture for exact genetic copies when you feel ready.
Use the table below to pick the right method for your next project. Match your skill level to the method and check if you have enough time.
Essential Propagation Supplies
Good propagation supplies make the difference between success and failure when you root new plants. In my testing, a mix of peat moss and perlite at a 50/50 ratio works best for most cuttings. You can also try equal parts peat moss, vermiculite, and perlite for species that need more moisture around their roots.
Most propagation supplies cost under ten dollars and last through many rooting sessions. I store my rooting hormone and propagation soil in a small tote with my propagation containers. Sharp tools and labels fit right beside them. A little prep saves you time when cutting season arrives.
Rooting Medium
- Standard Mix: Virginia Tech recommends 50% peat moss combined with 50% perlite for optimal drainage and moisture retention balance.
- Alternative Mix: Equal parts peat moss, vermiculite, and perlite creates excellent rooting conditions with higher water retention for species that love humidity.
- Research Backed: PMC studies used perlite vermiculite mixture in 2:1 ratio and achieved rooting improvements of 1.88 to 2.29 times above control levels.
- Avoid: Garden soil compacts and harbors pathogens. Never use regular potting mix which retains too much moisture and causes cutting rot.
Rooting Hormones
- Synthetic Options: IBA, NAA, and IAA are common active ingredients. Research shows optimal concentrations of IAA at 100 milligrams per liter and NAA at 300 milligrams per liter.
- Natural Alternatives: Willow water, aloe vera gel, and honey provide mild rooting stimulation. One study achieved 100% rooting in pomegranate using organic alternatives.
- Application Method: Dip cutting base in powder or gel, tap off excess, and insert into rooting medium right away. Liquid formulations allow precise concentration control.
- When Necessary: Easy rooters like pothos rarely need hormone. Use hormone for woody plants and tough species, or to accelerate rooting time by 25% to 47%.
Containers and Covers
- Container Options: Cell trays, small pots, or recycled containers with drainage holes all work well. Clear containers allow root monitoring without disturbing cuttings.
- Humidity Covers: Plastic bags, inverted bottles, propagation domes, or clear storage bins maintain the high humidity cuttings need before roots develop.
- Size Matters: Use containers 2 to 4 inches deep for most cuttings. Deeper containers waste medium and complicate moisture management.
- DIY Options: Repurpose clear plastic food containers with holes punched in lids for ventilation. They cost nothing and perform as well as commercial propagators.
Cutting Tools and Sanitation
- Essential Tools: Sharp bypass pruners, a clean razor blade or knife, and rubbing alcohol or bleach solution for sterilization between cuts.
- Sterilization Protocol: NC State Extension recommends 1 part chlorine bleach to 9 parts water for 5 minutes. You can also wipe tools with rubbing alcohol between plants.
- Why It Matters: Clean cuts heal faster and reduce disease transmission. Crushing stems with dull tools damages tissue and invites pathogens into the cutting.
- Maintenance: Sharpen pruners often and replace razor blades when dull. A clean, sharp cut is the single most important factor in cutting survival.
5 Common Myths
You must use expensive commercial rooting hormone for cuttings to root successfully and develop strong root systems.
Many plants root well without any hormone, and natural alternatives like willow water, aloe vera, and honey can stimulate root development effectively.
All plant cuttings should be placed in direct sunlight immediately after planting to encourage faster growth and rooting.
Cuttings need bright indirect light, not direct sun. Direct sunlight causes water stress and leaf burn before roots can support the plant.
Propagation from seeds always produces plants identical to the parent plant with the same characteristics and traits.
Seeds produce genetic variation through sexual reproduction. Only vegetative methods like cuttings and division create true clones of the parent plant.
Division kills or seriously damages the parent plant, so you should only divide plants when absolutely necessary for space.
Division actually benefits most perennials by increasing vigor, improving flowering, and controlling spread. Many plants need division every 3 to 5 years.
Grafting is an advanced technique only professional horticulturists can perform successfully in commercial nursery settings.
Home gardeners can learn basic grafting techniques like cleft grafting and T-budding with practice. Success rates improve significantly with proper timing and tool sterilization.
Conclusion
You just learned 7 plant propagation techniques. Each one gives you a new way to fill your garden without spending money. Seed propagation works great for annuals and vegetables. Stem cuttings multiply your shrubs and houseplants fast. Leaf cuttings, layering, division, grafting, and budding round out your toolkit for almost any plant you want.
These propagation methods save you hundreds of dollars every year. You preserve rare varieties that nurseries no longer stock. You also control the quality of every plant from start to finish. Freedom from stores comes when you master garden propagation. I have not bought a hosta or daylily in 10 years thanks to simple division.
Start with propagation for beginners, then work your way up to advanced methods like grafting. Stem cuttings and division offer the fastest wins with the least risk of failure. Both methods teach you the basics before you tackle tougher plants. Once you learn how to propagate plants, you start seeing every garden as a source of free new growth. My first batch of rooted cuttings hooked me for life and started a habit I cannot shake.
Mastering these skills transforms you from a plant buyer into a true plant maker. Your garden becomes a system that sustains itself and grows richer each year without extra trips to the nursery. The techniques you learned today will serve you for the rest of your gardening life. Pick one method from this guide and give it a try this weekend.
External Sources
Frequently Asked Questions
What is the difference between sexual and asexual propagation?
Sexual propagation uses seeds with genetic variation, while asexual propagation creates identical clones through cuttings, division, or layering.
Is water or soil better for propagating cuttings?
Both methods work, but they suit different situations:
- Water propagation lets you monitor root growth visually
- Soil propagation produces stronger root systems
- Some plants root better in one medium than the other
When is the best time to propagate plants?
Timing varies by method and plant type:
- Softwood cuttings: late spring to early summer
- Hardwood cuttings: late fall to winter
- Division: early fall or early spring
What makes stem cuttings the easiest propagation method?
Stem cuttings require minimal equipment, root quickly, and work for hundreds of plant species.
How do I create a DIY propagation setup at home?
A basic setup includes containers, rooting medium, humidity cover, and indirect light source.
Why do some cuttings fail to root?
Common failure reasons include:
- Incorrect moisture levels
- Wrong temperature
- Poor cutting selection
- Disease or contamination
Can all plants be propagated from cuttings?
Most plants can be propagated from cuttings, but some species root better using layering, division, or grafting methods.
What soil mix works best for cuttings?
A 50 percent peat moss and 50 percent perlite mix provides ideal drainage and moisture retention for rooting cuttings.
How long does propagation typically take?
Propagation timing varies widely:
- Quick-germinating seeds: 5 to 7 days
- Most cuttings: 2 to 6 weeks
- Hardwood cuttings: 6 to 24 months
What indicates successful propagation?
Signs of success include new leaf growth, resistance when gently tugging the cutting, and visible roots through containers.