
Introduction
You find a handful of old seed packets in the back of your drawer. Those seeds might be 2 or 3 years old, and you have no idea if they'll sprout come spring. The good news is that learning the 3 essential rules: how to store seeds can help you keep your collection alive for many seasons to come.
I've saved seeds from my garden for over 10 years now. Seeds are like dormant embryos with their own packed lunch, just waiting for the right moment to wake up and grow. Utah State research shows that the ideal conditions fall between 35-40°F with humidity below 40%. These numbers come from James Harrington's work, which still guides gene banks today.
Proper seed storage became a hot topic after 2020 when more gardeners started saving their own harvests at home. Yet most guides skip over why these rules work in the first place. When you know the science behind seed viability, you can adapt your setup to fit your climate and space. This makes the whole process simple rather than confusing.
This guide walks you through how to store seeds the right way from start to finish. You'll learn the 3 core rules that protect your collection, which containers work best, and how to test older packets. By the end, you'll have the confidence to build a seed library that lasts for years.
3 Essential Seed Storage Rules
The best seed storage conditions follow a simple mantra: cool dry dark. These rules aren't just folk wisdom passed down from old farmers. They come from decades of research by scientists who studied how seeds break down over time. When I first learned these principles, my tomato seeds went from lasting 2 years to over 5 years.
Temperature control matters because cold slows down the aging process inside seeds. Each 10°F drop doubles how long your seeds will last in storage. Humidity control matters just as much for keeping seeds dry. Each 1% drop in seed moisture content doubles that lifespan again. Keep relative humidity below 40% at all times.
The Rule of 100 gives you an easy benchmark. Take the temperature and add it to the humidity percentage. If that number stays below 100, your seeds have a good home. A room at 50°F with 40% humidity equals 90, which works great. A garage at 70°F with 60% humidity equals 130, which will cut your seed life short.
Darkness matters too, though most people forget about it. Light sends signals to seeds that tell them spring has arrived. Even dim light over months can trick seeds into waking up too soon. Store your containers in a dark closet, drawer, or opaque bin to block those signals.
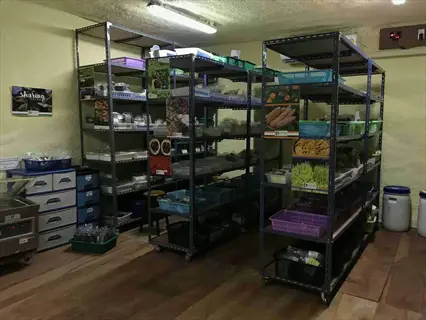
Best Containers for Seed Storage
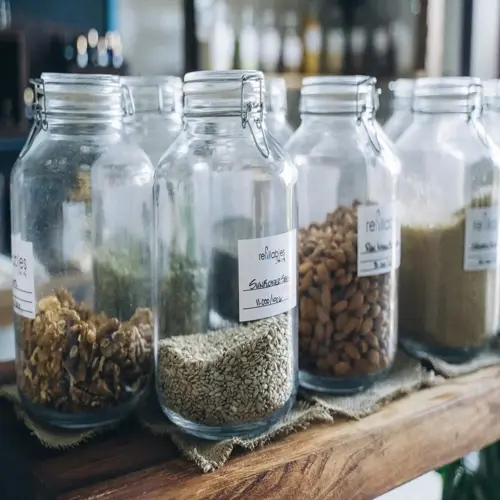
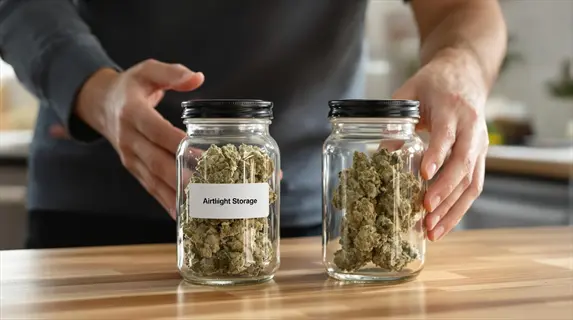
Your choice of seed storage containers can make or break your collection over time. I tested at least a dozen different options in my own seed library. The winner was clear: glass jars for seeds beat plastic every time when you plan to store them for more than a single season. Glass blocks moisture from sneaking in, while plastic lets tiny amounts through over months and years.
Mason jar seed storage has become the gold standard for home gardeners with good reason. These sealed containers create an airtight barrier that keeps humidity stable inside. Add a small packet of silica gel at about one tenth of your seed weight, and you have a setup that rivals what the pros use. USDA gene banks rely on sealed aluminum bags, but glass works just as well for home use.
You can also make ziplock bags seeds work for short term needs when you plan to plant within the same season. They're cheap, easy to label, and stack flat in a drawer or box. Just don't expect them to protect your seeds for more than 1 or 2 years since the plastic will let some moisture through over time.
Glass Mason Jars with Lids
- Moisture Barrier: Glass provides an impermeable barrier against humidity, making it the gold standard for home seed storage with zero moisture transfer over time.
- Visibility: Clear glass allows you to monitor seed condition without opening the container, helping identify any moisture problems or pest issues early.
- Durability: Glass jars last indefinitely with proper care and can be reused season after season without any degradation in protective quality.
- Seal Quality: Metal lids with rubber gaskets create reliable airtight seals when properly closed, preventing humidity fluctuations from affecting stored seeds.
- Cost Effective: Canning jars are widely available at grocery stores and can be repurposed from food packaging, making them an affordable long-term investment.
- Size Options: Available in 4 ounces to 32 ounces (118 ml to 946 ml), allowing you to match container size to your seed collection volume efficiently.
Heat-Sealed Mylar Bags
- Professional Grade: USDA gene banks use similar aluminum foil laminate materials, showing this method meets the highest preservation standards for serious collectors.
- Complete Light Block: Mylar bags eliminate all light exposure without needing an additional opaque container, fulfilling two storage rules simultaneously.
- Compact Storage: Flat bags stack efficiently in drawers or bins, maximizing storage space compared to bulky jars while protecting more seeds.
- Oxygen Barrier: Quality mylar provides excellent oxygen barrier properties that further slow seed deterioration beyond just moisture and light control.
- Sealability: Heat sealing creates permanent closures stronger than zip locks, though bags cannot be resealed after opening without additional equipment.
- Labeling Surface: Smooth exterior surface accepts permanent marker writing clearly, and labels remain legible throughout the storage period without fading.
Vacuum-Sealed Containers
- Maximum Protection: Removing air creates the lowest oxygen environment possible at home, significantly slowing oxidative damage to seed embryos over time.
- Moisture Lock: Vacuum sealing locks in whatever moisture level exists at sealing time, making proper seed drying before packaging absolutely critical.
- Space Efficient: Vacuum bags conform to seed volume, reducing storage footprint compared to rigid containers while maintaining superior protection levels.
- Investment Cost: Vacuum sealing equipment requires initial purchase investment of 50-150 dollars, but provides ongoing savings through extended seed viability.
- Reseal Limitation: Once opened, bags require re-sealing with equipment, making these best for long-term storage rather than frequently accessed seeds.
- Freezer Compatible: Vacuum-sealed bags work excellently for freezer storage, preventing the moisture condensation issues that plague other container types.
Plastic Zipper Storage Bags
- Accessibility: Zipper bags are the most widely available container option, found at every grocery store and requiring zero specialized equipment to use.
- Short-Term Suitable: For seeds used within one growing season, plastic bags provide adequate protection when combined with desiccant packets inside.
- Moisture Permeability: Unlike glass, plastic allows slow moisture transfer through the material over months, making them unsuitable for multi-year storage.
- Organization Friendly: Flat bags store easily in filing systems, photo boxes, or binders, making them popular for seed catalog organization methods.
- Budget Option: Costing pennies per bag, zipper bags represent the most economical entry point for gardeners just beginning to organize seed collections.
- Doubling Strategy: Using two bags (double-bagging) with seeds in the inner bag and desiccant in the outer improves moisture protection noticeably.
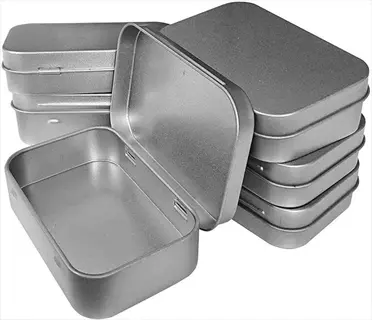
Metal Tins with Tight Lids
- Light Blocking: Opaque metal completely blocks light exposure, eliminating the need for additional dark storage locations or wrapping.
- Durable Construction: Metal tins resist crushing and punctures better than bags or plastic, protecting seeds during storage and transport.
- Moisture Resistance: Quality tins with fitted lids provide good humidity protection, though seals vary in quality between manufacturers significantly.
- Temperature Stable: Metal conducts temperature evenly, helping maintain consistent conditions when placed in refrigerators or cool storage areas.
- Decorative Options: Available in various sizes and designs, metal tins can make seed storage visually appealing while remaining functional.
- Reusability: Sturdy metal containers last for decades of use, making them environmentally friendly and cost effective over extended time periods.
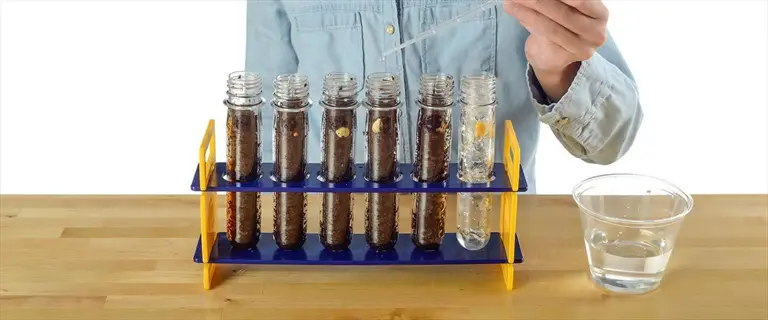
Glass Test Tubes with Corks
- Small Batch Perfect: Test tubes are ideal for storing small quantities of rare or valuable seeds where full jars would be excessive.
- Visual Appeal: Laboratory-style storage creates an attractive display and makes seed collections feel organized and professionally maintained.
- Individual Variety Separation: Each tube holds one seed variety, preventing mixing and making it easy to access specific seeds without disturbing others.
- Cork Seal Quality: Natural cork provides adequate short-term sealing but may dry out over years, consider rubber stoppers for long-term storage.
- Fragile Nature: Glass tubes break more easily than jars, requiring careful handling and storage in protective racks or padded containers.
- Space Efficiency: Tubes stored in racks maximize vertical space and keep collections organized by type, season, or planting date preferences.
No matter which airtight containers seeds you pick, add desiccant packets to absorb moisture trapped inside. Silica gel is safe and cheap. Replace them once a year or when the color indicator shows they've hit their limit.
Seed Viability by Type
How long do seeds last? The answer depends on what type of vegetable seed you're storing. Some seeds fade fast while others stay strong for years. This seed viability chart below groups vegetables by seed longevity so you can plan which packets to use first and which can wait.
I learned the hard way that onion seeds have a short seed shelf life. I planted 2 year old onion seeds one spring and got almost nothing. Meanwhile, my 5 year old lettuce seeds sprouted just fine. The difference comes down to seed coat thickness and oil content. Thin coated seeds with high oil dry out and break down faster than seeds with tough outer shells.
Your vegetable seed storage strategy should match how long each type can last. Plant your onions, corn, and parsnips within the first year or two. Save your brassicas and lettuce for later since they'll stay strong for 5 years or more with proper care. Don't toss seeds just because they've passed the printed seed expiration date. Test them first, since many remain viable far longer than the packet suggests.
How to Test Seed Germination
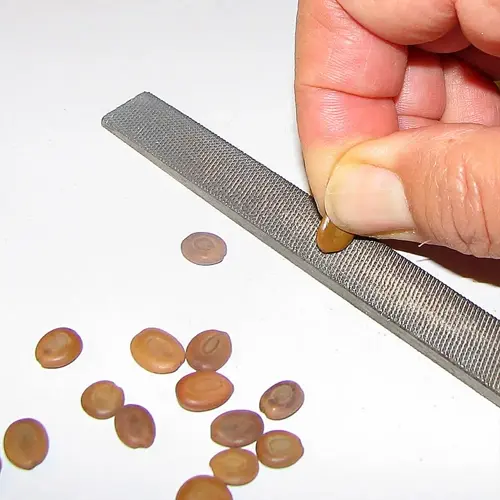
A germination test tells you if your stored seeds can still grow before you waste garden space on duds. The paper towel germination test takes about 10 minutes to set up. This seed sprouting test gives clear answers within 1 to 2 weeks. In my experience, I test any packet older than 2 years before planting season starts.
You can check if seeds are good using just paper towels, a plastic bag, and 20 to 50 seeds from your stash. More seeds give you a more accurate germination rate, but 20 is enough for a quick check. Iowa State recommends testing 50 to 100 seeds when you need precise numbers for large plantings.
Gather Testing Materials
- Paper Towels: Use plain white paper towels without printed patterns or heavy embossing, as dyes and textures can affect seed germination results.
- Plastic Bag: A standard sandwich-sized zipper bag creates the humid environment seeds need while allowing you to monitor progress daily.
- Seeds to Test: Count out at least 20 seeds from your stored collection, with 50-100 seeds providing more statistically reliable germination percentages.
- Permanent Marker: Label each bag with the seed variety and test start date to track multiple varieties simultaneously without confusion.
Prepare the Test Environment
- Moisten Paper Towel: Dampen the paper towel until wet but not dripping, wringing out excess water to prevent seeds from drowning or rotting.
- Fold and Place Seeds: Fold the towel in half, place seeds in a single layer with spacing between them, then fold the towel over the seeds.
- Seal in Bag: Place the folded towel in the plastic bag, leaving the bag slightly open for air exchange while retaining humidity.
- Choose Location: Place the bag in a warm location around 70-75 degrees Fahrenheit (21-24 degrees Celsius) away from direct sunlight.
Monitor and Record Results
- Check Daily: Open the bag daily to check for germination and add water if the towel begins drying out, maintaining consistent moisture.
- Count Sprouted Seeds: A seed is germinated when you see a root or shoot emerging through the seed coat, regardless of how small.
- Wait Full Period: Different seeds germinate at different speeds, so wait 7-14 days before calculating final percentages for accuracy.
- Calculate Percentage: Divide germinated seeds by total seeds tested and multiply by 100 to get your germination rate percentage.
Interpret Results and Plan
- 90-100% Rate: Excellent viability means you can plant at normal spacing and expect reliable germination in your garden beds.
- 70-89% Rate: Good viability but consider planting 25-50% more seeds than usual to compensate for reduced germination.
- 50-69% Rate: Marginal viability requiring double or triple seeding rates, or use for microgreens where dense planting is acceptable.
- Below 50% Rate: Poor viability suggesting these seeds should be composted rather than risk wasting valuable garden space on failed germination.
Run your germination test at least 4 to 6 weeks before planting season so you have time to order fresh seeds if needed. Test seed viability on a sample from each packet rather than guessing. This small step saves you from gaps in your garden rows when spring arrives.
Common Seed Storage Mistakes
Even good gardeners make seed storage mistakes that ruin their collections. When you have seeds not germinating after a year or two, the cause is almost always poor conditions. I've made most of these errors myself while learning why seeds fail to sprout.
The most common seed storage problems come from moisture and heat. Utah State warns against any location above 70°F or 60% humidity since those conditions speed up seed death. Seed mold shows up when moisture gets trapped inside containers. Condensation on seeds from temperature swings can trigger rot before you even notice a problem.
Storing Seeds Without Drying First
- The Problem: Seeds harvested from garden produce or purchased from bulk bins often contain internal moisture that enables fungal growth and cellular deterioration during storage.
- Why It Matters: Even seeds that appear dry may contain 10-15% moisture content, while optimal storage requires 4-8% moisture according to FAO standards.
- The Fix: Spread seeds in single layers on screens or paper for 1-2 weeks in a dry location, or use silica gel packets for 2 weeks before sealing containers.
Using the Freezer Without Preparation
- The Problem: Placing inadequately dried seeds directly in the freezer causes ice crystal formation within seed cells, rupturing membranes and destroying embryos permanently.
- Why It Matters: USDA protocols specify moisture content adjustment at 5 degrees Celsius and 25% humidity for 3-4 weeks before any freezer storage.
- The Fix: Ensure seeds are thoroughly dried to below 8% moisture and sealed in airtight containers before freezing, preventing all condensation issues.
Storing Near Heat Sources
- The Problem: Kitchen cabinets above stoves, shelves near heating vents, and sunny windowsills expose seeds to temperature fluctuations that accelerate deterioration.
- Why It Matters: According to PMC research, each 9 degrees Fahrenheit (5 degrees Celsius) increase in temperature halves the expected seed storage lifespan.
- The Fix: Choose consistently cool locations like basements, root cellars, or refrigerators where temperatures remain stable between 35-50 degrees Fahrenheit (2-10 degrees Celsius).
Ignoring Humidity Fluctuations
- The Problem: Non-airtight containers allow seeds to absorb moisture during humid seasons and dry excessively during winter heating, causing repeated stress.
- Why It Matters: South Dakota State Extension identifies humidity reduction as the single most important factor in extending seed storage life successfully.
- The Fix: Always use airtight containers with desiccant packets, and consider a small hygrometer in your storage area to monitor conditions regularly.
Leaving Seeds in Original Packets
- The Problem: Commercial seed packets are designed for retail display, not long-term storage, offering minimal moisture or pest protection over multiple seasons.
- Why It Matters: Paper packets readily absorb environmental humidity, passing moisture to seeds inside and significantly reducing their viable storage period.
- The Fix: Transfer seeds to glass jars or quality zipper bags with desiccants, keeping original packets inside for variety information and planting instructions.
Neglecting Pest Prevention
- The Problem: Grain moths, weevils, and mice can devastate seed collections, with insects potentially arriving dormant within seeds themselves at harvest time.
- Why It Matters: Competitor #4 High Mowing emphasizes pest management because a single infestation can destroy years of carefully collected and stored seeds.
- The Fix: Inspect seeds before storage, freeze suspicious batches at 0 degrees Fahrenheit (-18 degrees Celsius) for 48 hours, and use sealed containers in pest-proof locations.
Catching these mistakes early can save your seed collection. Check on your seeds every few months and look for signs of moisture, mold, or pest damage. A quick inspection twice a year keeps small problems from becoming total losses in your seed library.
5 Common Myths
Seeds last forever if you keep them in the freezer, so there is no need to test germination before planting them in your garden.
While freezer storage extends seed life significantly, all seeds gradually lose viability over time due to cellular damage, and germination testing remains essential after extended storage periods.
Any container works fine for seed storage as long as you keep the seeds in a cool location away from direct sunlight.
Container choice significantly impacts seed longevity because moisture-permeable materials allow humidity to damage seeds even in cool conditions, making airtight containers essential for proper preservation.
Fresh seeds from this year will always germinate better than properly stored seeds from previous seasons in your collection.
Properly stored seeds can maintain excellent germination rates for years, sometimes outperforming fresh seeds that were harvested under poor conditions or handled improperly before purchase.
The refrigerator is too cold for seed storage and will damage the embryos inside each seed through ice crystal formation.
Standard refrigerator temperatures of 35-40 degrees Fahrenheit (2-4 degrees Celsius) are ideal for most orthodox seeds, as freezing damage only occurs when seeds have excessive moisture content above 14%.
Silica gel packets are dangerous chemicals that will contaminate seeds and make them unsafe to plant in edible gardens.
Silica gel is a non-toxic, inert substance approved for food-grade use that safely absorbs moisture without releasing any chemicals, making it perfect for protecting seeds destined for food gardens.
Conclusion
Proper seed storage comes down to three simple words: cool, dry, dark. Keep your seeds in a spot below 40°F when possible. Always aim for below 40% humidity too. Use the Rule of 100 to check your setup by adding temperature to humidity. That number should stay under 100 for the best seed preservation results.
These seed saving tips work because they slow down the natural aging process inside each seed. When you store seeds properly, you give them the best chance to stay viable for years. In my own garden, I've grown tomatoes from 6 year old seeds using these methods. Each 1% drop in moisture doubles how long your seeds will last in storage.
Good seed collection organization also helps you track what you have and when to use it. Label every container with the seed type and storage date. Use short lived seeds like onions first and save your brassicas for later seasons. Test older packets before planting so you have time to order fresh ones if needed.
Setting up your seed storage system takes just an afternoon of work. Once you have your jars, desiccants, and a cool dark spot ready, the rest is easy. Your seeds will reward you with years of reliable germination and a garden full of plants you grew from your own collection.
External Sources
Frequently Asked Questions
Can seeds be safely stored in refrigerators?
Yes, refrigerators provide ideal temperatures of 35-40 degrees Fahrenheit (2-4 degrees Celsius) for most orthodox seeds when properly dried and sealed in airtight containers.
Are airtight containers necessary for seed storage?
Airtight containers are highly recommended because they prevent moisture absorption, which is the primary cause of seed deterioration during storage.
How long do seeds remain viable in mason jars?
Seeds in properly sealed mason jars with desiccants can remain viable for 3-10 years depending on the seed type and storage conditions.
Can Ziploc bags protect seeds during storage?
Ziploc bags provide adequate short-term protection but are not as effective as glass containers because plastic allows some moisture transfer over time.
What temperature permanently destroys seed viability?
Temperatures above 104 degrees Fahrenheit (40 degrees Celsius) begin damaging seeds, with prolonged exposure above 120 degrees Fahrenheit (49 degrees Celsius) causing permanent viability loss.
Does refrigeration improve germination rates?
Refrigeration preserves existing germination potential but does not improve it, and some seeds actually require cold stratification to break dormancy.
How to identify spoiled seeds before planting?
Spoiled seeds often appear discolored, shriveled, or moldy, and a float test plus germination test can confirm viability before committing to planting.
Why is seed drying essential before storage?
Drying removes internal moisture that would otherwise enable fungal growth and accelerate biochemical deterioration during storage.
Are there legal restrictions on saving seeds?
Most heirloom and open-pollinated seeds can be legally saved, but patented varieties and some commercially produced seeds have legal restrictions on saving and replanting.
What containers maximize seed longevity?
Glass jars with rubber seals, heat-sealed aluminum foil packets, and vacuum-sealed containers provide the best moisture barriers for maximum seed longevity.